• Welcome to Jetboaters.net!

    We are delighted you have found your way to the best Jet Boaters Forum on the internet! Please consider Signing Up so that you can enjoy all the features and offers on the forum. We have members with boats from all the major manufacturers including Yamaha, Seadoo, Scarab and Chaparral. We don't email you SPAM, and the site is totally non-commercial. So what's to lose? IT IS FREE!

    Membership allows you to ask questions (no matter how mundane), meet up with other jet boaters, see full images (not just thumbnails), browse the member map and qualifies you for members only discounts offered by vendors who run specials for our members only! (It also gets rid of this banner!)

    free hit counter

Looking for real-world feedback on replacing factory speaker wiring (255XD)

Maloney255XD

Member
Messages
10
Reaction score
3
Points
22
Boat Make
Yamaha
Year
2024
Boat Model
255XD
Boat Length
25
Hi,

I’m new to the forum, so please let me know if this isn’t the right place for this question.

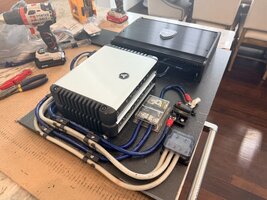
I’m in the middle of upgrading the audio system on my 2024 Yamaha 255XD and am debating whether it’s worth replacing the factory cabin speaker wiring. My original plan was to use the JetBoat Solutions harness to integrate new amplifiers (Wet Sounds SDX2 for the tower and SDX6 for the cabin). Once I got into the project, I realized the factory speaker wire is 16 AWG. That discovery has me questioning whether I should upgrade to 12 AWG to better support the current amplifiers and provide some headroom for future speaker upgrades.

At the same time, I’m considering pulling 18 AWG RGB wiring alongside the speaker wire while everything is accessible. Since this is a DIY install, part of my hesitation is whether pulling heavier-gauge wire—along with RGB—will turn into a major headache once I get deeper into the hull and into tighter routing areas.

What I’m specifically looking for is real-world experience, not just spec sheets:

  • Did you notice any measurable or audible improvement after replacing factory speaker wire?
  • Was the effort worth it once you factor in labor and routing through the hull?
  • Any downsides to running heavier-gauge wire (stiffness, termination issues, fitment, etc.)?
  • If you’ve done both tower and cabin rewires, did you treat them differently?
  • If you chose not to replace the factory wiring, do you regret it—or was it the right call?
This isn’t a “chasing SPL at all costs” build, but I do want clean output at higher volume and long-term reliability in a marine environment. I’m trying to decide whether this is a smart upgrade or unnecessary work.

I appreciate any firsthand insight, lessons learned, or “wish I had done this differently” feedback.

Thanks in advance.

-Mike
 
Also about to take this on. Following for sure
 
If you’re doing the rgb runs either way id go ahead and run heavier gauge speaker wire at same time. If not id just add separate runs to your mid cabin as the bow and mid cabin are ran in series from factory so adding those runs are the minimum you will want to do to have all speakers on their own channels. That’s the only runs i made and im quite happy with the results.

On a side note, at first i retained connext functionality by using adapter harnesses but was unhappy with the results as compared to the setup in my former boat. With a bit of reluctancy i ended up ditching connext functionality and installed a fusion hideaway head unit. The result was astounding enough that id recommend anyone who is looking to seriously upgrade their system to be willing to do this, if not your going to short charge the end product. I have all wetsounds and jl audio equipment.

Sub: jl 13w7 w/ jl 1200/1 hd
Cabin: factory except mid cabin sized up to 8’s all powered by ws sdx6
Tower: ws rev10’s w/ bridged jl 600/4 hd
 
I did this on my old 2017 242 - not sure if the difficulty in running wire has gotten more difficult since, but it was a trivial task on my boat - just fished from the helm all the way around the boat to the stern on each side, then started pulling new wires as the fish tape went passed each speaker hole. Maybe 1.5-2 hours and I had new wire at each location back to the helm. Hooked all that up to the new amps and done. If you're spending big money on amps and speakers, might as well optimize everything - makes it really easy to go back to stock if you want, too.
 
If you’re doing the rgb runs either way id go ahead and run heavier gauge speaker wire at same time. If not id just add separate runs to your mid cabin as the bow and mid cabin are ran in series from factory so adding those runs are the minimum you will want to do to have all speakers on their own channels. That’s the only runs i made and im quite happy with the results.

On a side note, at first i retained connext functionality by using adapter harnesses but was unhappy with the results as compared to the setup in my former boat. With a bit of reluctancy i ended up ditching connext functionality and installed a fusion hideaway head unit. The result was astounding enough that id recommend anyone who is looking to seriously upgrade their system to be willing to do this, if not your going to short charge the end product. I have all wetsounds and jl audio equipment.

Sub: jl 13w7 w/ jl 1200/1 hd
Cabin: factory except mid cabin sized up to 8’s all powered by ws sdx6
Tower: ws rev10’s w/ bridged jl 600/4 hd
@Jjason
Appreciate the detailed response — that’s exactly the kind of real-world feedback I was looking for.

My build direction / wiring approach:
  • Retaining Connext for now but using JetBoatSolutions amp replacement harnesses (RCAs + remote) to break out of factory wiring
  • Added a Wet Sounds WS-420BT for proper zone control and tuning
  • Cabin: (7) OEM Wet Sounds REVO 6 XS powered by a 6-channel SDX6
    • Keeping the existing 16-ga cabin wiring for now
    • If/when RGB is run to all cabin speakers, I’ll upgrade those runs to 12-ga at the same time
  • Tower: (4) Wet Sounds REV 10s powered by SDX2
    • Running 12-ga speaker wire and 18-ga RGB
  • Sub: DS18 ZXI-112LD-RG powered by Alpine MRX-M240
  • Electrical: dual-battery setup with a dedicated lithium house battery, MRBF protection, and reserved circuits for future expansion

I went back and forth on running 12-ga to the cabin, but ultimately landed where you did — fixing the factory wiring layout and managing the amp correctly is where the real gains are.

If you don’t mind me asking — any install tips you picked up along the way?
  • Any panels, trim pieces, or access points worth removing to make routing easier?
  • Anything you wish you had pulled early instead of fighting around it?
  • Any clips or parts that are easy to break and should be handled carefully?
Your insight is much appreciated — thank you.
 
I did this on my old 2017 242 - not sure if the difficulty in running wire has gotten more difficult since, but it was a trivial task on my boat - just fished from the helm all the way around the boat to the stern on each side, then started pulling new wires as the fish tape went passed each speaker hole. Maybe 1.5-2 hours and I had new wire at each location back to the helm. Hooked all that up to the new amps and done. If you're spending big money on amps and speakers, might as well optimize everything - makes it really easy to go back to stock if you want, too.
@Bluewater272
Thank you for the response — that’s really helpful.

If it ends up being a 1–2 hour job, I’m definitely going to do it. When I was initially looking into it, the routing looked a bit more challenging than expected, mainly around the helm area and the starboard side.

My first thought was pulling additional panels to make access easier, but after going through the service manual it seems like there isn’t a clean shortcut there. At this point I’m thinking it’s probably just a matter of sucking it up and crawling into the helm, fishing from the helm back like you described, and pulling wire as I go past each speaker location.

Good to know it was straightforward on your setup — that gives me confidence it’s manageable once you’re actually in there. Appreciate you sharing the timeline and approach.

Thank you,
Mike
 
@Jjason
Appreciate the detailed response — that’s exactly the kind of real-world feedback I was looking for.

My build direction / wiring approach:
  • Retaining Connext for now but using JetBoatSolutions amp replacement harnesses (RCAs + remote) to break out of factory wiring
  • Added a Wet Sounds WS-420BT for proper zone control and tuning
  • Cabin: (7) OEM Wet Sounds REVO 6 XS powered by a 6-channel SDX6
    • Keeping the existing 16-ga cabin wiring for now
    • If/when RGB is run to all cabin speakers, I’ll upgrade those runs to 12-ga at the same time
  • Tower: (4) Wet Sounds REV 10s powered by SDX2
    • Running 12-ga speaker wire and 18-ga RGB
  • Sub: DS18 ZXI-112LD-RG powered by Alpine MRX-M240
  • Electrical: dual-battery setup with a dedicated lithium house battery, MRBF protection, and reserved circuits for future expansion

I went back and forth on running 12-ga to the cabin, but ultimately landed where you did — fixing the factory wiring layout and managing the amp correctly is where the real gains are.

If you don’t mind me asking — any install tips you picked up along the way?
  • Any panels, trim pieces, or access points worth removing to make routing easier?
  • Anything you wish you had pulled early instead of fighting around it?
  • Any clips or parts that are easy to break and should be handled carefully?
Your insight is much appreciated — thank you.
Sounds like a great setup! Curious to see how the ws 420BT works out in making the connex more livable.

Hindsight advice…
Mount amps, distribution blocks, fuses, etc on a panel rather than direct to hull. This allows more flexibility in mounting options and more importantly makes swapping out pieces later much easier. I started with one configuration then switched up not 6 months later. Second time I made a panel from 1/2” starboard that i mounted with nut serts. Way easier getting things mounted up…wish i did it the first time around.

Take out mid cabin speakers and cup holders allong your wiring route to give you access points to feed wire. Cupholder chrome ring spins off counter clockwise to reveal mounting screws. Also, i ran low voltage smurf tubing at the same time to make future runs easy.

While your under the helm, might as well extend the open accessory switch wires to give you easy access at a later date if you need them. You need a single male bullet connector for each of the two switches. The female ends are about 6 inches from the switch panel tied up against wire loom.

Other than that just plan to be itchy as hell for a few days from all the fiberglass.
 

Attachments

  • IMG_7346.jpeg
    IMG_7346.jpeg
    4.6 MB · Views: 16
  • IMG_7349.jpeg
    IMG_7349.jpeg
    3.6 MB · Views: 17
Curious to see how the ws 420BT works out in making the connex more livable
I am curious as well. Looking at the product specs for the 420BT, it looks like it only accepts a single input zone, and then gives you 3 zones out (cabin, tower, and sub). If one uses this, it would seem to me that you are losing the zone control of the Connex/swim platform remote, and just retaining master volume control via the Connex/Remote, with the audio source displayed, and relaying on the 420BT for fine tuning the volume levels with the ability to tune the EQ. Am I overlooking something?

@Jjason - all great tips/call outs on the install.
 
Sounds like a great setup! Curious to see how the ws 420BT works out in making the connex more livable.

Hindsight advice…
Mount amps, distribution blocks, fuses, etc on a panel rather than direct to hull. This allows more flexibility in mounting options and more importantly makes swapping out pieces later much easier. I started with one configuration then switched up not 6 months later. Second time I made a panel from 1/2” starboard that i mounted with nut serts. Way easier getting things mounted up…wish i did it the first time around.

Take out mid cabin speakers and cup holders allong your wiring route to give you access points to feed wire. Cupholder chrome ring spins off counter clockwise to reveal mounting screws. Also, i ran low voltage smurf tubing at the same time to make future runs easy.

While your under the helm, might as well extend the open accessory switch wires to give you easy access at a later date if you need them. You need a single male bullet connector for each of the two switches. The female ends are about 6 inches from the switch panel tied up against wire loom.

Other than that just plan to be itchy as hell for a few days from all the fiberglass.
Thanks for all the great info, really helpful.
I do plan to build a StarBoard amp rack for the amps, distribution blocks, and fusing, so your advice definitely reinforces that direction. The tips on pulling mid-cabin speakers, cup holders, and adding smurf tubing are especially helpful.

Appreciate you taking the time to share. As soon as it gets a little warmer I’m going to start picking at it.

Thank you!
 
You’re not missing anything,
I am curious as well. Looking at the product specs for the 420BT, it looks like it only accepts a single input zone, and then gives you 3 zones out (cabin, tower, and sub). If one uses this, it would seem to me that you are losing the zone control of the Connex/swim platform remote, and just retaining master volume control via the Connex/Remote, with the audio source displayed, and relaying on the 420BT for fine tuning the volume levels with the ability to tune the EQ. Am I overlooking something?

@Jjason - all great tips/call outs on the install.
That’s basically correct. The 420BT takes a single input from Connext, so Connext becomes source selection + master volume, and all zone control (cabin, tower, sub) and EQ move to the 420BT. You do lose Connext’s zone sliders, but in return you get much better control, tuning, and day-to-day usability. For most multi-amp/tower setups, it’s a worthwhile tradeoff.
 
Hmmmm… if the only audio functionality retained using the 420 is volume control, I’d seriously look into the fusion hideaway. Adds a ton of features, a variety of remote sources and full control via app.
 
Hmmmm… if the only audio functionality retained using the 420 is volume control, I’d seriously look into the fusion hideaway. Adds a ton of features, a variety of remote sources and full control via app.
I get where you’re coming from, but just to clarify, the 420BT isn’t only retaining volume control. It becomes the primary zone controller (cabin/tower/sub) and EQ, while Connext is essentially source selection and master volume. The Fusion Hideaway adds features, but it would also mean replacing Connext rather than working with it.
 
I get where you’re coming from, but just to clarify, the 420BT isn’t only retaining volume control. It becomes the primary zone controller (cabin/tower/sub) and EQ, while Connext is essentially source selection and master volume. The Fusion Hideaway adds features, but it would also mean replacing Connext rather than working with it.
I would give it some more thought. Besides it's visually displeasing, the 420BT doesn't really give you much benefit. A 4 band EQ is pretty useless IMO. Money would be better spent on amps with built in DSPs or utilizing a dedicated DSP and you can keep zone control on the connext. You're probably cheaper on a DSP than the 420BT as well. Hertz S8DSP is a good option here.
 
I would give it some more thought. Besides it's visually displeasing, the 420BT doesn't really give you much benefit. A 4 band EQ is pretty useless IMO. Money would be better spent on amps with built in DSPs or utilizing a dedicated DSP and you can keep zone control on the connext. You're probably cheaper on a DSP than the 420BT as well. Hertz S8DSP is a good option here.
I appreciate the feedback, my thinking is the Wetsounds SDX6 and SDX2 already have onboard DSP and I’ll use that for tuning. The 420BT is more about helm-level zone/sub control and the 5V pre-out for a cleaner, stronger signal than Connext. I also got a good deal on it, and I’m not sure how long I’ll keep the boat, so I’m trying to cap things off at a reasonable point. If it doesn’t work out, I’ll look at a Fusion option next.
 
I get where you’re coming from, but just to clarify, the 420BT isn’t only retaining volume control. It becomes the primary zone controller (cabin/tower/sub) and EQ, while Connext is essentially source selection and master volume. The Fusion Hideaway adds features, but it would also mean replacing Connext rather than working with it.
Yeah, I was referring to the connect screen being basically a volume controller at that point. The Hideaway would give you the functionality of the 420 offers while giving you full functional remotes on the transom, on your phone via app, and other remotes they offer. Just seems more flexibility with that if you’re not committed one way or the other yet. Not familiar with what Adrian mentions above, but I’d probably do a bit of research on all three of these options before pulling the trigger if you haven’t already before making a final call.
 
The nrx300 remote also fits just about perfectly where the mobile phone cradle was mounted making for a clean install. Easy to adjust tone, zones, etc. dirty as this is mid install but an idea of what it looks like mounted and view of a few of the screens
 

Attachments

  • IMG_8611.jpeg
    IMG_8611.jpeg
    2.5 MB · Views: 15
  • IMG_8608.jpeg
    IMG_8608.jpeg
    1.7 MB · Views: 14
  • IMG_8607.jpeg
    IMG_8607.jpeg
    1.8 MB · Views: 13
I basically used the same setup for my audio upgrade. I retained the Connext system for playback and master volume control as well as the OEM stern remote. I considered using the 420 EQ but went with a Clarion 755 at about 1/4 of the cost of the 420. It is not marine rated, but I did mount it in a protected location. Like the 420 it only has one input, but I am using the fader for zone control between the tower speakers and boat speakers, and I have a separate bass knob. I will definitely consider the Hertz S8DSP to replace the Clarion in the future.


y7.jpg
 
Back
Top