Cajun Bill
Jet Boat Lover
- Messages
- 28
- Reaction score
- 30
- Points
- 82
- Location
- Morgan City, LA
- Boat Make
- Yamaha
- Year
- 2023
- Boat Model
- FSH Sport
- Boat Length
- 22
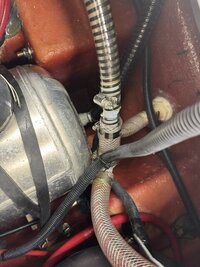
Although the boat comes with a thru hull transducer, it only gives depth and temperature. I wanted a transom mounted transducer, integrated with the Garmin MFD, for clear view, side view and seeing the bottom contour. With twin engines, the preferred location is in the center. But, it's hard to find room on the hull. In viewing the underside of the hull, the length of it looked clean just to the side of the centerline/keel. So, I decided to put it there. Plus, because I may later want to add trim tabs or the Seakeeper ride, it would keep the best areas of real estate free. I bought a short piece of 1/4 marine grade aluminum angle, cut it and drilled it to make a bracket. It's fixed to the boat with 2 bolts going into the ride plate. (If it didn't work out, I don't have any holes in the hull. There's no room for a stick on pad there). I used the template that came with the Garmin GT54UHD-TM transducer to get the mount and the holes in the bracket right. The cable's plug was just a little too big to fit into the drain outlet from the wet storage area. So, I replaced the thru hull drain fitting with a 1" one from West Marine and transitioned the hose back down to 3/4" at a tee above the water line. Here are a few pics. I'm pleased to report that I can run wide open in rough/choppy conditions, have a clear view of the bottom and receive continuous depth readings.