svana
Jetboaters Lieutenant
- Messages
- 441
- Reaction score
- 409
- Points
- 167
- Location
- Riverview, FL
- Boat Make
- Yamaha
- Year
- 2008
- Boat Model
- SX
- Boat Length
- 23
Introduction
While I absolutely love my '08 SX230HO, one of my biggest gripes I had was that the seat height got super annoying because I either stared right at my windshield frame sitting down or it was a literal pain in the butt with the bolster up over time. In addition, the locking mechanism on my old post had worn to where it would no longer positively lock facing forward. I looked up my options for a taller seat post and settled on the below. While not terribly complicated, hopefully the write-up will help others out.
While looking for a replacement I settled on the Springfield Marine 1250150-L1 (this seems to have had multiple names over the years which added to the confusion) because it was a) adjustable and b) taller and c) matched the existing bolt holes (so I thought). I purchased the seat via Amazon after some research and back-and-forth with Springfield to make sure I had the right product. I liked the idea of spending a little extra through Amazon only because the return policy is fairly relaxed. One point of note - make sure you receive the correct product, the first time I ordered it I received the shorter post and only realized by accident. It's also gone up quite a bit in price since I ordered it last June, I purchased it for around $200. At it's current price of $305 I might reconsider.
Tools/Materials Needed
Springfield Marine 1250150-L1
6 - 1.25” long 1/4”-20 pitch stainless steel oval head screws (matches OEM)
Dremel w/ 3/32” sphere engraving tip and metal cutting disc
Drill w/ #3 Phillips Head Bit
1/16” drill bit (capable of drilling through aluminum)
#7 (13/64” diameter) drill bit (capable of drilling through aluminum)
1/4”-20 Threading Tap
Metal Cutting Oil
Acetone
Rags
Anti-Seize
Painters Tape
Sharpie
Portable Vacuum
Existing Post Removal
Remove the seat from the post. This should be pretty straightforward, just loosen any corresponding knobs and levers under the seat.
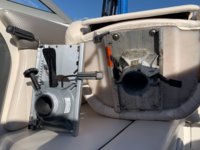
New Seat Base Vs Old Seat Base
Begin to GENTLY loosen the 6 screws holding the seat post to the deck. I would recommend a true drill here and not an impact driver, but use what you have on hand. If you can douse with Kroil or some other type of penetrating oil beforehand, it will help some. I snapped 3 of the 6 screws. Originally when I was thinking I could reuse the existing bolt holes I was concerned, only to find the OEM bolt pattern is slightly larger. If you snap them, no big deal - they won’t interfere with the new base as long as they snap flush (or close) to the deck. If they don’t, use the dremel with the metal cutting disc to cut off the bolt as low as possible (be careful not to slip and nick the deck gel coat). Under the old post should be pretty filthy, clean up with acetone and rags (the new post is slightly smaller, if you don’t clean up now you’ll have a dirt ring round the base that will be more difficult to clean later as seen below).
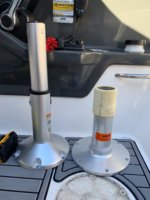
Old Post (Right) Vs New Post (Left)
Installation
The new seat post locks in the forward position in an orientation that is exactly 30* off of the OEM bolt holes. This means 2 of the bolts will be facing directly forward and backwards at the 12 and 6 position if you consider the face of the clock oriented towards the bow. The OEM bolt holes are at 1, 3, 5, 7, 9, and 11 positions on the clock, the new bolt holes are 12, 2, 4, 6, 8, and 10. Tape the GENERAL area of where the new bolt holes will be. Place the new post in it’s location and align properly. I used my seadek and bump pattern (for lack of a better term) to make sure the new post was completely straight and concentric with the seadek. Mark the bolt holes with the Sharpie.
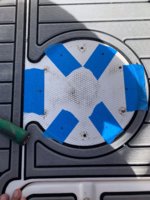
New Bolt Holes Taped and Marked
Remove the seat post and inspect the marks to make sure they’re exactly where they need to be. Once confirmed, use the Dremel with the spherical engraving tip to create a pilot point for your drill bit. This is done because the texture of the deck makes it super difficult to drill your pilot hole without it walking off of the edge of the bumps.
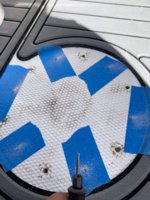
Dremel Bit and Pilot Points
Drill your pilot holes on the 6 points with you 1/16” bit. Begin by going in reverse until you pass the gel coat in order to prevent it from cracking (I drive it all the way through the fiberglass in reverse just to be safe, but not necessary). Be sure to drill completely plumb so your screws won’t go in at an angle. The way your pilot hole goes, the way your final hole will go. Be sure you drill all the way through the fiberglass and aluminum plate, about 1.5” deep. Once your pilot holes are done, drill your final hole with the 13/64” bit in the same fashion (reverse through the gel coat, forward the rest of the way). If you’re skeptical about the structure of drilling new holes, you can see the AL shavings below that I drilled into. Be sure to vacuum and clean up after every step, AL shavings will cut your foot up (or worse - your seadek lol) with no issue along with scratching your gel coat.
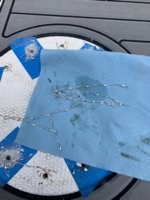
Aluminum Shavings
Once your holes are drilled, take your 1/4”-20 tap and begin to tap your new holes. BE SURE TO USE CUTTING OIL (The reason why is shown in the bloopers below). Thread your die until you meet resistance, then back it out. Clean the die up from AL shavings, fiberglass dust, gunk from your oil, etc. and repeat. Be sure to put on new oil every pass or two. It took me roughly 3-4 passes per hole. Once you tap all the way through, clean your die and make one more pass with it to clean out any remaining debris, repeat until it comes out clean. If not, you may struggle with putting in the new screws.
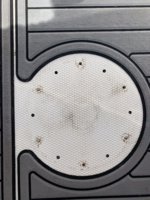
Final Holes After Cleanup
Set your post back down and pray you did it right lol. As long as you follow the old measure twice cut once adage, you should be fine. Take a look, rejoice. ?
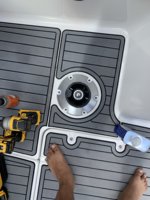
Success!
Coat your new screws with anti-seize and slowly screw down in a lug tightening pattern to make sure all screws are centrally seated. Barely tighten at first, then keep alternating until you’ve tightened them all (I tightened to 3 ugga-duggas on my little dewalt impact, YMMV). I debated between anti-seize and loctite but due to the fact that 3 of my old bolts sheared and I would be creating a condition of dissimilar metals (and salt…) I opted for the former. If they start to come loose in the future (doubtful), I’ll adjust accordingly.
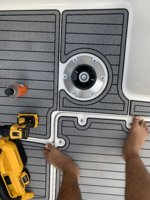
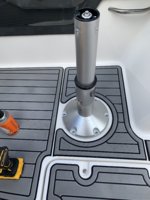
Post Installed Successfully
Swap out the old mounting plate and the new one under the seat (it should just be 4 philips head screws). Mine was a bolt on replacement, there are a myriad of new mounting holes on the new plate.
Pop the seat back on the post and that’s it!
Final Thoughts
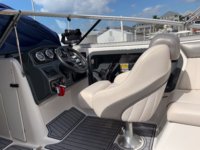
Full disclosure, it’s REALLY tall lol. It’s almost too tall, a bit of trouble to get into if I’m at full extension, but I could also afford to lose a few lbs lol. That being said, it’s super comfortable now when leaning and using the bolster. It feels exactly how I’d want it to. Fully retracted the seat height is also right where I’d want it. Overall, I’d 100% recommend it, it’s a very easy swap, if you have any questions I’ll try to answer as much as I can.

Bloopers:
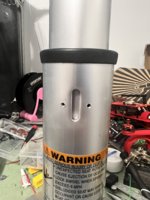
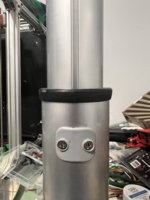
Blooper 1: When I was first undertaking the project, I measured the old bolt pattern before I removed it and (incorrectly) believed that the new post would fit up perfectly. If that was the case however, due to the aforementioned difference in bolt positions, the “forward lock” detent would have put me facing 15* off. In order to fix this, I took off the plastic cover on the front of the post and realized that it was just that plastic plate that acted as the key to hold the locking channel in place. If I removed the cap/key, the post could rotate freely. I therefore notched a new keyhole that would align the new post with the old bolt holes and 3D printed a new cap for it. I was a genius, I thought, until I found out that the bolt holes didn’t align and the whole effort was pointless. Dummy.
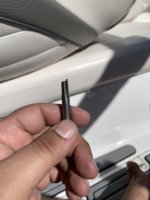
Blooper 2: When I originally started tapping the new holes I was under the belief that since AL was a softer metal I could tap through it without cutting oil. I was wrong… Luckily there was a little nub of the tap still exposed that I was able to unscrew with a set of channel locks.
While I absolutely love my '08 SX230HO, one of my biggest gripes I had was that the seat height got super annoying because I either stared right at my windshield frame sitting down or it was a literal pain in the butt with the bolster up over time. In addition, the locking mechanism on my old post had worn to where it would no longer positively lock facing forward. I looked up my options for a taller seat post and settled on the below. While not terribly complicated, hopefully the write-up will help others out.
While looking for a replacement I settled on the Springfield Marine 1250150-L1 (this seems to have had multiple names over the years which added to the confusion) because it was a) adjustable and b) taller and c) matched the existing bolt holes (so I thought). I purchased the seat via Amazon after some research and back-and-forth with Springfield to make sure I had the right product. I liked the idea of spending a little extra through Amazon only because the return policy is fairly relaxed. One point of note - make sure you receive the correct product, the first time I ordered it I received the shorter post and only realized by accident. It's also gone up quite a bit in price since I ordered it last June, I purchased it for around $200. At it's current price of $305 I might reconsider.
Tools/Materials Needed
Springfield Marine 1250150-L1
6 - 1.25” long 1/4”-20 pitch stainless steel oval head screws (matches OEM)
Dremel w/ 3/32” sphere engraving tip and metal cutting disc
Drill w/ #3 Phillips Head Bit
1/16” drill bit (capable of drilling through aluminum)
#7 (13/64” diameter) drill bit (capable of drilling through aluminum)
1/4”-20 Threading Tap
Metal Cutting Oil
Acetone
Rags
Anti-Seize
Painters Tape
Sharpie
Portable Vacuum
Existing Post Removal
Remove the seat from the post. This should be pretty straightforward, just loosen any corresponding knobs and levers under the seat.

New Seat Base Vs Old Seat Base
Begin to GENTLY loosen the 6 screws holding the seat post to the deck. I would recommend a true drill here and not an impact driver, but use what you have on hand. If you can douse with Kroil or some other type of penetrating oil beforehand, it will help some. I snapped 3 of the 6 screws. Originally when I was thinking I could reuse the existing bolt holes I was concerned, only to find the OEM bolt pattern is slightly larger. If you snap them, no big deal - they won’t interfere with the new base as long as they snap flush (or close) to the deck. If they don’t, use the dremel with the metal cutting disc to cut off the bolt as low as possible (be careful not to slip and nick the deck gel coat). Under the old post should be pretty filthy, clean up with acetone and rags (the new post is slightly smaller, if you don’t clean up now you’ll have a dirt ring round the base that will be more difficult to clean later as seen below).

Old Post (Right) Vs New Post (Left)
Installation
The new seat post locks in the forward position in an orientation that is exactly 30* off of the OEM bolt holes. This means 2 of the bolts will be facing directly forward and backwards at the 12 and 6 position if you consider the face of the clock oriented towards the bow. The OEM bolt holes are at 1, 3, 5, 7, 9, and 11 positions on the clock, the new bolt holes are 12, 2, 4, 6, 8, and 10. Tape the GENERAL area of where the new bolt holes will be. Place the new post in it’s location and align properly. I used my seadek and bump pattern (for lack of a better term) to make sure the new post was completely straight and concentric with the seadek. Mark the bolt holes with the Sharpie.

New Bolt Holes Taped and Marked
Remove the seat post and inspect the marks to make sure they’re exactly where they need to be. Once confirmed, use the Dremel with the spherical engraving tip to create a pilot point for your drill bit. This is done because the texture of the deck makes it super difficult to drill your pilot hole without it walking off of the edge of the bumps.

Dremel Bit and Pilot Points
Drill your pilot holes on the 6 points with you 1/16” bit. Begin by going in reverse until you pass the gel coat in order to prevent it from cracking (I drive it all the way through the fiberglass in reverse just to be safe, but not necessary). Be sure to drill completely plumb so your screws won’t go in at an angle. The way your pilot hole goes, the way your final hole will go. Be sure you drill all the way through the fiberglass and aluminum plate, about 1.5” deep. Once your pilot holes are done, drill your final hole with the 13/64” bit in the same fashion (reverse through the gel coat, forward the rest of the way). If you’re skeptical about the structure of drilling new holes, you can see the AL shavings below that I drilled into. Be sure to vacuum and clean up after every step, AL shavings will cut your foot up (or worse - your seadek lol) with no issue along with scratching your gel coat.

Aluminum Shavings
Once your holes are drilled, take your 1/4”-20 tap and begin to tap your new holes. BE SURE TO USE CUTTING OIL (The reason why is shown in the bloopers below). Thread your die until you meet resistance, then back it out. Clean the die up from AL shavings, fiberglass dust, gunk from your oil, etc. and repeat. Be sure to put on new oil every pass or two. It took me roughly 3-4 passes per hole. Once you tap all the way through, clean your die and make one more pass with it to clean out any remaining debris, repeat until it comes out clean. If not, you may struggle with putting in the new screws.

Final Holes After Cleanup
Set your post back down and pray you did it right lol. As long as you follow the old measure twice cut once adage, you should be fine. Take a look, rejoice. ?

Success!
Coat your new screws with anti-seize and slowly screw down in a lug tightening pattern to make sure all screws are centrally seated. Barely tighten at first, then keep alternating until you’ve tightened them all (I tightened to 3 ugga-duggas on my little dewalt impact, YMMV). I debated between anti-seize and loctite but due to the fact that 3 of my old bolts sheared and I would be creating a condition of dissimilar metals (and salt…) I opted for the former. If they start to come loose in the future (doubtful), I’ll adjust accordingly.


Post Installed Successfully
Swap out the old mounting plate and the new one under the seat (it should just be 4 philips head screws). Mine was a bolt on replacement, there are a myriad of new mounting holes on the new plate.
Pop the seat back on the post and that’s it!
Final Thoughts
Full disclosure, it’s REALLY tall lol. It’s almost too tall, a bit of trouble to get into if I’m at full extension, but I could also afford to lose a few lbs lol. That being said, it’s super comfortable now when leaning and using the bolster. It feels exactly how I’d want it to. Fully retracted the seat height is also right where I’d want it. Overall, I’d 100% recommend it, it’s a very easy swap, if you have any questions I’ll try to answer as much as I can.


Bloopers:
Blooper 1: When I was first undertaking the project, I measured the old bolt pattern before I removed it and (incorrectly) believed that the new post would fit up perfectly. If that was the case however, due to the aforementioned difference in bolt positions, the “forward lock” detent would have put me facing 15* off. In order to fix this, I took off the plastic cover on the front of the post and realized that it was just that plastic plate that acted as the key to hold the locking channel in place. If I removed the cap/key, the post could rotate freely. I therefore notched a new keyhole that would align the new post with the old bolt holes and 3D printed a new cap for it. I was a genius, I thought, until I found out that the bolt holes didn’t align and the whole effort was pointless. Dummy.


Blooper 2: When I originally started tapping the new holes I was under the belief that since AL was a softer metal I could tap through it without cutting oil. I was wrong… Luckily there was a little nub of the tap still exposed that I was able to unscrew with a set of channel locks.

