
biglar155
Jetboaters Admiral
- Messages
- 1,577
- Reaction score
- 2,142
- Points
- 277
- Location
- Fredonia, WI
- Boat Make
- Yamaha
- Year
- 2009
- Boat Model
- SX
- Boat Length
- 23
Bringing this thread over from "the other place." Didn't think it would be so easy, but it's just select, copy, and paste. Pics came right along with no issues (my pictures are hosted on google picasa).
I originally posted this on August 2, 2011.
Alright. I mentioned a few weeks ago in another thread that I was gonna replace my depth finder. Well, it's done and after a test run last Tuesday I can say that it worked flawlessly.
The replacement unit is a $99-ish Garmin Fishfinder 140 that I had originally purchased and installed on the ol' Rinker.
So the whole thing started out on Saturday by loading up all the stuff I figured I'd need in the Suburban and heading to the storage unit (about 6 miles or so up the road).
Naturally I didn't remember everything, but that's to be expected. I got a cold chill though when I realized I had forgotten my most important boat-working tool: The Camera! I actually thought to myself "They're gonna kill me. I promised pics of this install." Luckily, I had my phone with me and while not great by any means, the camera on it did a passable job until I made a trip home for parts - and forgot the dang thing again. Sigh. So there's a mixed bag of pics....
At any rate, step one was to pull up the cleanout tray. Anyone who's done this knows that it isn't "hard" per se, but it IS a pain in the tail. I actually went so far as to pull the muffler so that I'd have more room to work in there. I later realized that I really didn't need to do that because the area I needed to get to was fairly easy to access, but it still gave me room to swing my elbows.
With the clean-out tray up, the first thing to do was remove the factory transducer. I unscrewed it and removed the cable hold down and the little black thingy where the cable passes through the hull.
After cleaning out the silicone both inside and out, I did some test fitting of the new transducer. I was unable to use the original holes for the new transducer, but I WAS able to mount the new transducer "around" the original screws. This meant that I could simply silicone the old screws in for now and worry about filling those holes properly during the off-season.

I had originally considered trying save the factory transducer and cable, but then I though "What for?" So I cut the factory cable and used it as a pull wire.
I put down blue masking tape in the area I'd be drilling the new holes, marked the holes with a pencil, drilled, and removed the tape. The new holes came out MUCH cleaner than the chipped-out mess that Yamaha made when they drilled the holes.
I shoved the new cable up through the hole in the hull, re-installed the cable hold-down and the fitting on the pass through. At that point I broke out the silicone for the original transducer screws, the new transducer screws, the cable hold-down, and the pass-through.
In the off season I'll patch the old holes properly and use 4200 or 5200 on the new holes.
Here's the new Garmin transducer all mounted up:
Here's the silicone job on the inside:

At that point I taped the new transducer wire to the now cut-off transducer wire. Unfortunately I had also forgotten my electrical tape and had to try the blue masking tape. That worked to a point but parted on me when I tried to make the pull through the console. A trip home for real electric tape and a fish-tape solved that problem.
The floor up and the new wire pulled in:

(Hmmm... Why so tiny?)
The PROPER tape:

Fish tape fed up through the console (it took a couple tries):

When I put the floor back in, I made sure to coat the bolts with anti-seize. (It's anti-seize on the floor bolts and lock-tite on the cleat bolts right? RIGHT?!?!?!") )
)

To remove the floor bolts I used a 5/16" piece of keystock chucked into my cordless drill and tried to VERY gentle. I wouldn't recommend this method to others but it was very hot and my patience was getting pretty thin by this point in the project. The right way would be to take that piece of keystock and J.B.-weld it into an appropriately sized 12 point socket. Then use a ratchet to remove and install.
Now, just a reminder - the factory cable for my Fishfinder 140 has a transducer on one end and a big plug on the other end. I "solved" this little problem by cutting it. If you decide to follow in my footsteps, please keep in mind that cables like this carry small signals that are easily disrupted by electrical noise. You have to be VERY careful when you splice one of these back together. I mean, it's possible to get away with putting it back together with wire nuts but don't count on that working every time. I knew that going in and it was a risk I was willing to take.
To be honest, this part of the job is the one that I gave the most forethought.
Here's my cable cut apart. I staggered the cuts so that I didn't have one massive bulky-spot from the connections:

We start by stripping the wires back:
Then slip a piece of shrink tubing over the wire and twist 'em together:

And solder. I like the butane-powered variety:

You DO have be cognizant of where the exhaust port is aiming. When I first started with a butane pen (many years ago) I melted a plastic face-plate):
O.K. - Solder done (note shrink-tube on the red wire):
Slide that shrink tube into place

And hit it with a heat gun. (If ONLY I could remember which box contains the heat gun... )

And no, I didn't have all the correct colors of shrink-tubing in my kit so I had to improvise...
I even used some shrink-tube on the shield wire (the bare one) just to provide more mechanical strength:
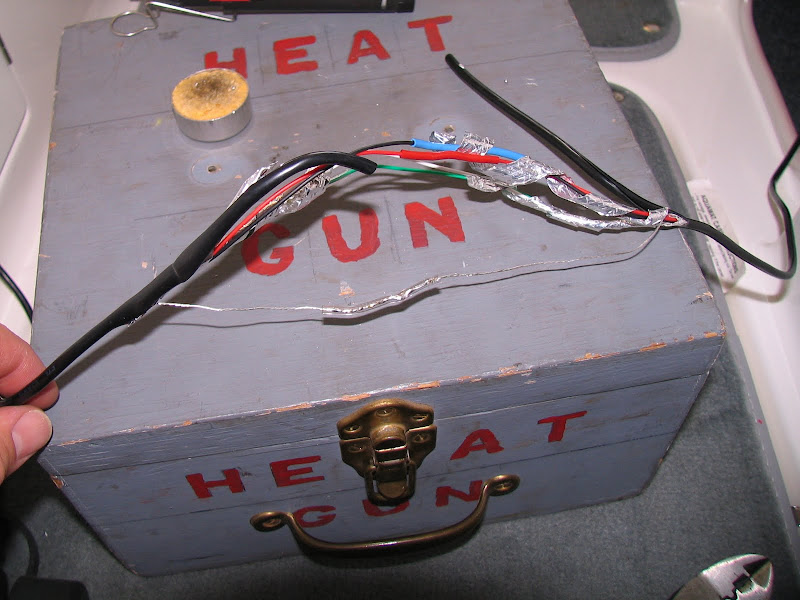
Now, I don't know what I did with the pics of it, but I completed the work by wrapping the shields around the pairs as best I could. I was still left with a gap, so I cut some pieces of aluminum foil, wrapped them around the exposed portion (making sure it came into contact with the rest of the shield) and taped them into place. I then put the twist back into the cable and wrapped the whole thing with electric tape (I didn't have a big enough piece of shrink-tube to fit over that whole mess).
To route the cable to the display, I started by pulling the dash open

I needed a place to route the cable so I cut a notch along the edge of the plate where it doesn't show (sorry forgot a pic after the cut was made):

And for some reason, I seem to have managed to stop taking pictures. Could have been the 100 degree heat and 90+% humidity while working in a storage unit that pretty much amounted to a VC hotbox, but I don't want to sound like a whiner. I'll have to 'splane it as best I can...
To mount my fishfinder to the dash, I cut a "hockey puck" out of 3/4" plywood. This puck is about 1/4" in diameter larger than the diameter of the old hole. (I painted it black to help it blend in even though it isn't visible from the front.)
The mounting base for the fishfinder is also about 1/4" diameter larger than the hole. So all I had to do was drill 3 holes in the wooden puck and hold it behind the hole, put the mounting base over the hole, and run 3 screws in. No glue, no visible holes. It's a "squeeze" fit.
I mounted up the bracket and display and it works great!
Here I am doing 30-something and she's working great:

The fuel gauge is not as hidden as it appears in that picture. It's covered a tiny bit from the normal driving position, but once the needle comes off of the Full mark, it's in plain view.
I prefer the "fishfinder" style depth finder for the simple fact that it's got a graph of the bottom and gives me a better visual indication of the rate of change as well as an idea of what the bottom is made of. (Plus it's kinda cool to see the fish - even though I don't fish... )
This addition also gave me a system voltage meter as well as a water temperature display. I'm very happy with the outcome.
I originally posted this on August 2, 2011.
Alright. I mentioned a few weeks ago in another thread that I was gonna replace my depth finder. Well, it's done and after a test run last Tuesday I can say that it worked flawlessly.
The replacement unit is a $99-ish Garmin Fishfinder 140 that I had originally purchased and installed on the ol' Rinker.
So the whole thing started out on Saturday by loading up all the stuff I figured I'd need in the Suburban and heading to the storage unit (about 6 miles or so up the road).
Naturally I didn't remember everything, but that's to be expected. I got a cold chill though when I realized I had forgotten my most important boat-working tool: The Camera! I actually thought to myself "They're gonna kill me. I promised pics of this install." Luckily, I had my phone with me and while not great by any means, the camera on it did a passable job until I made a trip home for parts - and forgot the dang thing again. Sigh. So there's a mixed bag of pics....
At any rate, step one was to pull up the cleanout tray. Anyone who's done this knows that it isn't "hard" per se, but it IS a pain in the tail. I actually went so far as to pull the muffler so that I'd have more room to work in there. I later realized that I really didn't need to do that because the area I needed to get to was fairly easy to access, but it still gave me room to swing my elbows.
With the clean-out tray up, the first thing to do was remove the factory transducer. I unscrewed it and removed the cable hold down and the little black thingy where the cable passes through the hull.
After cleaning out the silicone both inside and out, I did some test fitting of the new transducer. I was unable to use the original holes for the new transducer, but I WAS able to mount the new transducer "around" the original screws. This meant that I could simply silicone the old screws in for now and worry about filling those holes properly during the off-season.
I had originally considered trying save the factory transducer and cable, but then I though "What for?" So I cut the factory cable and used it as a pull wire.
I put down blue masking tape in the area I'd be drilling the new holes, marked the holes with a pencil, drilled, and removed the tape. The new holes came out MUCH cleaner than the chipped-out mess that Yamaha made when they drilled the holes.
I shoved the new cable up through the hole in the hull, re-installed the cable hold-down and the fitting on the pass through. At that point I broke out the silicone for the original transducer screws, the new transducer screws, the cable hold-down, and the pass-through.
In the off season I'll patch the old holes properly and use 4200 or 5200 on the new holes.
Here's the new Garmin transducer all mounted up:
Here's the silicone job on the inside:
At that point I taped the new transducer wire to the now cut-off transducer wire. Unfortunately I had also forgotten my electrical tape and had to try the blue masking tape. That worked to a point but parted on me when I tried to make the pull through the console. A trip home for real electric tape and a fish-tape solved that problem.
The floor up and the new wire pulled in:
(Hmmm... Why so tiny?)
The PROPER tape:
Fish tape fed up through the console (it took a couple tries):
When I put the floor back in, I made sure to coat the bolts with anti-seize. (It's anti-seize on the floor bolts and lock-tite on the cleat bolts right? RIGHT?!?!?!
)
To remove the floor bolts I used a 5/16" piece of keystock chucked into my cordless drill and tried to VERY gentle. I wouldn't recommend this method to others but it was very hot and my patience was getting pretty thin by this point in the project. The right way would be to take that piece of keystock and J.B.-weld it into an appropriately sized 12 point socket. Then use a ratchet to remove and install.
Now, just a reminder - the factory cable for my Fishfinder 140 has a transducer on one end and a big plug on the other end. I "solved" this little problem by cutting it. If you decide to follow in my footsteps, please keep in mind that cables like this carry small signals that are easily disrupted by electrical noise. You have to be VERY careful when you splice one of these back together. I mean, it's possible to get away with putting it back together with wire nuts but don't count on that working every time. I knew that going in and it was a risk I was willing to take.
To be honest, this part of the job is the one that I gave the most forethought.
Here's my cable cut apart. I staggered the cuts so that I didn't have one massive bulky-spot from the connections:
We start by stripping the wires back:
Then slip a piece of shrink tubing over the wire and twist 'em together:
And solder. I like the butane-powered variety:
You DO have be cognizant of where the exhaust port is aiming. When I first started with a butane pen (many years ago) I melted a plastic face-plate):
O.K. - Solder done (note shrink-tube on the red wire):
Slide that shrink tube into place
And hit it with a heat gun. (If ONLY I could remember which box contains the heat gun...
)
And no, I didn't have all the correct colors of shrink-tubing in my kit so I had to improvise...
I even used some shrink-tube on the shield wire (the bare one) just to provide more mechanical strength:
Now, I don't know what I did with the pics of it, but I completed the work by wrapping the shields around the pairs as best I could. I was still left with a gap, so I cut some pieces of aluminum foil, wrapped them around the exposed portion (making sure it came into contact with the rest of the shield) and taped them into place. I then put the twist back into the cable and wrapped the whole thing with electric tape (I didn't have a big enough piece of shrink-tube to fit over that whole mess).
To route the cable to the display, I started by pulling the dash open
I needed a place to route the cable so I cut a notch along the edge of the plate where it doesn't show (sorry forgot a pic after the cut was made):
And for some reason, I seem to have managed to stop taking pictures. Could have been the 100 degree heat and 90+% humidity while working in a storage unit that pretty much amounted to a VC hotbox, but I don't want to sound like a whiner. I'll have to 'splane it as best I can...
To mount my fishfinder to the dash, I cut a "hockey puck" out of 3/4" plywood. This puck is about 1/4" in diameter larger than the diameter of the old hole. (I painted it black to help it blend in even though it isn't visible from the front.)
The mounting base for the fishfinder is also about 1/4" diameter larger than the hole. So all I had to do was drill 3 holes in the wooden puck and hold it behind the hole, put the mounting base over the hole, and run 3 screws in. No glue, no visible holes. It's a "squeeze" fit.
I mounted up the bracket and display and it works great!
Here I am doing 30-something and she's working great:
The fuel gauge is not as hidden as it appears in that picture. It's covered a tiny bit from the normal driving position, but once the needle comes off of the Full mark, it's in plain view.
I prefer the "fishfinder" style depth finder for the simple fact that it's got a graph of the bottom and gives me a better visual indication of the rate of change as well as an idea of what the bottom is made of. (Plus it's kinda cool to see the fish - even though I don't fish...
)This addition also gave me a system voltage meter as well as a water temperature display. I'm very happy with the outcome.
Last edited:


