CrankyGypsy
Jetboaters Captain
- Messages
- 352
- Reaction score
- 296
- Points
- 202
- Location
- Tampa, FL 33615
- Boat Make
- SeaDoo
- Year
- 2008
- Boat Model
- Challenger
- Boat Length
- 18
(referencing a 2005 AR230HO)
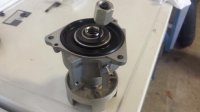
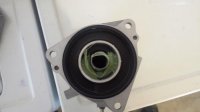
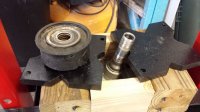
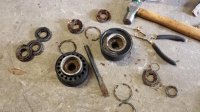
my bearing housings for the coupler shaft were shot - the vulcanized rubber had started to separate from the housing (i separated them completely just for the heck of it). i used a cheapo shop press from Northern Tool that is not perfect (as expected), but it does the job.
DISMANTLE
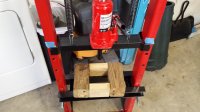
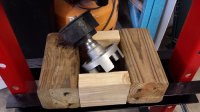
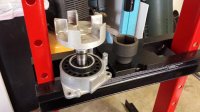
i tried once to remove the coupler from the shaft, but it didn't budge. unsure if it is reverse threaded like the impellers or not, i left it on. so i made a table wide enough for the coupler to fit through and tall enough to press the shaft out:
i found that my 13mm impact socket fits perfectly into the shaft with the internal o-rings removed:

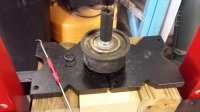
everything lined up and ready to go:
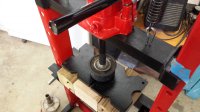
it did not take that much force at all to press it out and the height of the 4x4 with plates was just enough for the shaft to clear the bearing without a reset (total distance pressed was around 0.50"):
REASSEMBLY
the manual is pretty vague on this - there is a page in there that appears to be from an older manual they just cut-and-pasted in. plus, i don't have their fancy stepped (assumed) seal drivers. so i had to experiment and get creative in some instances.
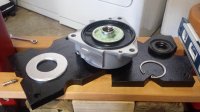
here are the new parts minus the bearing (i did both sides). the seal with a metal ring (referred to here as the metal-ring seal) at the top goes on the aft side (rear) of the housing. the other two are the same and go on either side of the bearing.
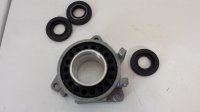
i reused the circlips, so i had to pull the seals. there was a lot of salt water corrosion in there. surprisingly, the bearings in both units seemed to be just fine - they are sealed.
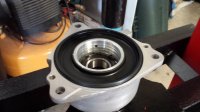
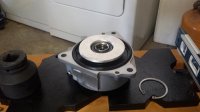
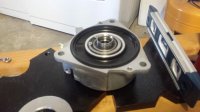
aft-most circlip in place and the unit back on the press. the rubber lip that seals the housing halves together prevents the unit from sitting flush, so i placed a large bearing driver under it at the aluminum lip.
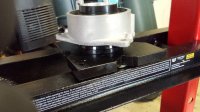
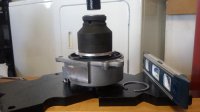
pressing in the bearing (which i had placed in the freezer for a few hours). i was careful not to seat the bearing onto the circlip for fear of pressing it too far in the aluminum housing. once i was close, i pulled it off and carefully snugged it against the circlip with the driver rod and a hammer. then i pressed in the seal. again, once it was close, i made it flush to the circlip with the hammer to avoid squashing it with the press.
the 2005 SX/AR230 manual states the distance between the top of the seal and the aluminum lip is to be 6.8-7.2mm. making it flush to the circlip is a tad beyond this, but i'd rather have it too far (the circlip will keep it level) than it be crooked.
flipped over and ready for the next seal (do not install the metal-ring seal until the shaft is installed).
on the first attempt, i tried to install all three seals, then the shaft, then fill it with grease. this was a failure for two reasons: 1) i later learned the grease doesn't go in there that well; 2) i was unable to get the seal to sit level at the outlined depth with a seal driver - i just wasn't happy with it being slightly off (maybe 0.5mm), so i bought another seal and tried a different route...
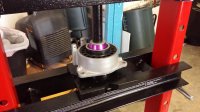
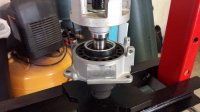
with one seal installed on either side of the bearing, it's time to press in the coupler shaft. here i used a large socket to again keep the unit from resting on the rubber lip. i prepped the coupler shaft by cleaning it with a paper towel and some Barkeepers Friend.
carefully pressing it in little by little, checking the distance of the aft end of the shaft from the aluminum lip of the housing. i measured two ways. by subtracting the thickness of a spare chunk of aluminum (pictured) and by adding the thickness of a chunk placed on the lip (sorry, not pictured). the manual for a 2005 SX/AR230 states the distance is to be 9.5-10.5mm.

ready for the final (metal-ring) seal. set up the plates so only the aluminum lip is making contact and not the flanges that sit a little deeper.
here's where it gets tough - time to get really creative.
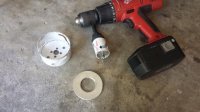
in order to seat the final seal level where it needs to be without warping it because of the raised metal inner section, i used a 1.50" and 3.25" holesaw to make a giant washer out of 3/16" aluminum sheet i had laying around.
with the grease fitting removed, i filled the area above the installed seal with grease (i use Green Grease for just about everything - the trailer, my Rubicon, now the boat). i went crazy with it to make sure it stayed full.
note the circlip: this is a spare i had from my old shop and i will be using it to get the proper distance on the seal...
the homemade washer is ready to press the metal-ring seal and make it level with the aluminum lip.
the seal is flush, but the manual recommends a distance of 1.6-2.0mm lower than the lip. i assume this is only necessary so the entire seal can make contact below the chamfer. this is difficult to accomplish with just the seal driver since there is nothing to flush the backside of the seal against (we are leaving room between the two seals so grease can be added through the fitting, though you'll see below that i'm not convinced how well this actually works). to keep the seal level, but get it just below the chamfer, i used a spare circlip i had laying around that fit perfectly. it measured out to 1.7mm thick all the way around. i placed the clip, stacked on the giant washer and pressed it.
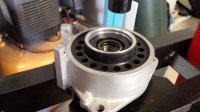
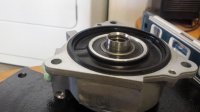
seal is level and where it needs to be. note the excess grease - definitely grease inside there.
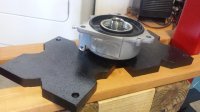
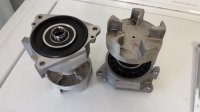
both done.
i also replaced the rivet on the right coupler (i removed it when i tried to separate the coupler from the shaft - turns out it just keeps water from leaking into the engine bay).
my bearing housings for the coupler shaft were shot - the vulcanized rubber had started to separate from the housing (i separated them completely just for the heck of it). i used a cheapo shop press from Northern Tool that is not perfect (as expected), but it does the job.
DISMANTLE
i tried once to remove the coupler from the shaft, but it didn't budge. unsure if it is reverse threaded like the impellers or not, i left it on. so i made a table wide enough for the coupler to fit through and tall enough to press the shaft out:
i found that my 13mm impact socket fits perfectly into the shaft with the internal o-rings removed:
everything lined up and ready to go:
it did not take that much force at all to press it out and the height of the 4x4 with plates was just enough for the shaft to clear the bearing without a reset (total distance pressed was around 0.50"):
REASSEMBLY
the manual is pretty vague on this - there is a page in there that appears to be from an older manual they just cut-and-pasted in. plus, i don't have their fancy stepped (assumed) seal drivers. so i had to experiment and get creative in some instances.
here are the new parts minus the bearing (i did both sides). the seal with a metal ring (referred to here as the metal-ring seal) at the top goes on the aft side (rear) of the housing. the other two are the same and go on either side of the bearing.
i reused the circlips, so i had to pull the seals. there was a lot of salt water corrosion in there. surprisingly, the bearings in both units seemed to be just fine - they are sealed.
aft-most circlip in place and the unit back on the press. the rubber lip that seals the housing halves together prevents the unit from sitting flush, so i placed a large bearing driver under it at the aluminum lip.
pressing in the bearing (which i had placed in the freezer for a few hours). i was careful not to seat the bearing onto the circlip for fear of pressing it too far in the aluminum housing. once i was close, i pulled it off and carefully snugged it against the circlip with the driver rod and a hammer. then i pressed in the seal. again, once it was close, i made it flush to the circlip with the hammer to avoid squashing it with the press.
the 2005 SX/AR230 manual states the distance between the top of the seal and the aluminum lip is to be 6.8-7.2mm. making it flush to the circlip is a tad beyond this, but i'd rather have it too far (the circlip will keep it level) than it be crooked.
flipped over and ready for the next seal (do not install the metal-ring seal until the shaft is installed).
on the first attempt, i tried to install all three seals, then the shaft, then fill it with grease. this was a failure for two reasons: 1) i later learned the grease doesn't go in there that well; 2) i was unable to get the seal to sit level at the outlined depth with a seal driver - i just wasn't happy with it being slightly off (maybe 0.5mm), so i bought another seal and tried a different route...
with one seal installed on either side of the bearing, it's time to press in the coupler shaft. here i used a large socket to again keep the unit from resting on the rubber lip. i prepped the coupler shaft by cleaning it with a paper towel and some Barkeepers Friend.
carefully pressing it in little by little, checking the distance of the aft end of the shaft from the aluminum lip of the housing. i measured two ways. by subtracting the thickness of a spare chunk of aluminum (pictured) and by adding the thickness of a chunk placed on the lip (sorry, not pictured). the manual for a 2005 SX/AR230 states the distance is to be 9.5-10.5mm.
ready for the final (metal-ring) seal. set up the plates so only the aluminum lip is making contact and not the flanges that sit a little deeper.
here's where it gets tough - time to get really creative.
in order to seat the final seal level where it needs to be without warping it because of the raised metal inner section, i used a 1.50" and 3.25" holesaw to make a giant washer out of 3/16" aluminum sheet i had laying around.
with the grease fitting removed, i filled the area above the installed seal with grease (i use Green Grease for just about everything - the trailer, my Rubicon, now the boat). i went crazy with it to make sure it stayed full.
note the circlip: this is a spare i had from my old shop and i will be using it to get the proper distance on the seal...
the homemade washer is ready to press the metal-ring seal and make it level with the aluminum lip.
the seal is flush, but the manual recommends a distance of 1.6-2.0mm lower than the lip. i assume this is only necessary so the entire seal can make contact below the chamfer. this is difficult to accomplish with just the seal driver since there is nothing to flush the backside of the seal against (we are leaving room between the two seals so grease can be added through the fitting, though you'll see below that i'm not convinced how well this actually works). to keep the seal level, but get it just below the chamfer, i used a spare circlip i had laying around that fit perfectly. it measured out to 1.7mm thick all the way around. i placed the clip, stacked on the giant washer and pressed it.
seal is level and where it needs to be. note the excess grease - definitely grease inside there.
both done.
i also replaced the rivet on the right coupler (i removed it when i tried to separate the coupler from the shaft - turns out it just keeps water from leaking into the engine bay).
Last edited: