• Welcome to Jetboaters.net!

    We are delighted you have found your way to the best Jet Boaters Forum on the internet! Please consider Signing Up so that you can enjoy all the features and offers on the forum. We have members with boats from all the major manufacturers including Yamaha, Seadoo, Scarab and Chaparral. We don't email you SPAM, and the site is totally non-commercial. So what's to lose? IT IS FREE!

    Membership allows you to ask questions (no matter how mundane), meet up with other jet boaters, see full images (not just thumbnails), browse the member map and qualifies you for members only discounts offered by vendors who run specials for our members only! (It also gets rid of this banner!)

    free hit counter

Pump intake grates- thinking of trying something taboo

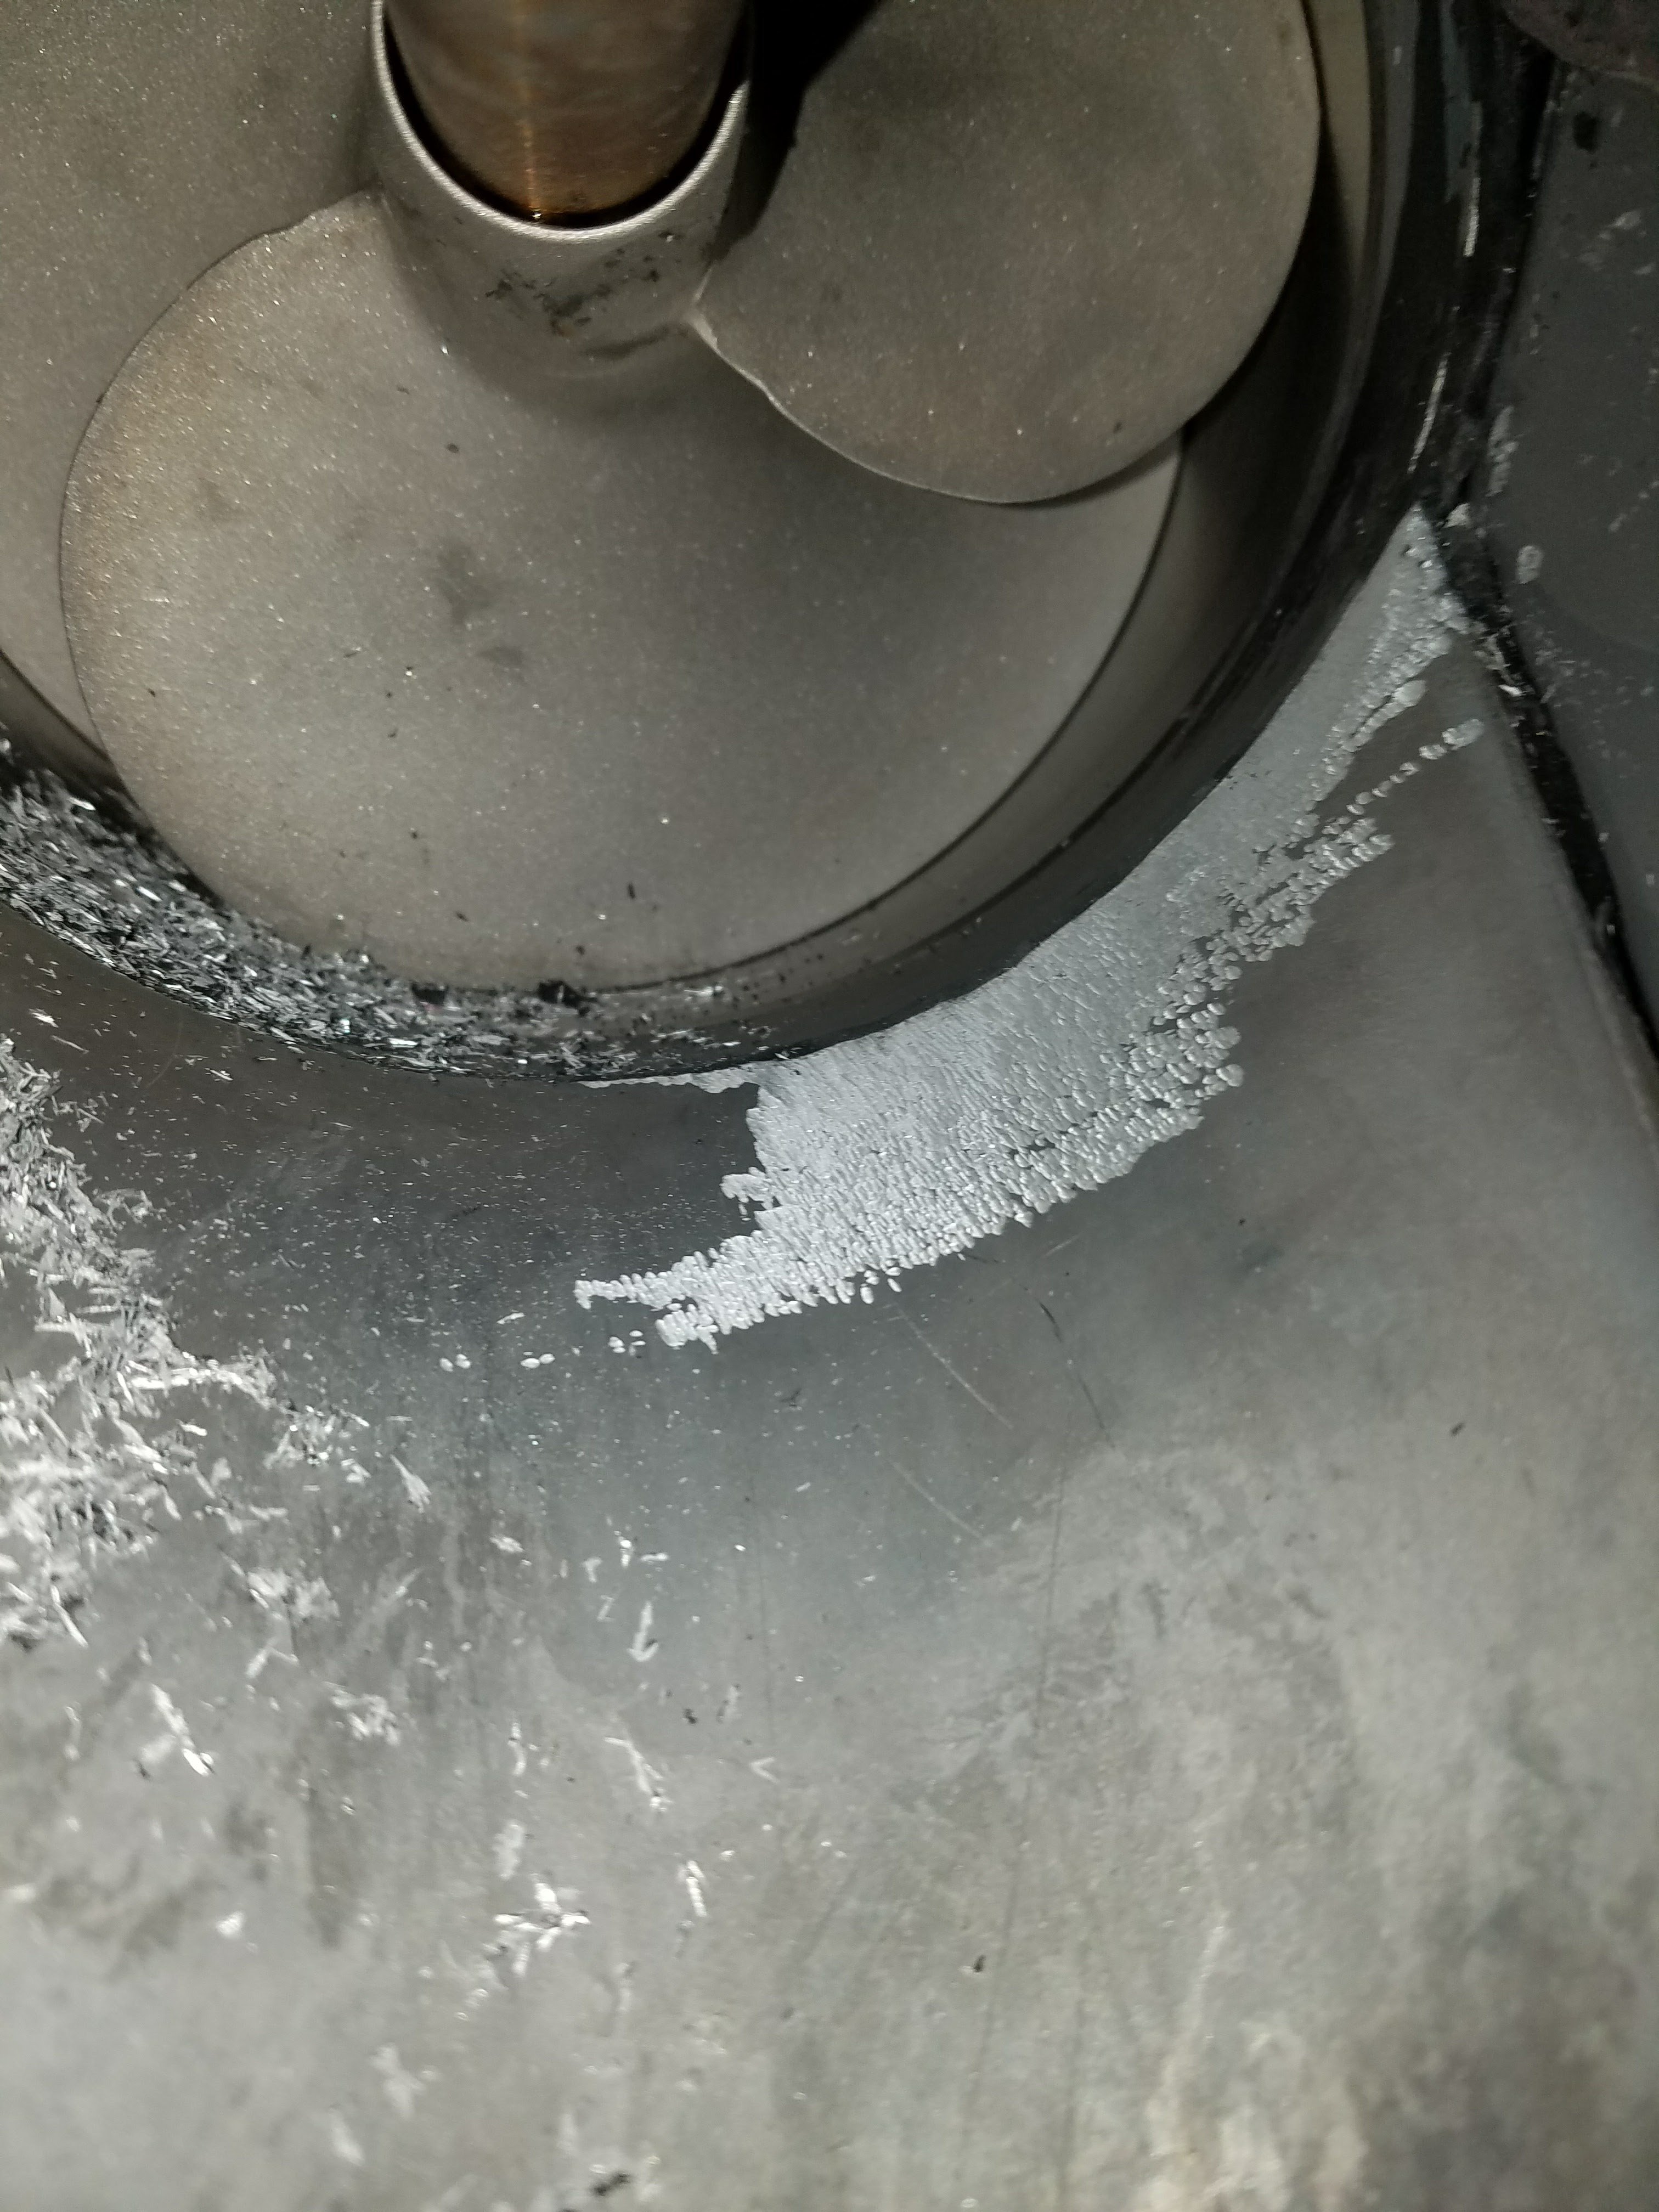
So I still haven't gotten a set of replacement grates so I didn't want to do anything crazy yet. I decided to "blueprint" what was there. I cut the crossbar out of the stock grates and knife edged the bars. I also cleaned up the intakes a bunch, there was a pretty good ledge that the water would have to go over on the bottom edge of the intakes right in front of the impellers. This picture shows the beginning of the "porting" work I did. After I smoothed out the ledge, I filled and smoothed the rest of the gaps and holes in the intakes.

The difference was absolutely noticeable! I did everything possible to try to get either engine to cavitate, they didn't. I could go full speed and crank the wheel into a hard 360 (just put the cobra jet fins on it) and come out of it without touching the throttles. A little slip, but no cavitation whatsoever. Top speed looked to be about the same, but the pumps definitely worked better at all speeds and rpm's. I have no idea if it was the minor grate mod, the minor intake tunnel smoothing or eliminating that ledge on the bottom side of the impeller opening that made it so different. Sometimes it's simply doing a whole bunch of "little" things that make something work more efficiently. In everything I do on cars, that's always been true. Attention to details makes the total package work better.

Anyway, I may still put a couple of wings or blades on those grates similar to the loader grates later. I'm just not sure I can improve on the way it's working right now. What I'm going to work on now is getting both the engines synced up a little closer power wise. I'm thinking about either making a nozzle insert for the port side or boring out the starboard side nozzle a little bit. Same as it was stock, the port engine still turns a little faster than the starboard side. I either need to put a little more load on the one, or free up the load on the other one to even them out a little more.

Regarding the RPM differences from side to side, the port spins faster in the new twins as Yamaha now installs two identical impellers on both sides. They used to pitch the port side a bit more aggressive (it was marked with notches on that neck). Changing the pitch is easy on the trailing edge (and it could cure the issue), any adjustments on the leading edge would be above my grade and may require bending tools, not just a crescent.

Another idea, not mutually exclusive with boring the venturi nozzles - would be to use the Lucky 13 cones, where one can vary the number of spacers/cone volume - and totally tune in the RPMs.

I am following your progress, keep us posted!!!

--
 
I'm going to try the @gmtech16450yz intake grade mod.
Do I need a mill or can it be done with a grinder?
Any suggestions Re: surface coating later? Spray paint okay?

--
 
I'm going to try the @gmtech16450yz intake grade mod.
Do I need a mill or can it be done with a grinder?
Any suggestions Re: surface coating later? Spray paint okay?

--
It's pretty easy, no mill required. Just cut the center bar out with whatever saw or cutoff tool you have. I honestly think the bar across the center isn't good for pump efficiency. It's got to be causing some amount of restriction or turbulence in the intake flow. How much is debatable of course. Obviously cutting the center support bar out compromises the strength of the grate, but if you understand the risks and want the possible benefits, it's not a big deal.

I used a porting tool kind of like an overgrown Dremel tool, but most anything will work to knife edge the bars. When you have the grates out, feel up into the intakes and you'll be able to feel the bump at the bottom edge of the area right in front of the impeller opening. I also used a porting tool to clean that up, but that's a little trickier than modifying the grates. If you want to attempt that, I'd say you should probably pull the impellers out so you can have easy access to that area. That way you might be able to use a hand file to straighten up that area.

Good luck and have fun! Don't forget to smooth out and fill in all the gaps in the intake where the parts come together.
I am so doing it. Just need an afternoon of daddy's time alone, lol.

I'll probably use a sanding roller on that transom plate. And this is also one place where may need to look at what sealant to use. When I seal the pump, use the regular 5200 which I think is adequate for the most part, but the gap between that bottom of the transom plate and the intake "shoe" may need some thing else, maybe even bondo w/fiber. I need to look at it again

But the intake grate mod is obvious! - it has to be done.

EDIT: Importantly, I may not see as much of an improvement with the "GMTech" intake grate modification (as I already have my tunnels sealed and the L13 cones installed that eliminated most all hole shot cavitation) there is still room for improvement.

I have now looked into this a little bit more and there is definitely a case to be made for reducing the intake obstruction/enhancing free flow.

I may run a quick experiment/test - with the intake grates out. Hopefully I can do this close to a ramp and test it w/o grates same day, same conditions, back to back. If that shows a difference, it would convince me to do the mod and shave, thin-out and shape the bars.

This is similar to testing the RPM gains w/ air filters off. Since it only brings marginal RPM gains (after ribbon delete), I never bothered with fixing that. Well, beyond removing the "snorkels" anyway.

--
 
Last edited:
It's pretty easy, no mill required. Just cut the center bar out with whatever saw or cutoff tool you have. I honestly think the bar across the center isn't good for pump efficiency. It's got to be causing some amount of restriction or turbulence in the intake flow. How much is debatable of course. Obviously cutting the center support bar out compromises the strength of the grate, but if you understand the risks and want the possible benefits, it's not a big deal.

I used a porting tool kind of like an overgrown Dremel tool, but most anything will work to knife edge the bars. When you have the grates out, feel up into the intakes and you'll be able to feel the bump at the bottom edge of the area right in front of the impeller opening. I also used a porting tool to clean that up, but that's a little trickier than modifying the grates. If you want to attempt that, I'd say you should probably pull the impellers out so you can have easy access to that area. That way you might be able to use a hand file to straighten up that area.

Good luck and have fun! Don't forget to smooth out and fill in all the gaps in the intake where the parts come together.
I did the intake grate mod today - kicked my butt. I don't know what kind of alloy these grates are built of, but it is pretty crazy strong. It took me a while to chop those middle bars off with a standard diamond disc, bogged my grinder down a couple of times. I don't remember that ever happening before, even when cutting stainless steel bars. Anyway - I think that structural strength is the last think I will worry about with the modified grate, the function of the crossbar must be to prevent larger objects lodging into the tunnel, I guess? Anything that would have enough force to bend those bars would certainly damage fiberglass...
upload_2017-11-5_19-59-33.png
upload_2017-11-5_20-0-23.png

I pulled the pumps and impellers and polished up the transom plate junctions. Ended up using polycarbide disc and sanding flap-wheels to get rid of ridges and then filled up any small gaps/cracks with a marine epoxy putty.
upload_2017-11-5_20-5-29.png


Next up I will clean up the ridges in the steering nozzles, start adjusting L13 spacers, and if necessary bore the venturi.

--
 
Yea, I broke one of those this year and didn't damage the fiberglass. Mine was a medium quality casting. We were able to grind/smooth/weld on mine without much of any problem. Maybe the dual engine boats have a different grate material?

Here's my grate busted:
Busted intake Grate.jpg

Here it is prepped for welding:
Grate Prepped for Weld.jpg

Finally welded:
Welded Grate.jpg

And here it is smoothed out. Ran it this way for a few outings until I had a new one put in at the 10hr service:
Smoothed Repair.jpg

Something I do notice about your modifications is that it is very similar to my factory grate shape. My grate has a "knife edge" from the factory. Those bars are thin and tall with chamfered edges. They aren't "sharp", but I sure wouldn't want to get by one at speed. Your before pictures look like the bars are thicker and don't have quite as aggressive of a chamfer. Your modified shape isn't far from my stock shape.

Your boat is a '17 same as mine right? I would've expected if not the same then at least a VERY similar grate between the two boats. The big difference being any sort of angularity coming from having twins in a V-hull, as compared to my single in a V (the hull is really flat right there by the intake though)

*edit*......Holy crapola, I just now realized you removed a center bar as well. Mine doesn't have that at all. Whats the opening size on your grate? I'm curious if the 240's have larger intakes than the 190's?!?! Wonder if it's part of the angularity of the mounting again? more side loading on those spars with the twin engine arrangement than the singles?!?! Now I'm very curious.
 
Last edited:
Something I do notice about your modifications is that it is very similar to my factory grate shape. My grate has a "knife edge" from the factory. Those bars are thin and tall with chamfered edges. They aren't "sharp", but I sure wouldn't want to get by one at speed.
That’s right! And another interesting similarity between the 190 and GMTECH grate mod, as I call it after copying the @gmtech16450yz , -there is no bar.

I forgot you posted on that broken grate!

But I don’t know what would it take to break mine. This did not:
01512082-BDDA-483A-AB8E-3F2B0D4A79E0.jpeg
Destroyed the impeller but there was not even a ding on the grate.
 
That’s right! And another interesting similarity between the 190 and GMTECH grate mod, as I call it after copying the @gmtech16450yz , -there is no bar.

I forgot you posted on that broken grate!

But I don’t know what would it take to break mine. This did not:
View attachment 65866
Destroyed the impeller but there was not even a ding on the grate.

I can't believe something like that DIDN'T break the intake, but then I break one without even noticing a thud/thunk/bonk on the boat at all. Kinda makes you wonder how useful they are in general.

Regardless of how mine got busted.....forklift, road debris during trailering, or a bonk in the water.....it was clearly busted and best I can tell didn't effect performance only being attached at one end. I'm also curious exactly what it would keep out of the pump. Perhaps it's not at all about protection and more about "water shaping" into the pump in general?!?! With that notion though I would have expected a more "airfoil" shape to it than just thick cross bars......Who knows....
 
No, I would not think those grates are shaping the water intake stream, more just protection - for stopping major stuff entering the tunnel and "exploding"/or cracking it.

These boats are (relatively) heavy and slow, so no need for a scupper/top loader design - as in some faster skis. The skis need suction to be able to stick to the water at high speeds (not exactly our problem in the boats).


As far as the alloy strength, now that I think of it again - I think I was probably cutting through the factory welds on those bars/cross members - and maybe that is why it was so hard? I was just surprised, that disc cuts through aluminum like butter, and even goes very fast through SS.

--
 
Hi guys! I currently have everything from the tunnel castings back taken off of the boat. The first round of intake "porting" made so much of a difference I'm doing V2.0 on it right now. A little more aggressive on the transition from the intake tunnel into the wear ring area to smooth the flow. I also cleaned up the vanes and nozzles quite a bit, basically ended up with a pretty big pile of aluminum shavings on the floor of my shop! Just little details that can only help in the efficiency of the pumps. I also painted all the pump parts gloss black, just because I didn't like the bare aluminum look and didn't feel like polishing everything.

Next mod will be dealing with the cr@ppy, vague and plastic toy feeling throttles. I'm actually thinking of ditching them all together and going with real throttle controls like this...

http://www.livorsi.com/catalog/controls_platinum.htm

I'll let you guys know how it all works out. I should have the pumps back together today. I also did a little modding to the Cobra Jet fins. I didn't like the idea of the "fangs" being separate bolt on pieces so I made new plates myself. I like the looks much better, we'll see how they work. I know the design is patented, I'm not trying to sell my modded design or step on any toes, just didn't like the look and wanted to make mine better. Pics later.

BTW those grates are simple cast aluminum, nothing fancy. Those bars cut easily with the right tools. That cut off wheel is more for masonry or concrete, it will load up with aluminum pretty easily, especially at high speeds. Once it loads up, you're basically trying to cut aluminum WITH aluminum. For aluminum you have to use a cutter that either "sheds" like a standard cut-off wheel or something with teeth that cuts VERY slowly so it doesn't load up with melted aluminum. I also think the angled "blades" of the grates do make some difference in the twin engine boats. If you think about the water being pushed to the sides away from the centerline of the hull, the grates could direct some amount of flow into the inlets instead of letting it escape to the sides somewhat. It might not be a huge factor, but I actually wanted to keep the blades instead of cutting them completely out for that reason. Totally open without the angled blades might actually not work as well.
 
Last edited:
Hi guys! I currently have everything from the tunnel castings back taken off of the boat. The first round of intake "porting" made so much of a difference I'm doing V2.0 on it right now. A little more aggressive on the transition from the intake tunnel into the wear ring area to smooth the flow. I also cleaned up the vanes and nozzles quite a bit, basically ended up with a pretty big pile of aluminum shavings on the floor of my shop! Just little details that can only help in the efficiency of the pumps. I also painted all the pump parts gloss black, just because I didn't like the bare aluminum look and didn't feel like polishing everything.

Next mod will be dealing with the cr@ppy, vague and plastic toy feeling throttles. I'm actually thinking of ditching them all together and going with real throttle controls like this...

http://www.livorsi.com/catalog/controls_platinum.htm

I'll let you guys know how it all works out. I should have the pumps back together today. I also did a little modding to the Cobra Jet fins. I didn't like the idea of the "fangs" being separate bolt on pieces so I made new plates myself. I like the looks much better, we'll see how they work. I know the design is patented, I'm not trying to sell my modded design or step on any toes, just didn't like the look and wanted to make mine better. Pics later.

BTW those grates are simple cast aluminum, nothing fancy. Those bars cut easily with the right tools. That cut off wheel is more for masonry or concrete, it will load up with aluminum pretty easily, especially at high speeds. Once it loads up, you're basically trying to cut aluminum WITH aluminum. For aluminum you have to use a cutter that either "sheds" like a standard cut-off wheel or something with teeth that cuts VERY slowly so it doesn't load up with melted aluminum. I also think the angled "blades" of the grates do make some difference in the twin engine boats. If you think about the water being pushed to the sides away from the centerline of the hull, the grates could direct some amount of flow into the inlets instead of letting it escape to the sides somewhat. It might not be a huge factor, but I actually wanted to keep the blades instead of cutting them completely out for that reason. Totally open without the angled blades might actually not work as well.
How do I give it informative AND love it???? LOL
 
How do I give it informative AND love it???? LOL
Haha. Thanks Wojtek! I was afraid you'd take it as I was "picking" on you, I'm glad you didn't take it that way because that's not how I meant it. I simply try to inform and share knowledge, and try to do it without hurting anyone's feelings that might have said something different.

Oh and on the throttle/forward/reverse idea... I also think having cables run all the way to the engines and then switching to electric position sensors is stupid. At least they changed that in the E series boats. If I do a major change to the throttles, I probably will move the position sensors to the front and eliminate the cables. We'll see!

Here's another teaser for you guys, I also didn't like the stupid exhaust outlet Yamaha put on these boats. I made these to fix the "problem"... (not in the right order but whatever)
20171110_090811.jpg20171110_090804.jpg20171108_204031.jpg20171108_204047.jpg20171110_203343.jpg
20171110_203330.jpg20171111_115232.jpg20171111_115911.jpg20171111_115857.jpg
 
Last edited:
Nice work,
Looks clean and should be louder than stock.

Though not a mod i would consider, i prefer my boat to be quiet
 
Haha. Thanks Wojtek! I was afraid you'd take it as I was "picking" on you, I'm glad you didn't take it that way because that's not how I meant it. I simply try to inform and share knowledge, and try to do it without hurting anyone's feelings that might have said something different.

Oh and on the throttle/forward/reverse idea... I also think having cables run all the way to the engines and then switching to electric position sensors is stupid. At least they changed that in the E series boats. If I do a major change to the throttles, I probably will move the position sensors to the front and eliminate the cables. We'll see!

Here's another teaser for you guys, I also didn't like the stupid exhaust outlet Yamaha put on these boats. I made these to fix the "problem"... (not in the right order but whatever)
View attachment 65878View attachment 65876View attachment 65877View attachment 65874View attachment 65875
View attachment 65879View attachment 65880View attachment 65881View attachment 65882
John - totally awesome!!!! I say - this falls straight into "boat porn" category, super cool.

Love the idea of a cleaned up exhaust, I'm pretty sure you eliminated some rudimentary leakage with that mod as well. I would not think this is going to make the boat louder at all, unless/until you start removing other exhaust parts like the waterbox and resonators.

LOVE the idea of moving the APSs - please keep us posted. That would be an instant E_series conversion!!!

BTW - I looked at the cutting disc I used to cut the intake grates' bars - exactly like you said: clogged up with molten aluminum - clearly I'm not much of a metal worker, LOL.

--
 
Nice work,
Looks clean and should be louder than stock.

Though not a mod i would consider, i prefer my boat to be quiet
I looked at this extensively - the noise issues in our boats. I've put a lot of extra sound deadening, and managed to help it some.

I am quite convinced that, once the engine compartment soundproofing is beefed up (with a good hatch seal, too) - the major source of noise are the pumps.

For example, when I run the engines with the pumps off (very very briefly, and low RPM only!) - the noise is reduced dramatically, almost unreal (w/engine hatch closed)

I think the exhaust becomes loud when the resonators are removed, but those rubber baffles/rings are probably not doing much.

--
 
I currently have everything from the tunnel castings back taken off of the boat. The first round of intake "porting" made so much of a difference I'm doing V2.0 on it right now. A little more aggressive on the transition from the intake tunnel into the wear ring area to smooth the flow. I also cleaned up the vanes and nozzles quite a bit, basically ended up with a pretty big pile of aluminum shavings on the floor of my shop! Just little details that can only help in the efficiency of the pumps. I also painted all the pump parts gloss black, just because I didn't like the bare aluminum look and didn't feel like polishing everything.
If you have ANY pics - please post, I'm dying to see what you are doing.
I also went back and pulled the pumps - to do some more "porting" and sealing - after I read what you are doing.
These are simple mods but I think they make a huge difference.
I used an epoxy putty this time - JB Weld - and liked it a lot - just between the transom plate and wear ring, I have sealed the tunnel before with 3M 5200 - it's all white, so hard to tell what is what in pictures.
I used Marine-Tex in the past but it is very hard and can be a bit difficult to sand, whereas the JB Weld was softer and way easier to smooth out with a sander flap wheel. Will see if it holds up though.

Here is a picture - work in progress, not finished, just trying to get all the gaps sealed up and smooth out the trnsitions between the pump segments and the transom ring etc.
upload_2017-11-11_22-49-19.png
upload_2017-11-11_22-49-58.png
upload_2017-11-12_7-49-38.png
upload_2017-11-12_7-49-2.png
upload_2017-11-12_7-54-10.png

--
 
Last edited:
BTW - I looked at the cutting disc I used to cut the intake grates' bars - exactly like you said: clogged up with molten aluminum - clearly I'm not much of a metal worker, LOL.

--

You may not be a metal worker, but you're obviously an intelligent guy that can learn. Not everyone has every experience to work from, or have every piece of information memorized. But if you can learn anything from anyone, you're a wise person. You took something a guy on an internet forum said, took that information and verified it yourself, and now you have knowledge you didn't have before. That's awesome! The next time you go to cut something made of aluminum, you'll be better at it.

I didn't take any real pictures yet, but this picture I'll post shows the areas I'm working on. The side areas where the cast upper and lower aluminum pieces attach to the fiberglass have a pretty big variation. I originally filled in the uneven parts like it looks like you've done, but this time I spent a little more time evening them out. This is stuff that's kind of labor intensive if you don't have the right tools. Basically what I did was I removed 1/16th or 1/8th of an inch of material on the aluminum sides so it's all the same level with no bumps or ridges.

The other part I worked on a little more was the very bottom area in front of the wear ring. If you look in this pic, you can kinda see that it doesn't flow up smoothly into the wear ring area. There's a little bit of a "shelf" the water has to go over as it enters the pump. What I did was again I took a fair amount of aluminum off of that area to make the flow have a nice clean shot at the bottom of the impeller. Will all this grinding and sanding make a difference? Who knows. It sure seemed to make a difference when I did the first round. I think it's one of those "it can't hurt and HAS to help" things. And it's free, I like that. Just be careful. There's not a whole lot of material in sections of the castings so you can't just go crazy on it.

I'll put another pic of the wonderful gasket material around those exhaust outlets. OMG what a joke! On top of the horribly shoddy rubber, they put some sort of silicone sealer on it that just squeezed out around the sides. It's no wonder that rear area would end up with water in it. As far as exhaust noise level, I removed the resonators after I had the boat out for it's first time. I don't think it's too loud, I like to actually be able to hear the engines. These outlets I made probably won't change the volume too much, I just like the fact that it keeps the diameter 3" all the way to the exit. Stock it necks down from 3.15" ID hose to barely 2.5" ID at the outlet. Again, it's not huge differences, but it's the little details that add up.

20171111_161335.jpg Inked20171111_115911_LI.jpg
 
Here's some more pics guys!...

The tunnel pics are really hard to tell what it looks like because the paint I used was really glossy. I painted it so it would be smoother. The paint seems to be holding up ok so far. If it doesn't I'll just strip it off. The last two pics are of the exhaust, I took the resonators out and shortened the hoses significantly from how they had them. The port side exhaust goes around the rear of the compartment instead of across the front. I probably shortened the exhaust piping at least a couple feet per side. It sounds much deeper and better with the 3" exhaust outlets I made too.

20171112_103158.jpg 20171112_103207.jpg 20171112_104816.jpg 20171112_104809.jpg 20171112_140110.jpg 20171113_122755.jpg 20171113_122811.jpg 20171113_122926.jpg 20171113_123009.jpg 20171113_123540.jpg 20171113_123509.jpg
 

Attachments

  • 20171112_140155.jpg
    20171112_140155.jpg
    1.1 MB · Views: 42
John - amazing work, that pump blueprinting project of yours looks spectacular.
I have never seen anyone paint the wear rings, but if it holds it could actually be great - making OD tolerances tighter to further reduce impeller slippage and generate more thrust.

I see what you did with the Ultimates! - those look like they are on steroids!!!!
I think you are going to need a bucket seat and a harness to stay put at the helm!
I'm actually only half-joking. In my experience Cobra AK fins have enough bite to give the boat a couple extra Gs in hard turns... (as I recently found out the hard way - but that is a different story). And that's before your mods. Combined with other performance upgrades these boats can actually get pretty close to racing machines.

I would try to do something like that (i.e. copy you) but for now I'm waiting to see what is @Cobra Jet Steering LLC coming up with, I've heard some rumors.

Regarding the paint, @Bruce posted on some special pump coatings when exploring this topic with another member here who is in the know. I wonder if they ever came up with an answer.

EDIT: If you ever consider making extra copies of those exhaust outlets - I would be so interested to buy a pair.

--
 
Back
Top