• Welcome to Jetboaters.net!

    We are delighted you have found your way to the best Jet Boaters Forum on the internet! Please consider Signing Up so that you can enjoy all the features and offers on the forum. We have members with boats from all the major manufacturers including Yamaha, Seadoo, Scarab and Chaparral. We don't email you SPAM, and the site is totally non-commercial. So what's to lose? IT IS FREE!

    Membership allows you to ask questions (no matter how mundane), meet up with other jet boaters, see full images (not just thumbnails), browse the member map and qualifies you for members only discounts offered by vendors who run specials for our members only! (It also gets rid of this banner!)

    free hit counter

Scarab add a battery (modification)

The battery drain will equalize if your draining both at the same time. But if you have a bad battery that is drained, or doesnt hold a charge, it will drain the other. Only switch both on (1+2) when the boat is running so they charge, but when using it for the radio or accessories, choose only one.
 
Thats interesting @GIII. Im going to do some further investigating into this. The Isolator/switch has no issue with the stator as long as the battery connections are correct.

The battery isolator is not going to switch from a completely drained battery to the good one by itself. You need the special selector switch to make that happen. without that selector switch, all the money you have spent on the dual system is bypassed for the most part.

In normal conditions, the stator creates electrical energy from the magnets in the flywheel passing the coils that make up the stator. It sends this to the powerpack which stores and changes the voltage from AC to DC volts. The trigger, also under the flywheel sends a small voltage to the powerpack depending on the flywheel position, this releases the stored electricity to the coils which step it up and on to fire the plugs. The battery is only there to turn the motor over, it has no play on the ignition system. Stators output AC voltage to a rectifier and sometimes regulator. An alternator has the rectifier built in and outputs DC voltage and is rated at much higher amperage.

That isolator is basically doing the same thing you are doing with the switch. But, that isolator can go bad, and you will be dead in the water. I rather be able to control and see what the system is doing.

The MarineMax dealer here in FL applauded the setup.

@ScarabMike , I have decided to install the add a battery for my new battery add. Do you know if when I connect the solenoid wire for the engine battery should I connect all of the addition wires connected to the fuses or should I leave them connected to the house panel battery and have the solenoid wire isolated by itself on its own battery? Hopefully this makes sense. Not sure if the fuse block wires are needed if the house battery is drained to start the engine or if they are house loads that would drain the starting battery while the engine is off?
 
Hey Mike,

Did you have any issues fitting the new switch in to the existing hole? I am at my local Marine Max and they are installing a new switch because mine is bad so I talked them in to installing the dual switch like the one you have. The tech went to install it but is now saying that it won't fit in to the hole. He says it is too large for it. I double checked the item number you posted PN6007 and it is the same switch they have here.

Any suggestions?

Ok,

Today was the day to finally install my second battery, and multi-battery switch.

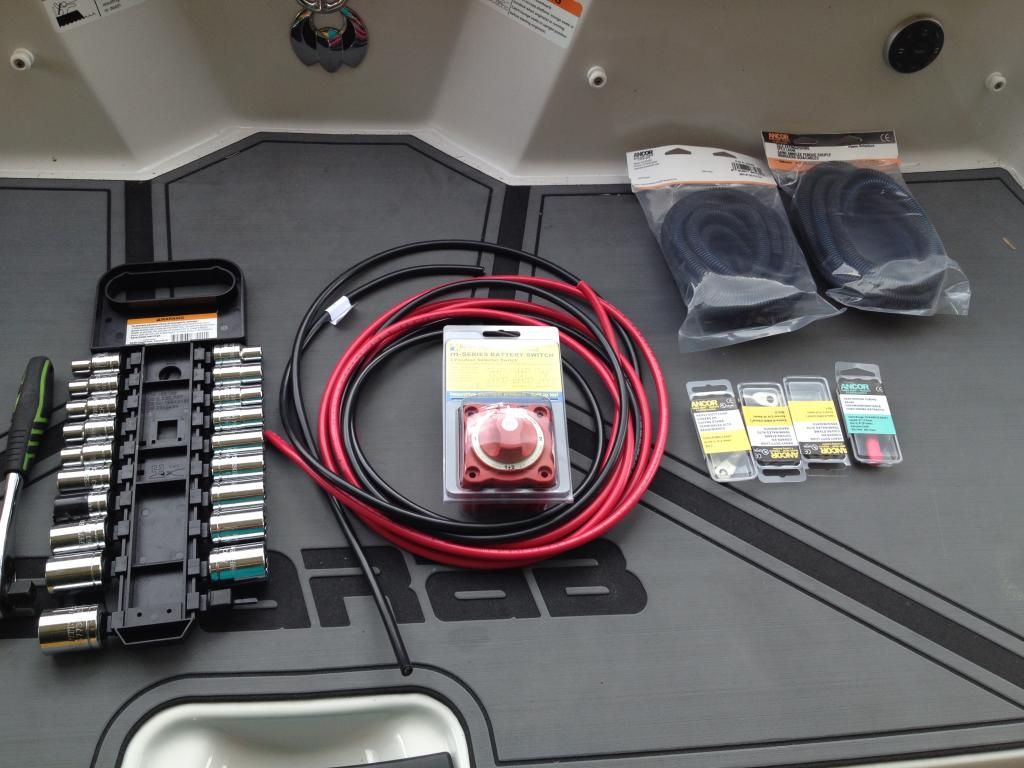
Here is what you will need.


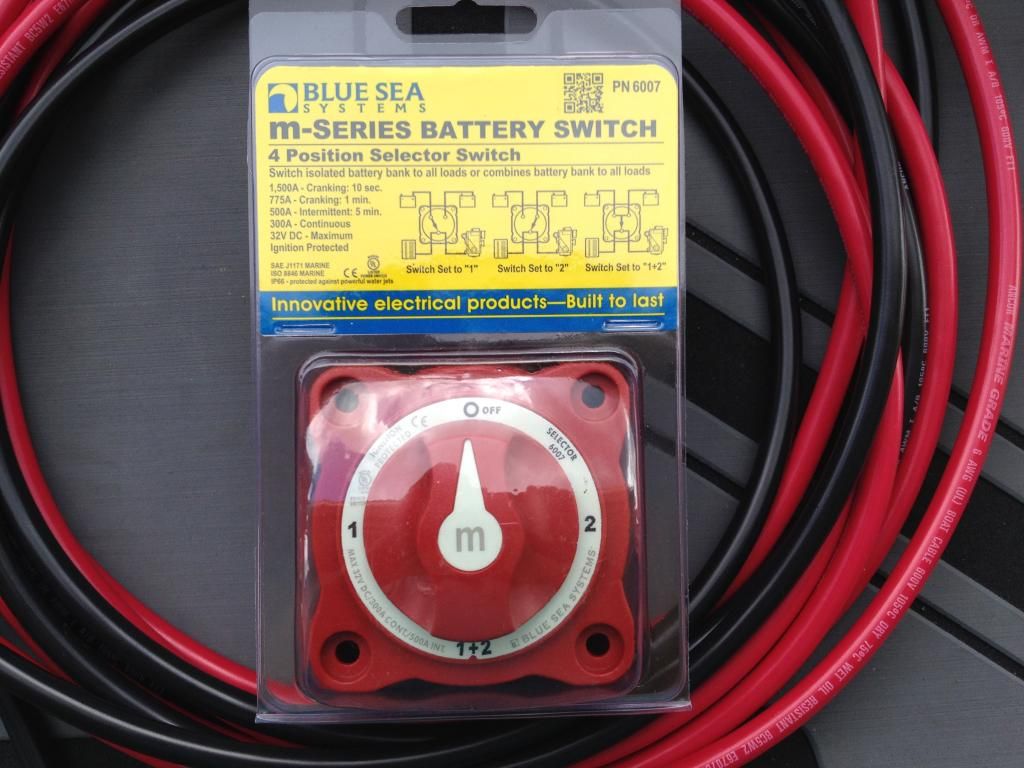
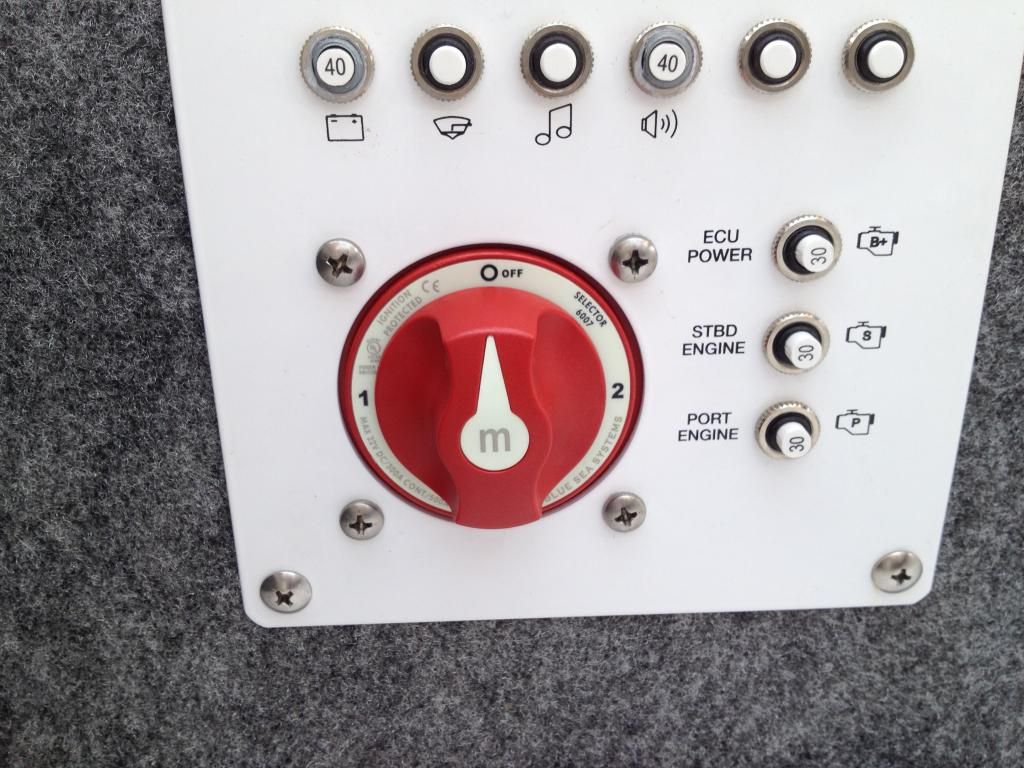
Blue Sea Systems 6007 Switch
12ft of 6 gauge red cable
12ft of 6 gauge black cable
2 sets of battery connectors (the ones with the holes)
red/black shrink wrap
2 10" bags of wire loom
Group 27 Battery
Battery tray
Stainless steel wood screws (1/2")
3M 5200 sealant
Wire ties/zip ties
B67FE661-E0E8-483C-8FA0-6F0911C3DE95_zps2joddns6.jpg
61FFF9F1-5AC0-4280-B42F-DDF3294FA43F_zpsc3s8cvob.jpg


Here we go!

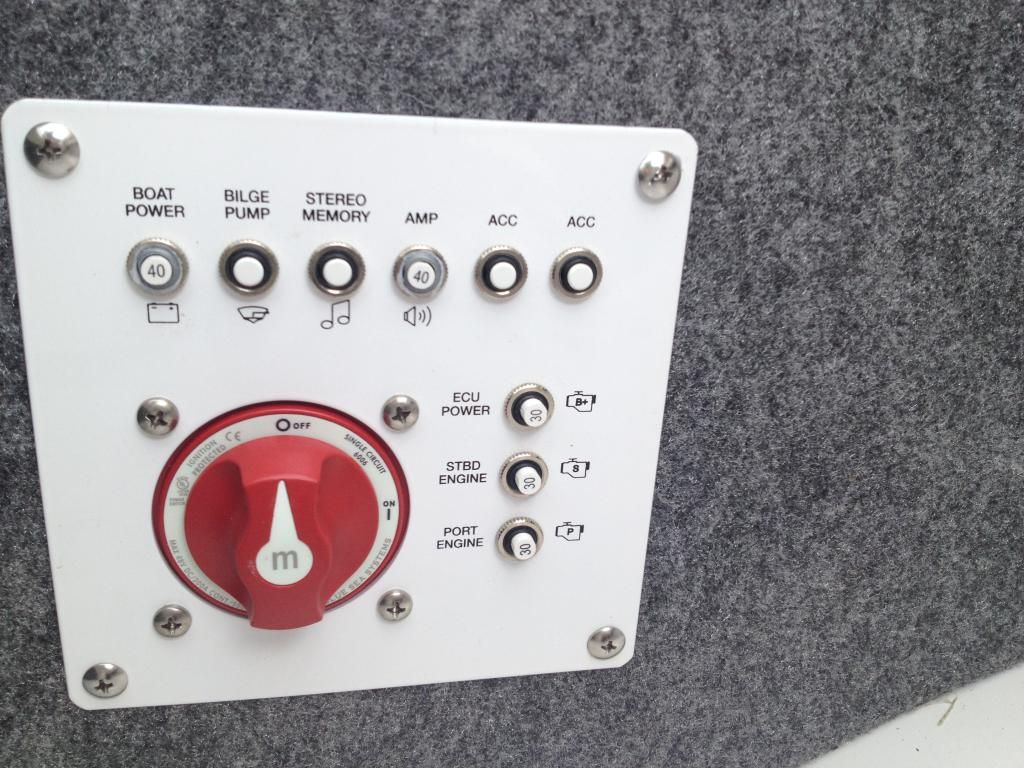
  1. Open the engine cover, and the port side rear cushion to access the battery switch and breaker panel. Disconnect the positive on the battery.
    334A81A6-F236-4DCF-93D0-07C650FD5036_zpsmwrirc7t.jpg
  2. Look behind the switch and you will see a black plastic cover screwed into the noise insulator material. Remove the screws (its going to be tight. Take your time and don't loose the screws.)
    17D400EC-841A-492A-B681-18572B587805_zpsmelzf320.jpg
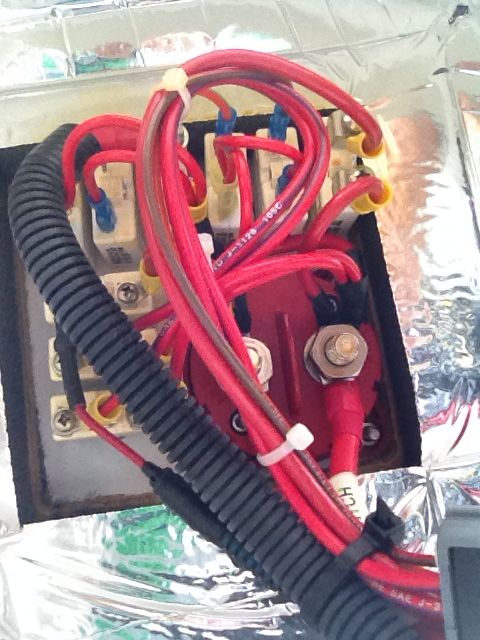
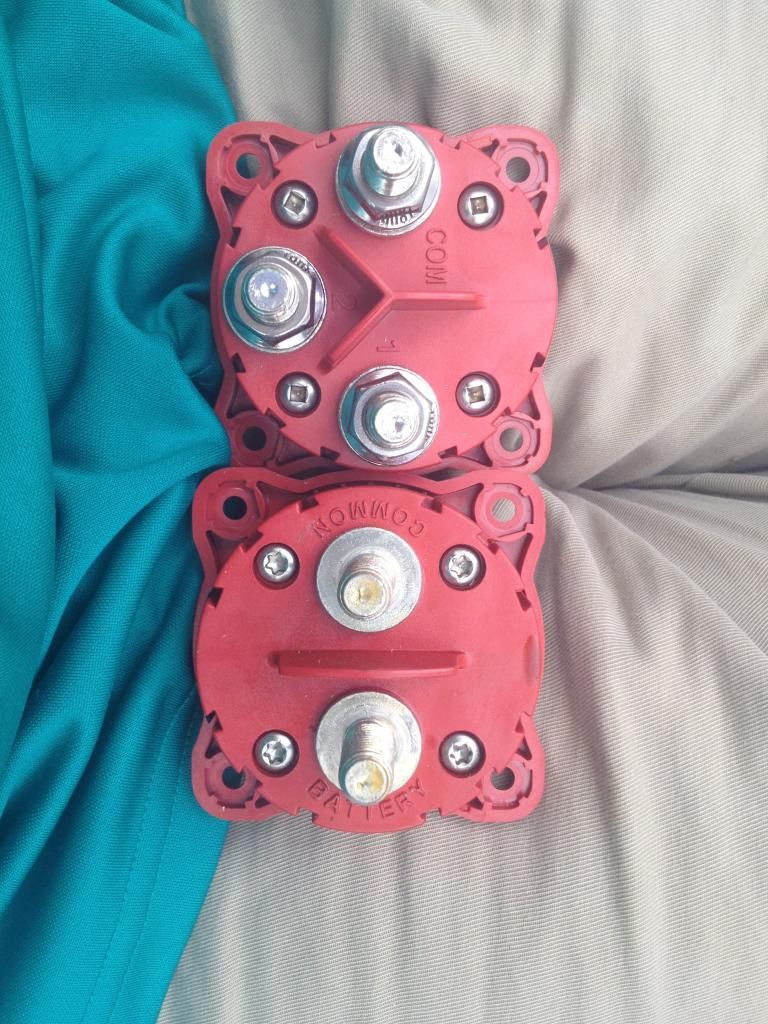
  3. Now you will have exposed the connections. You will see the back of the switch with two large nuts.
  4. On the oem switch, the common (switch) wire is on the left, and the battery is on the right. Make sure you keep track of the wires that are attached to each side. DON'T MIX THEM UP!!!
    1CD4E981-C17C-440F-8C62-93AA962AB734_zps8qz5dv9k.jpg
  5. Remove the cables and wires, and put them aside
  6. Get your fingers and feel around behind the switch. Find the nuts/bolts and unscrew it (4 bolts/nuts) Be careful not to loose the nuts. And place them in a safe place.
  7. Remove the switch, and install the new switch.
    5D4830F3-3E14-49AD-8ADA-09939CD8D595_zpsmolwavde.jpg
  8. Once the new switch is installed, the common will now be the port side bolt/connector on the switch. The battery will be the center bolt/connector. Go ahead and connect the wires and cables, and connect them just like they were on the oem switch, and tighten. YOUR OLD/PORT SIDE BATTERY IS NOW #2 ON THE SWITCH!!!
  9. You have now connected the switch to the boat, and the first battery. The boat will work on that battery's position. And your stereo's memory will not be affected by any position on the switch.
  10. Time to install battery tray on the starboard side storage next to the engine. Make sure to pre-drill the holes with the drill in reverse, and use painter's tape. This will keep the gel-coat from fraying.
  11. Squeeze some 3M 5200 in the holes you just made, and screw the battery tray down. HAND TIGHT ONLY!!!! Let the 5200 dry for a couple hours before going to the next step.
  12. Install the new battery, and strap it down.
  13. Time to run the new battery cables. Put one end of the connectors, and wire loom on the new battery cables. The side with the new connectors will be your new battery side.
  14. Fish the new cables behind the ventilation pipe, and the 3 engine bay shocks. Tie wrap onto the existing wiring. Not to many ties, just enough to hold the new cables. You don't want to give yourself a headache if you ever need to isolate a trouble.
  15. Cut the black cable to length needed to connect the BLACK cable to the negative of the first battery (old one). Make sure the connection is TIGHT.
  16. Bring the new RED cable to the starboard side bolt/connector on the new switch. Cut the cable to length, and tighten. You now have the second battery connected.
  17. Test and make sure you can start the engine on all 3 settings (1,2,1+2)
  18. Enjoy your new 2 battery setup. You dont ever have to worry about getting stranded because of a dead battery
When you run the motor, you should try to use the 1+2 setting. This will charge both batteries, then switch to 1 or 2 when your listening to your stereo.
 
I used the Blue Sea Systems 6007 switch to replace the stock switch and did it all myself. It does fit, the two switches are the same dimensions. One thing that happened to me is that I had to shuffle some of the cords around becuase they were pushing back on the switch. But, in terms of size, it screws right into the same holes as the stock switch.

Pain in the ass though to get the switch back in, and the rear cover (black palstic box) back on. Things are tight in there.
 

Would this add a battery work better due to the 4 bolts instead of the three. Looks much simpler to charge both. Just on and off switch??
 
In order for you to charge both batteries you must make sure you switch to the "both" setting. When your anchored and listening to music you should make sure your only on the "one" battery setting. If you have the system I posted it will charge both batteries by only switching to the "on" setting. No monkeying around with on, off, one, both etc. Just on and off.
 
@Dsalverda You are correct. And that switch you show will do exactly waht you need it to do. I personally wanted a visual reassurement. Post pics of your install when complete.
 
Thanks Scarabmike! Made the addon a piece of cake. Job was done in less than two hours. Not counting trip back to hardware store. Check screw depths to the thickness of your battery bay mount holes. 1/2" might not always work. image.jpg image.jpg
 
i am doing the secondary deep cycle in my scarab 195 open now. i am putting it in the center console on the starbord side behind the snap curtains. the 2 position switch is great so is the isolator. i am planning on the accessories like stereo system, bottom machine, and vhf running off the secondary battery and through the accessory 1 switch instead of the key. with an isolator and the 2 position sitch i will be able to constantly charge both batteries but still connect them together in the event i kill the starting battery. i have over 25 years of installation eperience and see this as an optimum way to run the dual batts
 
I just bought a topvision lithium jumper pack (like 2 pound and much smaller). The pack has enough juice to jump the boat in case i drain the main battery. The boat is too small to loose that much real estate. So far I have not needed to jump the battery yet it is good to know i have it.
 
Not to reawaken an old thread here but I'm mid 2nd battery install and I believe the spot id like to put my second battery in my 195 is occupied by the mechanism that controls the reverse gate. Where is this located for everyone else? It has one hard line and looks like I could move it. Anyone else have this issue

Edit: I think that is the mechanism for the electronic shift/control module
 

Attachments

  • 15944302786238885617978805846360.jpg
    15944302786238885617978805846360.jpg
    3 MB · Views: 61
Last edited:
In case anyone comes up with the question I had. I ended up moving that module a few inches back and maybe an inch closer to the motor. I was able to mount the battery tray flat and just barely squeeze in the battery flat against the most forward part of that compartment. I was told by the dealer if the angle of the cable changes too much it wouldnt work at all and throw error codes and would have to all be re calibrated. I took it out Sunday and everything works, no change in performance.

Thanks to @ScarabMike for the original write up.
I've been playing with the idea of doing this but hadn't gotten around to doing it yet. Can you post pics of your install?
 
Sure. Let me know if you want any particular pictures
Those look pretty good. Interesting. It looks like your bucket actuator was mounted at more of an angle than mine:

Or is that what you changed? Looks pretty tight. No problem getting the battery in or out?
Also, I have a piece of wood installed under the actuator but it doesn't look like you do?

Thanks for the pix,
 
Actually, after a second look, it looks like I have some sort of a heat exchanger that is missing on yours:
https://jetboaters.net/threads/new-dual-bank-charger-and-agm-batteries.4689/post-420286

Might make it tougher to squeeze the battery and stuff that way.?
My apologies, I'm only familiar with the engine bay on mine, its the 250hp motor from 2017. You are correct. I do not have that heat exchanger. My plan B was to run the battery under the seat on the starboard side and put it inside a battery box. I even bought a battery box from the interstate distributor here thinking that might be my only option. I understand not wanting to put it there. what I REALLY didnt want to do was put it on the same side as the other battery under the seat near the battery switch.

Battery is VERY tight to get in and out where I put it but I only need to move it twice a year.

Sorry I cannot be of anymore help.
 
My apologies, I'm only familiar with the engine bay on mine, its the 250hp motor from 2017. You are correct. I do not have that heat exchanger.
Yeah, I have the 300's. They probably generate more heat.
Sorry I cannot be of anymore help.
No problem. Your information has been helpful. I'm still convinced that I can do this and seeing your setup keeps my gears going.
 
Back
Top