Follow along with the video below to see how to install our site as a web app on your home screen.
Note: This feature may not be available in some browsers.
Welcome to Jetboaters.net!
We are delighted you have found your way to the best Jet Boaters Forum on the internet! Please consider Signing Up so that you can enjoy all the features and offers on the forum. We have members with boats from all the major manufacturers including Yamaha, Seadoo, Scarab and Chaparral. We don't email you SPAM, and the site is totally non-commercial. So what's to lose? IT IS FREE!
Membership allows you to ask questions (no matter how mundane), meet up with other jet boaters, see full images (not just thumbnails), browse the member map and qualifies you for members only discounts offered by vendors who run specials for our members only! (It also gets rid of this banner!)
Thanks for the encouragement!
I am now waiting for a little warmer weather to reinstall the exhaust manifold so that I can be sure that the sealer works correctly.
I am using Permatex 85420 which is (perhaps) the same as Hylomar Universal Blue.
The Hylomar is a polyester - urethane sealant that seals, but does not set and can the parts can be removed and reused.
Because I used this the first time I can reuse the gasket.
I think the seal failed because the thread inserts failed and did not pull the manifold tight against the block.
What I plan to do is to test the sealing of the manifold (and head) by running the flush from the bottom with the #1 plug out to see if water decided to run out!.
I think one problem with the flushing is that although the flush flow from the city water is low, once it has filled the engine the pressure will still go up to the supply pressure, limited only by the flow through the 1/4" tube that feeds the exhaust elbow and bellows cooling and the spring that acts line a pressure limiter at the thermostat.
I plan to build a limiter that consists of a PVC pipe 10' long that would give a pressure relief at 4 psi (the pipe vertical and open at the end giving 4 psi head at the bottom).
I also have made a Tee for the temperature sensor and a bypass at the head to also relieve about 1/8" tube to the head cover and from there to the water box below.
This morning it was warm enough to do a little work and get the exhaust manifold back on.
I expected to have some trouble with the line up of the repaired threads with the holes in the exhaust manifold and I was not disappointing at all.
The repaired holes had to be retapped to get the bolts started, luckily the tap was long enough to reach into the block to true up the threads. Still nervous about the repairs, but we will see if it holds.
I used the Permatex Hylomar universal blue that will allow for removal and reinstallation of the manifold.
I just slightly tightened the bolts and I will let the gasket sealer conform through the day and come back and torque it this afternoon.
If the repairs hold and the flush system I am building work maybe, just maybe the boat will be OK.
I still need to calibrate the timing and adjust the throttle.
As I understand it the timing has to be calibrated to the carbs setting the cam for idle at 8* and WOT at 32*.
I think(!) that the idle stop is set for the 8* and the stop at the top of the tower for the 32*.
Later the low speed or the timing stop is adjusted for proper idle speed, but I am a little confused as the manual calls the same screw two different things, depending on if you are adjusting the timing or the idle.
If anyone has a better explanation I would like to hear it!
@RedBarron55 sounds like you’re making good progress on the fix.
Keep in mind that I have no knowledge of how the cooling system on your engine works. So with that in mind, I’m not certain exactly how you’re pressure testing the repair. But I do know that on all of the sea Doo and Yamaha watercraft engines that I’ve owned it’s essential to start the engine first then the flow of cooling water. This is due to the fact that the exhaust manifold is cooled from the same water supply and water will backflow into the cylinders if if the engine isnt running. The water is normally forced out of the manifold by the exhaust pressure.
Anyway, you probably have a clear understanding of how yours works. I just read your description of how you’re going to pressure test it and I thought that you were going to test it with water psi from the flush line and look to see if it leaks into the cylinders. However, it might be simply backflowing from the manifold through the exhaust ports into the cylinder.
Im probably just not familiar with your cooling system or possibly I’m not catching every detail of your description. So just ignore me if I’m completely off base here
Thanks for posting your project. I’m enjoying the journey.
Thanks for the support and the flushing is confusing and there is not a factor write up I have found.
There are two flush "kits" for the Sport Jets, one a "consumer" that has a 1/8" NPT on the top of the head that flushes from the top of the head back through the cylinder jacket and the exhaust manifold and cannot completely fill the cooling system (IMO) and this one is not for running the engine at all.
The Dealer adapter replaced the flow from the impeller on the pump and flows up from the bottom of the exhaust manifold and through the cylinder jackets to the top of the head where the thermostat lives.
The only pressure relief is the 1/4" tube that taps off the exhaust manifold to the exhaust water jacket.
When water is flowing and the temp is below 130*F the thermostat is closed and the spring is holding the thermostat closed so no flow through the head cover to the exhaust box under the engine.
My guess is that even with a low flow if it is less than the flow through that 1/4" tube to the exhaust then the pressure will build to the supply pressure even though the water valve is just barely open.
I am doing two things to try to control this.
1. Add a 1/8" bypass across the thermostat
2. Add a pressure regulator inline and a pressure relief valve before the line to the adapter.
Ideally the pressure will remain low, but can increase when the thermostat opens while running out of the water.
If you look at the area of the exhaust manifold (call it 16" X 8") = 128 square inches x 16 psi (at full throttle) = 2000 lbs pushing the manifold apart.
I plan to limit the pressure to 4 - 5 psi on the hose or about 910 lbs trying to push then apart.
Of course these numbers are approximate and depend on what area you decide is active, but give an idea of just why there are so many bolts there and how they might leak.
As an addendum to the above on why the water gets into the cylinders.
Beats me I would think that the water would still end up going out the exhaust to the box under the engine even with higher flow.
The water could get in with a crack in the cylinder, the exhaust manifold leaking or the head gasket leaking.
I wish there was a way to pressure test this thing.
The closest I can get is building the regulated flush thingy when the rest of the parts get here.
Yesterday I did the final torque on the exhaust manifold and found another bad thread!
Back off with the manifold and another repair...
At least the sealant I used allows for R&R without damaging the gasket!
Made the repair and back together.
Today some time the pressure relief valve (0-100 psi) should arrive and I am going to make the adapter to reduce the house pressure to first 25 psi (with an irrigation drip watering reducer) and then the relief valve.
I think that a problem is over pressuring the cooling system on the hose so I am trying this.
Perhaps many of the problems with these Sport Jets is poor water regulation and flow.
You need flow to cool, but it should not go over 1 1/2 psi at idle and 15 psi at full throttle.
I got my pressure relief valve today and build a log with the pressure regulator, relief valve, pressure gauge, and shut off valve.
It is a little loo late today to test the system and the PVC glue needs to set.
I have installed the 1/8 " bypass and temp sensor and tested the sensor by heating the tee with a heat gun.
I bought a solid state horn from Radio Shack and I have traced the wires the instrument panel and I need to mount it an get it wired in.
Tomorrow if it doesn't rain all day and it warms up some I will test the regulators and test for water getting into the cylinders.
Wish me luck!
The rain stopped and it warmed up and I tried my regulated flush setup.
It worked well, but with only 2 psi of water on the engine it still filled every cylinder!
Sadly I pulled the exhaust manifold and the cylinder head to check it and also clean the cylinders etc.
Where the heck is the water coming from!
This was a full cylinder each rev!
The water was flowing the thermostat by pass and everything!
So I kept looking fro a crack.
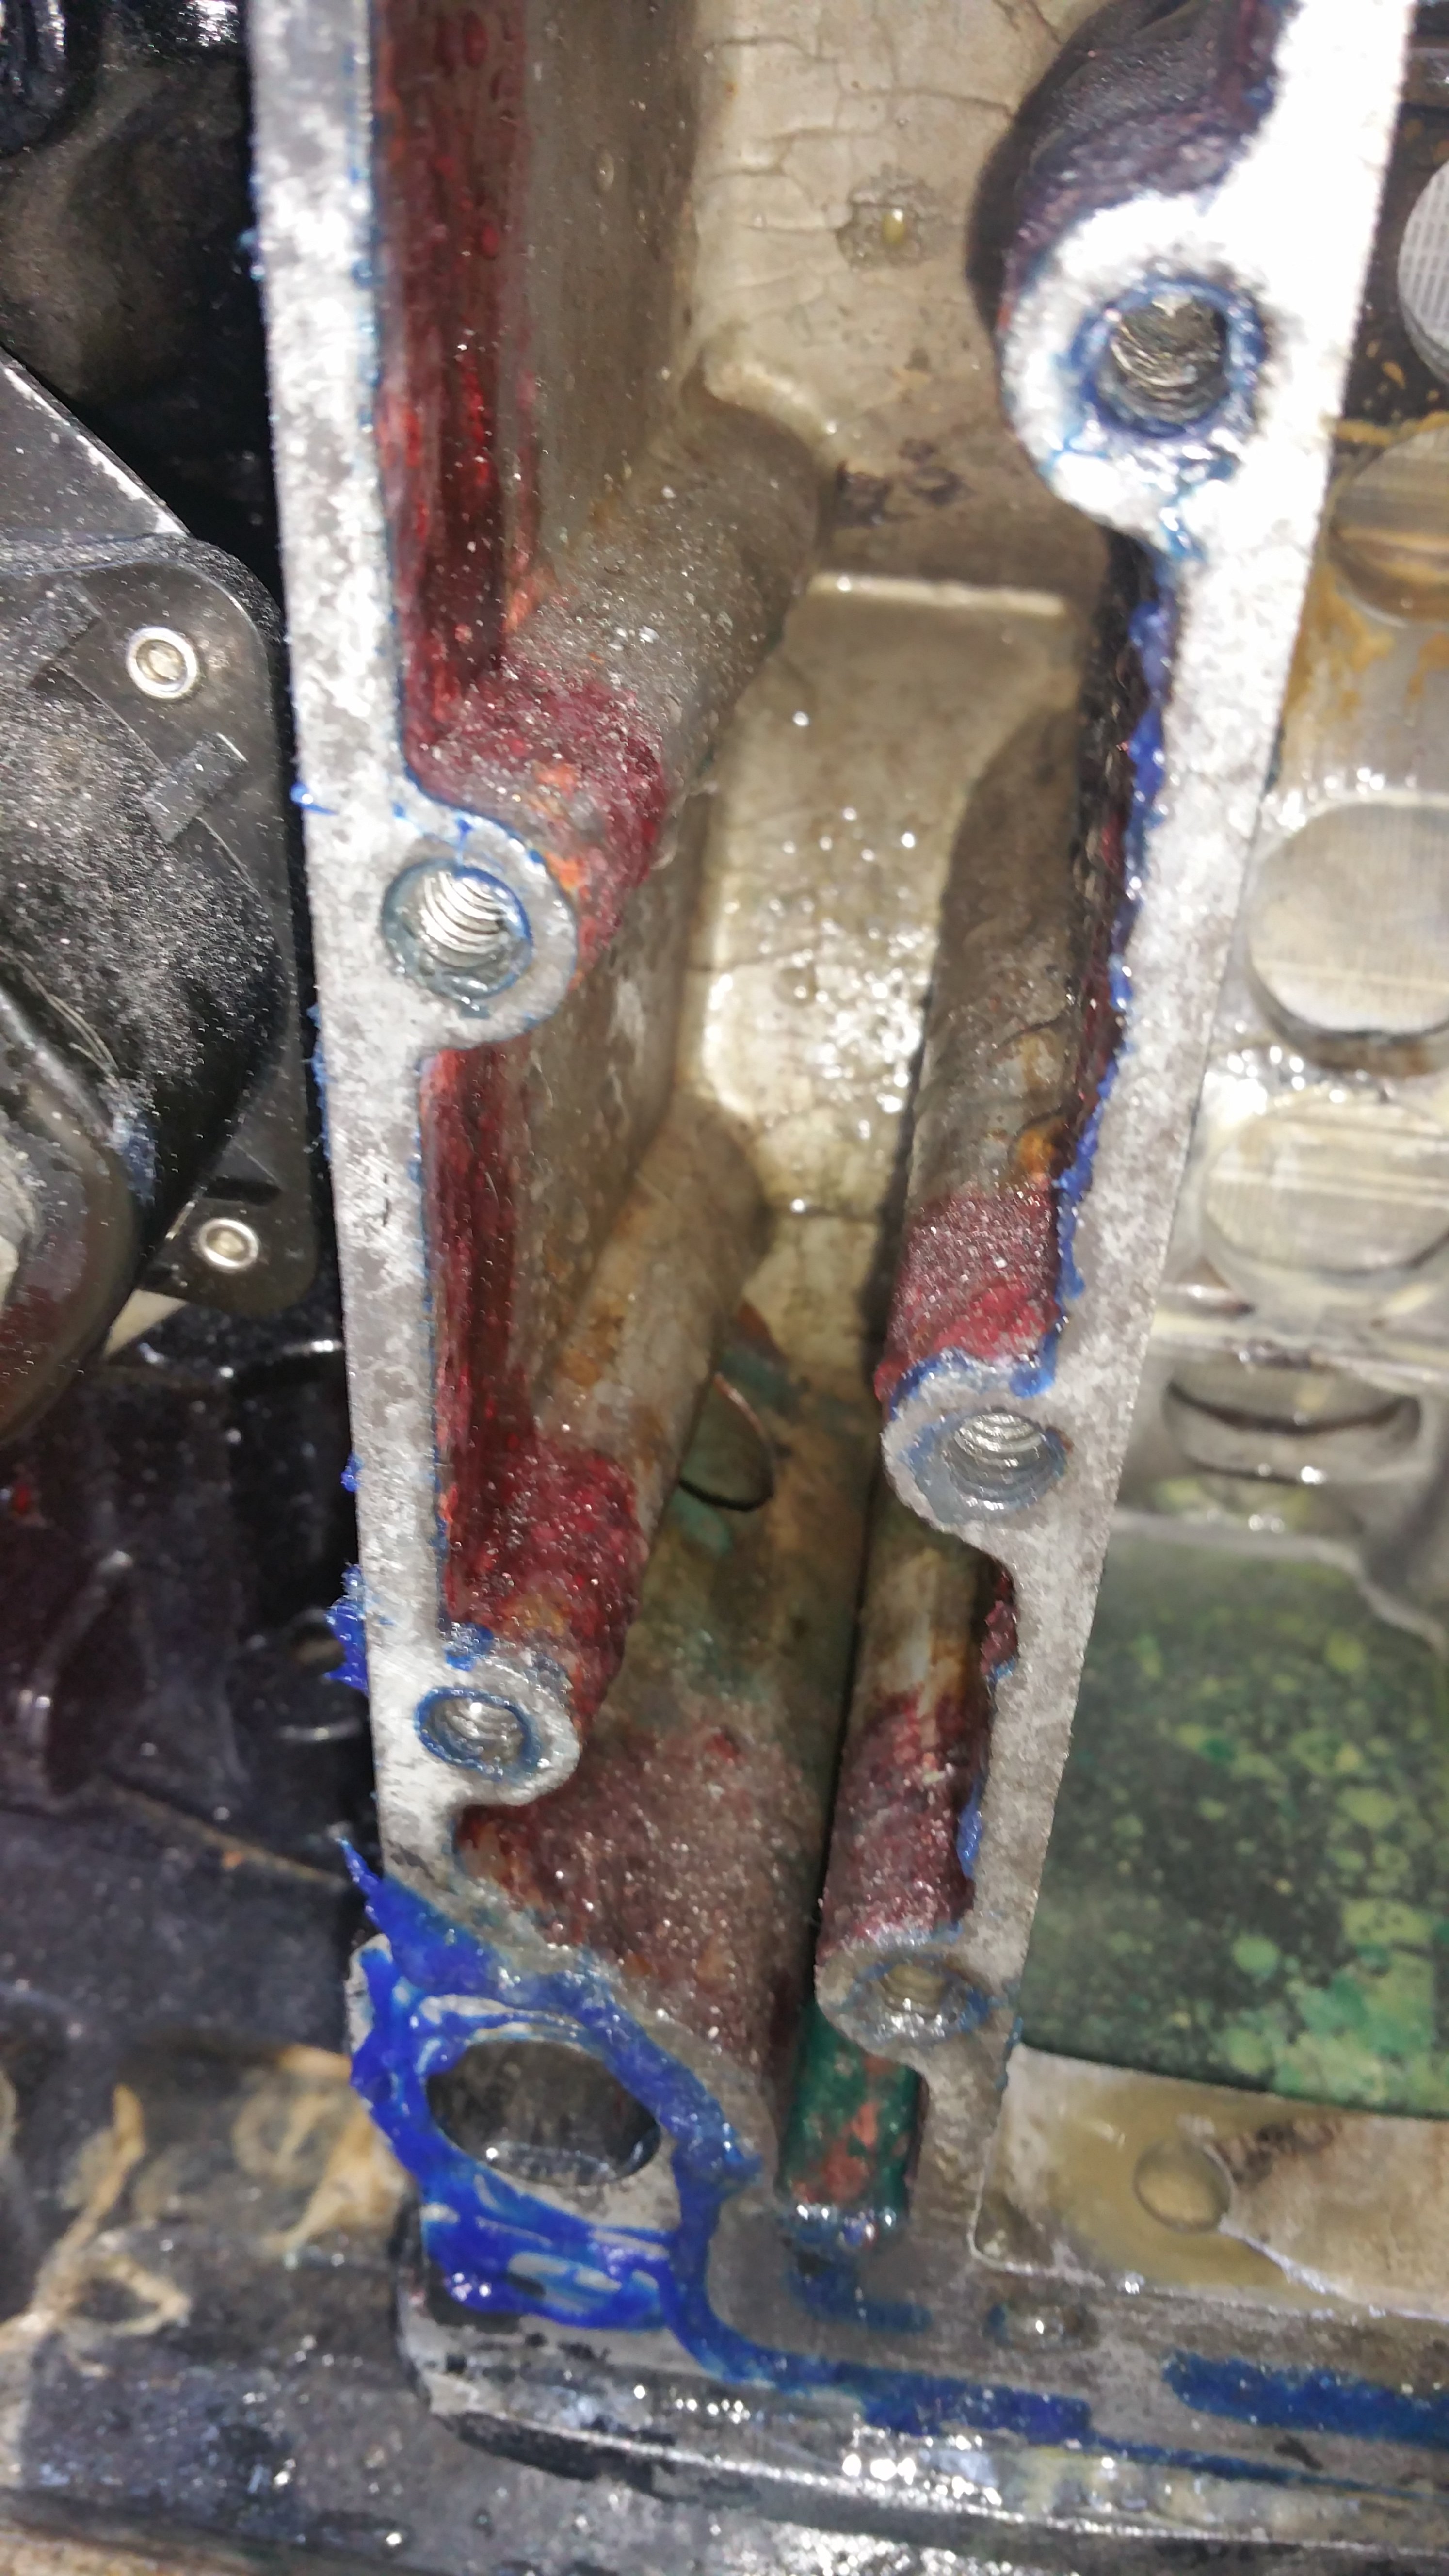
I noticed this hole and I thought it was sealed.
I am talking about the one in the back of the passage going down.
Notice that there is oily water in the bottom of the exhaust log.
I had vacuumed everything out of there and put a plastic tube in and poured water into the hole and out it came.
I saw a little bit of gasket material in the left side and could feel a gap as well.
I put an air hose on the tube and blew bubbles
So maybe the block is not cracked.
I assume that the base gasket is torn in this area and the power head has to come off, but hopefully the engine is OK if this "little" problem is fixed.
Unon closer examination and thought I believe that that hole is not supposed to be there on the Sport Jet installation and this is a Force L drive block forced into service.
The gasket could never have sealed since there is over an 1/8 " gap under the sides of the exhaust chamber.
The hole is drilled all the way through and looking at a picture of the L drive base there is hole matching for a water hose, perhaps a pressure bypass, but I don;t know.
There is also an exhaust manifold "stuffer not there, but I have never seen one to know what it would look like.
I have a plan since I don't think replacing the base gasket will help anything anyway since there is no sealing surface for it to go between.
I think I will press JB Weld into service to fill the hole and seal the area where the stuffer might just go as well.
Does anyone have access to a block to look at this area to see if there is a hole where this is?
I have washed out the bottom of the manifold in the exhaust chamber and perhaps I can figure out what needs to be done
The water IS definitely getting into the cylinders from the exhaust, but the water is getting into the exhaust from the hole in the bottom of the left side of the water Jacket down through that hole and the unsealed almost 1/4" gap under the aide wall of the exhaust manifold.
I think that this is not the correct block for this application and the hole that fed the pressure regulator "I think" and mates with the L jet base to a hose that goes "somewhere"
I think that since the paint is not burned on the bottom perhaps the answer would be to pour epoxy into the void to seal the chamber. Next I will fill the hole with some JB Weld to keep the cooling water in the block and out of the exhaust.
Or I could pull the power head and tap that pesky hole and plug it.
The epoxy is easier, the plug is, perhaps, more professional.
OK, I stuffed some backer rods under the plate through the gap so that maybe the JB Weld would stay in the hole and not fill the whole bottom.
I think that this hole is an artifact of other applications. Some of the earlier engines had a stuffing (what ever that is) and the later ones did not.
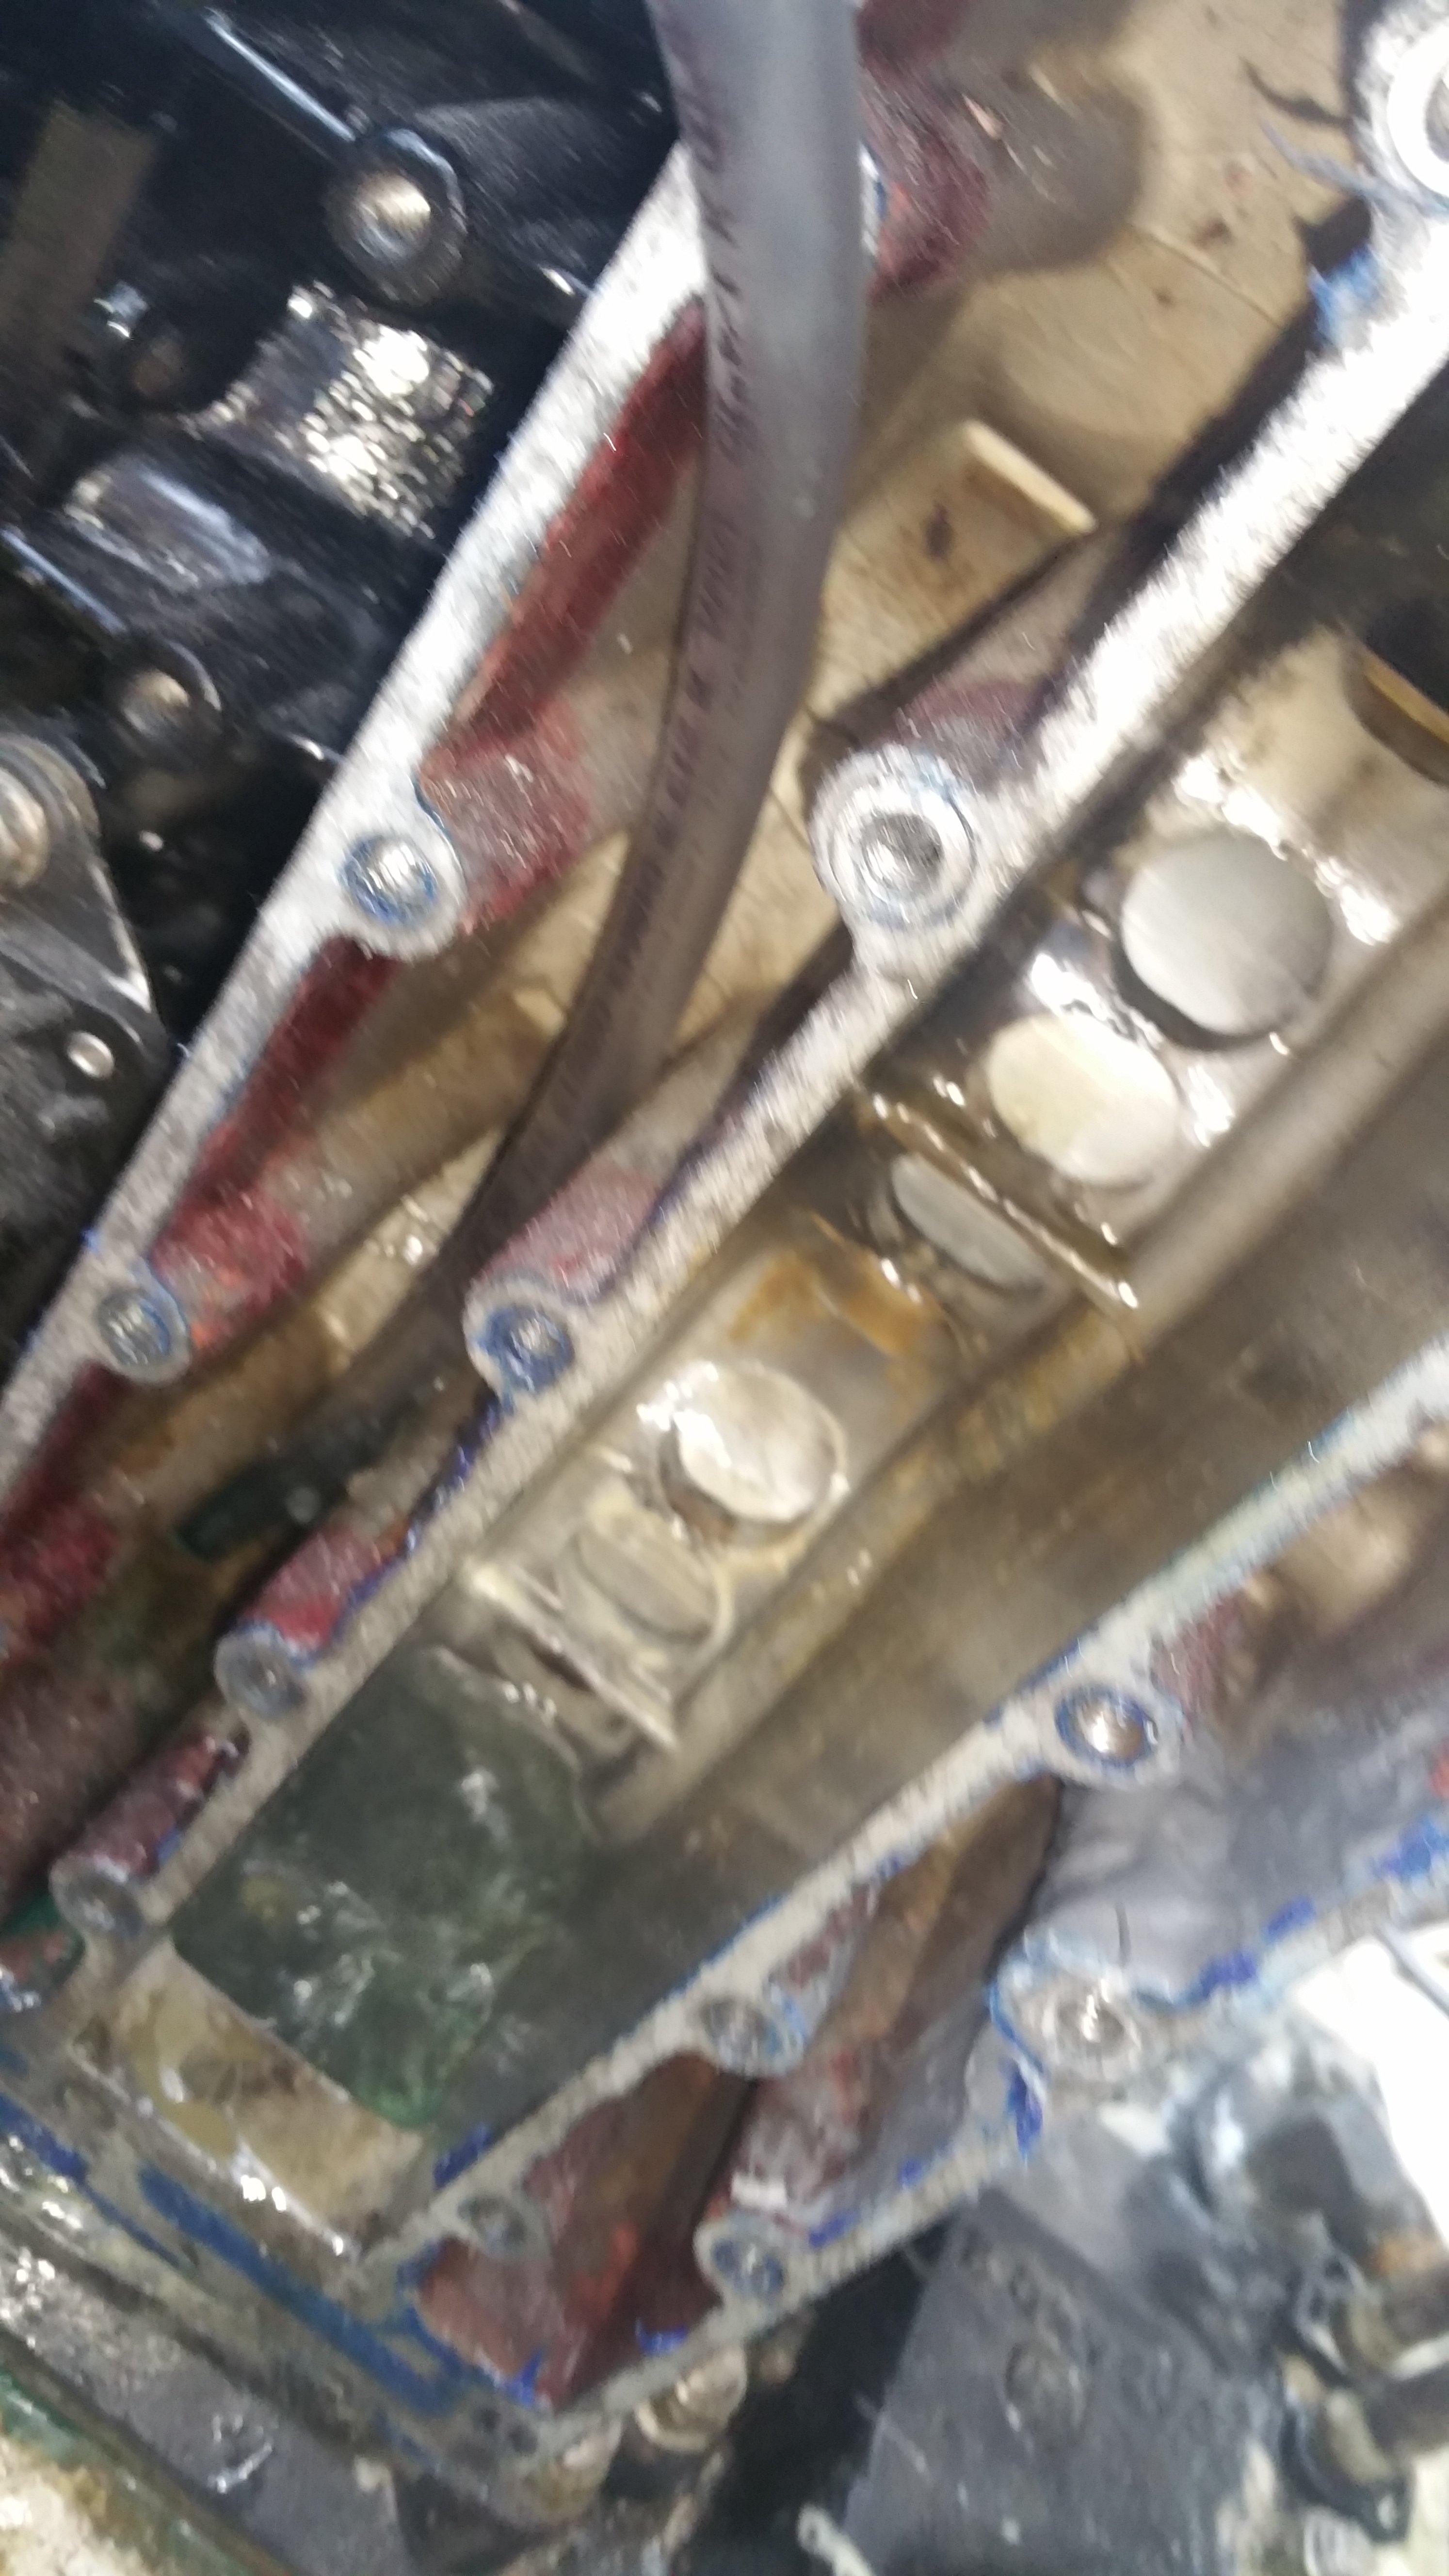
I finally was able to find some pictures that give me an idea why this hole is there.
On the L drive this hole in the water jacket is fed from the water pump on the foot and uses a pressure regulator to bypass the excess. This inlet is not necessary or desired on the sport jet engine. This would be blinded on the adapter and a gasket would seal it, but this one either was torn or for some reason failed to seal.
I do know that water would happily flow from the water jacket into the exhaust manifold.
Since the JB weld is supposed to the good to 550*F this should work in the water jacket (I hope).
Tomorrow I am going to reassemble the engine using the old gaskets just to check for the water leaks like today.
If the system keeps water out of the cylinders I will buy some more gaskets and try again.
Good News!
Plugging the big hole in the bottom of the water jacket has fixed my problem!
I also made a closure of PC-7 epoxy putty on the left (forward) side of the bottom of the exhaust chamber.
Where I filled all three cylinders in minutes before with 1 1/2 PSI on the flush adapter I ran 7 psi for 30 minutes with not only no water in the cylinders, but none in the exhaust log.
I checked the exhaust log by pulling the bottom forward bolt which is drilled all the way through into the chamber so a collection here would drain out.
Later I am going to put the plugs back in and start the engine.
I need to check the timing and calibration first but I am very hopeful!
My guess is that this hole, which is the cooling water inlet to the engine in the L-drive and outboards could be the problem for other Sport Jet users if the gasket is damaged.
In my case (I am guessing here) I think that there are different gaskets for different applications and years and the mix of an older engine on a 1996 base the correct gasket was not used. Or the gasket was damaged on Assembly.
Either way if I had the engine off (of and Force rig) I would counter-bore this hole and install an O-ring!
If I was putting together a Sport Jet engine I would tap it and install a stainless plug. (I think you would know since the Sport Jet crank is specific to this engine.)
I think filling this hole with JB Weld has solved my problem and I will try running the engine later.
Since the hole is in the water jacket and the temp range of JB Weld is to 550*F I think it will be OK in this application.
The PC-7 is good to 200*F, but it is below the exhaust guide so I think it will be OK too, but if it doesn't then I don't think it will matter either.
I think the base gasket is more important than many realize, especially around the big hole in the water jacket!
OK Set the timing and hooked up everything and put the boat in the water.
Ran the boat at the dock and checked the timing. I had set the motor off timing to 32* at WOT and could not quite get the idle right and also get the WOT.
We ran the boat close to the launching ramp and dock (Upwind and close!).
We could not get over 4100 rpm by the tach and the engine bogged and quit due to fuel starvation from the built in tank with the water separator filter (10 Micron).
I had brought along another portable tank and it ran better, but still after running awhile bogged down, but did not quit.
So so far the epoxy plug in the hole is keeping the water out of the cylinders!
WIN!
Ordered an electric priming pump and a kit for the Fuel pump this afternoon.
It seems that this "Rebuilt" motor has a later model fuel pump than what shows in the manual a square one instead of the figure 8.
If we can get the boat to 5000+ Rpm we will have a game!
It does get up on a plane fairly quickly but just doesn't rev like it should.
with all 90 hp on tap the Hobie Fisherman is supposed to be able to run close to 40 MPH.
I also put the Cobra Jet rudders on and the thing steers good, but I don't have a reference to judge against.
Turning the flywheel by hand with the plugs in it seems to have good compression and equal on all cylinders.
When I get a chance I'll do a compression check again after I have run it a little more.
One step at a time.
I know this is a old post but I'm trying to figure where the hole is you plugged. I just installed a flush kit and removed the center section of the thermostat and put the ring back in to restrict the water flow some what flushed the engine with low water pressure and it filled a bottom cylinder, if you could tell me how that worked out for you I will plug the hole, ticked me off!
If your problem is water getting into the cylinders then the suggestion would be different than leaking at the manifold.
In case you are talking about water leaking from the water side of the manifold into the exhaust and getting into the cylinders then the hole you are looking for is in the pictures. Look at the picture where the exhaust is shown and look at the bottom inside of the manifold water side.
The next picture is of the bottom of the block and you can see the hole where the water would come up from the pump in the foot. In this picture it has been filled with JB Weld.
Sealing the hole stopped water from getting into the cylinders. Water leaks from that hole to the exhaust side and builds up to the level where the elbow in the exhaust lets it run out the exhaust port and into the cylinders. Since I have plugged that hole I have had no problem with water getting into the engine cylinders. Figuring that out along with the problems it caused cost me a lot of time and $$$$.
A problem is that often if the engine is removed the wrong gasket is supplied and installed and the port is not sealed around the hole. If the hole is sealed then the gasket will no longer matter and you don't have to pull the engine and change it. I used a popsicle stick to dab the hole full of JB weld after cleaning it as good as I could.

")