• Welcome to Jetboaters.net!

    We are delighted you have found your way to the best Jet Boaters Forum on the internet! Please consider Signing Up so that you can enjoy all the features and offers on the forum. We have members with boats from all the major manufacturers including Yamaha, Seadoo, Scarab and Chaparral. We don't email you SPAM, and the site is totally non-commercial. So what's to lose? IT IS FREE!

    Membership allows you to ask questions (no matter how mundane), meet up with other jet boaters, see full images (not just thumbnails), browse the member map and qualifies you for members only discounts offered by vendors who run specials for our members only! (It also gets rid of this banner!)

    free hit counter

Surge break wear pad

ncnmra

Jetboaters Commander
Messages
370
Reaction score
230
Points
182
Location
Ontario, Canada
Boat Make
Yamaha
Year
2008
Boat Model
X
Boat Length
21
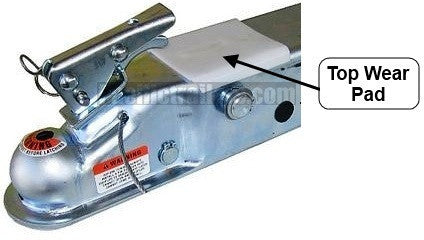
The wear pad on my MFI trailer has disintegrated. Getting these parts here in Canada is a huge pain, I may have to fashion something myself. Any hints or ideas would be great.

I'm tempted to just change out the entire A-75 inner member, but before I do that, has anyone changed out the wear pad? Do you have to remove the entire inner member to do so?
 

Beachbummer

Jetboaters Admiral
Messages
3,963
Reaction score
2,881
Points
332
Location
Houston TX
Boat Make
Yamaha
Year
2008
Boat Model
SX
Boat Length
23
There is a kia or hyunday model that shares the pad so you can buy it at the auto parts. I need to find it....
 

Beachbummer

Jetboaters Admiral
Messages
3,963
Reaction score
2,881
Points
332
Location
Houston TX
Boat Make
Yamaha
Year
2008
Boat Model
SX
Boat Length
23

ncnmra

Jetboaters Commander
Messages
370
Reaction score
230
Points
182
Location
Ontario, Canada
Boat Make
Yamaha
Year
2008
Boat Model
X
Boat Length
21
Thanks for the reply. However, I'm not looking for the break pads, but plastic the wear pad that allows the surge brake actuator to slide:

Mine has broken off. I'm just wondering if you have to take the entire inner member out to replace it.
 

Beachbummer

Jetboaters Admiral
Messages
3,963
Reaction score
2,881
Points
332
Location
Houston TX
Boat Make
Yamaha
Year
2008
Boat Model
SX
Boat Length
23
ahhh.... Sorry, i see you issue.

I believe you need to take the c-clips of the pin and push it thru, then the whole thing slides out. It's not hard as long as you have a circlip removing tool... Those are big and tight.
 

ncnmra

Jetboaters Commander
Messages
370
Reaction score
230
Points
182
Location
Ontario, Canada
Boat Make
Yamaha
Year
2008
Boat Model
X
Boat Length
21
Thanks! I have some C-clip pliers, will give it a go. Do you know if you have to disconnect any brake lines, or can the inner member be removed without disconnecting anything?
 

Beachbummer

Jetboaters Admiral
Messages
3,963
Reaction score
2,881
Points
332
Location
Houston TX
Boat Make
Yamaha
Year
2008
Boat Model
SX
Boat Length
23
I think there is enough play to get to the pad, but it was a few years ago, so I'm speculating.
 

Seadeals

Jetboaters Admiral
Messages
1,273
Reaction score
1,498
Points
262
Location
Greenville, South Carolina
Boat Make
Yamaha
Year
2006
Boat Model
SX
Boat Length
21
So that is on top of the coupler section beneath the fixed outer sleeve that is welded to the rest of the trailer? I never noticed it was/is under there.
95427816-E377-4360-A940-9F87F2419301.jpeg
 

suke

Jetboaters Admiral
Messages
2,103
Reaction score
2,608
Points
267
Location
Holly Springs, NC
Boat Make
Yamaha
Year
2020
Boat Model
X
Boat Length
21

ncnmra

Jetboaters Commander
Messages
370
Reaction score
230
Points
182
Location
Ontario, Canada
Boat Make
Yamaha
Year
2008
Boat Model
X
Boat Length
21
For the time being I fashioned a slide plate using a thin plastic sheet, with a nut epoxied to it that fits into the little hole on the top of the actuator. Getting the actuator out was no problem, so long as you have the slip ring pliers.

However, reassembling it was a HUGE pain, primarily because I didn't want to disconnect the brake line. The top and bottom parts of the slide peice fit together very precisely especially with all of the other components in there (rollers, shocks, rods, etc). There is a very specific order to how it needs to go back together, so if you do this job, take it very slowly, especially when disassembling, so you can see how it is all supposed to fit together after the fact.

Additionally, I found that my safety cable had been completely melted due to arcing of some sort. It was sheered off completely, so was basically not attached to the safety clip!

I will probably replace the entire actuator this year. @suke & @Seadeals : do you guys have brakes on both axles? My trailer has brakes only on the rear axle....I've seen the newer 21' boats (especially in Canada) have tandem brakes. There is a part number difference for the single and dual axle actuators.

When I order, I will probably ship it to Port Huron and bring it across myself. UPS charges us egregious fees to import things here.
 

ncnmra

Jetboaters Commander
Messages
370
Reaction score
230
Points
182
Location
Ontario, Canada
Boat Make
Yamaha
Year
2008
Boat Model
X
Boat Length
21
@Seadeals : yup, there is a plastic "wear pad" that helps the actuator slide back/forth. It will work without, but it makes an awful lot of creaking when it isn't there. It is a tiny part, but quite important.

97875
 

suke

Jetboaters Admiral
Messages
2,103
Reaction score
2,608
Points
267
Location
Holly Springs, NC
Boat Make
Yamaha
Year
2020
Boat Model
X
Boat Length
21
For the time being I fashioned a slide plate using a thin plastic sheet, with a nut epoxied to it that fits into the little hole on the top of the actuator. Getting the actuator out was no problem, so long as you have the slip ring pliers.

However, reassembling it was a HUGE pain, primarily because I didn't want to disconnect the brake line. The top and bottom parts of the slide peice fit together very precisely especially with all of the other components in there (rollers, shocks, rods, etc). There is a very specific order to how it needs to go back together, so if you do this job, take it very slowly, especially when disassembling, so you can see how it is all supposed to fit together after the fact.

Additionally, I found that my safety cable had been completely melted due to arcing of some sort. It was sheered off completely, so was basically not attached to the safety clip!

I will probably replace the entire actuator this year. @suke & @Seadeals : do you guys have brakes on both axles? My trailer has brakes only on the rear axle....I've seen the newer 21' boats (especially in Canada) have tandem brakes. There is a part number difference for the single and dual axle actuators.

When I order, I will probably ship it to Port Huron and bring it across myself. UPS charges us egregious fees to import things here.
Mine is single axle brakes. I replaced everything brake wise on my trailer over the winter(lines, hubs/bearings, calipers, pads, slide/actuator).
 

ncnmra

Jetboaters Commander
Messages
370
Reaction score
230
Points
182
Location
Ontario, Canada
Boat Make
Yamaha
Year
2008
Boat Model
X
Boat Length
21
@suke, did you replace with the #47723 (single brake) or #47724 (dual brake) actuator?

Does anyone know the difference?

I'm about to order everything from Pacific Trailer. I'm wondering if I ever decide to put brakes on my front axle, if it is possible to re-configure the actuator?
 

suke

Jetboaters Admiral
Messages
2,103
Reaction score
2,608
Points
267
Location
Holly Springs, NC
Boat Make
Yamaha
Year
2020
Boat Model
X
Boat Length
21
@suke, did you replace with the #47723 (single brake) or #47724 (dual brake) actuator?

Does anyone know the difference?

I'm about to order everything from Pacific Trailer. I'm wondering if I ever decide to put brakes on my front axle, if it is possible to re-configure the actuator?
This is what I bought and where I bought it from.
 

ncnmra

Jetboaters Commander
Messages
370
Reaction score
230
Points
182
Location
Ontario, Canada
Boat Make
Yamaha
Year
2008
Boat Model
X
Boat Length
21
So I replaced my actuator, but it was a huge pain. At first, the new one wasn't going in all the way, it was a tight fit. I had to undo everything and used a drill with metal brush attachment to get rid of all the old rust, etc. It went in better, but still a bit tighter than I expected. I'm hoping that after a couple trips it will wear itself in. I also had a bit of an issue trying to bleed the brakes using a vacuum bleeder. I had never used one before so I'm not sure if I was doing something wrong. I ended up bleeding using the actuator/screwdriver method as in the manual.
 

Seadeals

Jetboaters Admiral
Messages
1,273
Reaction score
1,498
Points
262
Location
Greenville, South Carolina
Boat Make
Yamaha
Year
2006
Boat Model
SX
Boat Length
21
I am sorry you had trouble but glad you got it done. I am now convinced I definitely need to give mine some attention. I am not sure I will do the whole assembly or do the research on piece parts to replace the slide damping (not much rust). I am having problems with the trailer locking brakes when I have to head down a slope or stop at a stop sign between the lot and the ramp. With the weight of the boat it behaves fine; but having the trailer lock up and do the “(Trailer) Buddy Hop” on the way to load is embarrassing.
 

Recoveringfiberglassaddic

Jet Boat Addict
Messages
139
Reaction score
148
Points
87
Location
Boise, ID
Boat Make
Other
Year
1995
Boat Model
Other
Boat Length
Other
I'm late to the party on this thread. Boatmate trailers out of Tennessee has a great parts site with a lot of goodies. They use surge brakes so have lots of actuator parts, and use dexter/UFP stuff like everyone else so brakes and running gear parts as well.


I replace a lot of actuators completely as many times the master brings in water and dusts everything out. A handy trick (that's probably not super cost effective for a guy doing the job once) is to buy an extra set of the pins that go thru the channel and get c-clipped to retain them. You grind the pins down so that as you slide the old pins out the ground down pin holds the actuator and those PITA plastic bushings on either side of the assembly. Then once your release the brake line you can slide out the whole actuator as a complete assembly. Reverse the process to go in with the new one. The pins are especially handy for replacing breakaway cables that have been pulled as you can flip the actuator over on the bench and keep everything together.

I bleed with pressure rather than vacuum. Theres a rig I have at the shop that I will take a pic of tomorrow for anyone that likes to maintain their trailers.
 
Top