• Welcome to Jetboaters.net!

    We are delighted you have found your way to the best Jet Boaters Forum on the internet! Please consider Signing Up so that you can enjoy all the features and offers on the forum. We have members with boats from all the major manufacturers including Yamaha, Seadoo, Scarab and Chaparral. We don't email you SPAM, and the site is totally non-commercial. So what's to lose? IT IS FREE!

    Membership allows you to ask questions (no matter how mundane), meet up with other jet boaters, see full images (not just thumbnails), browse the member map and qualifies you for members only discounts offered by vendors who run specials for our members only! (It also gets rid of this banner!)

    free hit counter

Winter/Spring Mods

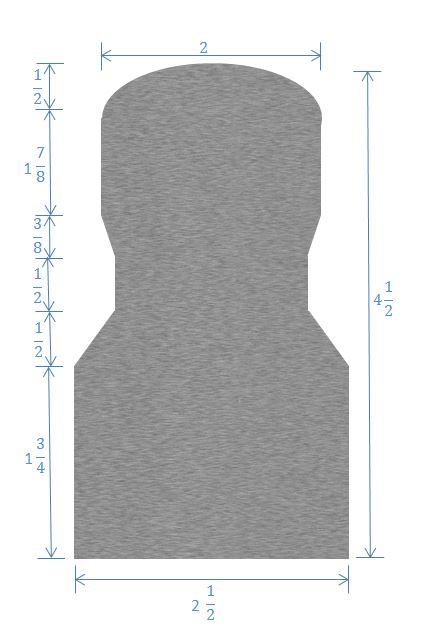
(1ea) Schedule 40, 2-1/2" Spigot x 2" Socket UPC-054211241608: "This is the PVC that goes on the bottom and has the hole drilled in each side for the rope, this does not actually fit over the lower part of the tow point it fits snug against the bevel, hole placement is critical for alignment"
(1ea) 2" Schedule 40 PVC Pipe: "Top piece slides over top of tow point glued into in the Spigot/Socket above"
(1ea) 2" Test Cap UPC-1194205287: "Piece glued into top with the bolt through center for camera mount"
(1ea) 2" PVC Pipe Hanger UPC-8018313150: "The arm glued around the pipe"
(1ea) Hairpin Cotter Pin: "Clipped over the rope first then through the hole in the end of the arm, the hole is already there"

Note: hard to see in the pictures is a filed notch in the end of the arm so the Cotter Pin stay pointing forward, this take any slop out of the tracking.

Below is a diagram of the tow point I made for measurements.


@Russ C That rocks!!
You should sell these or at least sell the idea to someone.
 
@Master-Spud

Generally a perko type switch with two 12v batteries connected to a 2 bank smart charger is ok. Ideally you want that perko to be off. When on, it puts the batteries in parallel and they can equalize. Then the charger cannot get an optimal charge in.

Now if one battery is an AGM and the other a lead acid OR one battery is one group size and the other is a different group size, these can be problems. Not only for the equalization, but it will stress the charger. AGM charge profiles are usually different from lead acid, so you could have over/under charge issues.

Let me know if I can help more.
thanks!
 
2 more things added to the list that I finally thought of, ordered replacment forks for the wakeboard racks, switched from wakeboard wakeboard, to wakeboard surfboard. Trying just one side first but will most liekly do both. Picked them up from http://www.diywake.com/ from what I've read they should be a drop in replacement for the stock forks on the 212x.

Next on the list is installing a door on the drivers console. Drives me crazy there is no easy way to reach the dash on the 212x. But I'll have to wait until I get my boat out of storage to take some measurements to see how big of door I can actually fit in there. Sadly that may be another couple of months. Any 2012-2015 212x owners want to do me a favor and take some measurements? Basically looking to do what @Joe Covelli in this tread to give you an idea what measurements I'm looking for.

https://jetboaters.net/threads/sx192-add-access-hatch-to-the-helm-compartment.2869/
 
Next on the list is installing a door on the drivers console. Drives me crazy there is no easy way to reach the dash on the 212x. But I'll have to wait until I get my boat out of storage to take some measurements to see how big of door I can actually fit in there. Sadly that may be another couple of months. Any 2012-2015 212x owners want to do me a favor and take some measurements?

I don't know if it's the same on the 212x, but on the ar210, there's a plastic bracket there that is right on the middle of the possible spot where an access door can go:

upload_2015-3-7_22-33-52.png

This bracket holds the left storage door to create a wind dam. This greatly limits the size of a possible access door that can be used there to where it may not be useable.
 
Bah you are totally right... forgot all about that thing! Well guess that one will be getting removed off the mod list, that makes me sad! guess it's crawling into the bow storage for my PP install
 
Tha
Regarding EZ locks, the nice thing about them is that they all but eliminate the possibility of user error when installing the plugs because they make it obvious when you have the plugs seated and the dogs fully engaged. For $35, it was an easy decision for me.
I second that,, I think of EZ locks as cheap insurance. I don't plan on crashing or having an issue, but yet it can happen so I have insurance just in case.. $35 insurance in the name of EZ locks takes care of the chance of a plug blow out.. there is no way they can come out, no matter what. A one time cost, a easy install with one small hole drilled in each plug and done.
That is quite the impressive list of mods..I am jealous...
 
Well went to the boat show this weekend and managed to get a deal on some Rev 8's and an HT-6 amp! Now to just find an installer I trust to do the work that won't kill me install price. From anyone's previous experience what's a reasonable install cost for 2 amps, towers and a sub?
 
I believe mine quoted me $525 for labor, but that was also with buying the equipment from him.
 
So did some sorting out of all my mods I've bought but sitting in my garage waiting to be installed. Just wondering if I'm missing anything that I should really be considering.

Already purchased and installed:
1x Full SeaDek package
1x Snap in bow/Cockpit cover
1x Ramp-n-Clamp
1x Boat Buckles
1x Trailer Rock guard

Already purchased and delievered:
1x Thrust Vectors XL
1x Perfect Pass
1x Wetsounds Syn 6
1x Wetsounds SW-10FA
1x Dragonfly 7
1x AO Cooler Stow-N-Go
2x Blue Sea Systems 2315 MiniBus 100 Ampere Common BusBar (4 x 10-32 Stud Terminal with Cover)
1x Megaware KeelGuard 102-8B Black Keel Guard for 21-22-Feet Boat
1x Megaware KeelGuard 02638 5-3/4-Inch X 4 -1/2-Inch SS Scuff Buster
1x Wetsounds HT6
1x Wetsounds Rev8
1x 15 amp 12v outlet


Ordered but awaiting dellivery:
1x Ronix Eight.3 Telescoping 800lbs bag
1x Ronix Eight.3 Telescoping 400lbs bag
1x Ronix Eight.3 3700GPH pump
1x Blue Sea Systems 5511E Dual Circuit Battery Switch Plus
1x Blue Sea Systems 7610 120 Amp SI Series Automatic Charging Relay
1x CE Smith 27760 60" Guide-On Posts With LED Light
1x ProMariner 43020 Prosport 20 AMP 2 Bank Battery Charger 12/24 Volt
1x Blue Sea Systems 5029 - Fuse Block with Cover - 12 Circuit
1x Wakeboard/Wakesurf combo forks

Not Yet ordered but on the list:
2x Registration numbers decal
1x House battery (size and type TBD recommendations welcome)
1x Wake Wedge (awaiting 212x/TV-XL fix)


Think that is all I have ordered/planned. The stereo will be installed professionally so I'm not worried about wiring and such for that and the charging relay system(which they said they can also install)

So to all you other mod crazy people, help me spend my money, what else am I missing that I shoudl really have! Think I've hit most of the common/key mods for the yamaha's. Do I need to find some guide post pads for the CE Smith's? Any good recommendations as to were I can find some?

Just verifying - if I purchase the full Seadek kit, will I have to remove all those snaps on the deck and fill the holes left behind?
 
That is correct, all snaps will be removed, the holes will need to be filled with something like 3M 5200 caulk, or life caulk. These holes should be covered by the mats.
 
Great.....now I HAVE to buy a GoPro after seeing that mount....
But IM ok with that! Just dont tell the wife.
 
Well finally was able to pull the boat out and get some of the backlog of mods done to the boat. Perfect pass installed (sure I'll need to do a bunch of throttle cable adjustments) thrust vectors and keel guard on. Drilled and mounted the 12v plug for the ballast pump but still need to wire it. But I chickened out on the dragonfly install, I'll let the dealer drill the holes lol. IMG_20150330_145103664.jpg IMG_20150330_145103664.jpg IMG_20150330_141536832_HDR.jpg IMG_20150330_125936723_HDR.jpg IMG_20150330_125747136_HDR.jpg
 
Well despite my wiring woes... I snapped a few pictures if the install for your viewing pleasure. Only thing I regret is not going with the normal grill style for the sub... I was worried someone might stick a foot through it so I got a little more protection. But doesn't blend as well as I was hoping. Wiring getting fixed tomorrow then should be good to go.

IMG_20150422_151942820_HDR.jpg
IMG_20150422_151759350.jpg IMG_20150422_151809924.jpg IMG_20150422_151924196_HDR.jpg IMG_20150422_151909300.jpg IMG_20150422_152106858_HDR.jpg IMG_20150422_152123591_HDR.jpg IMG_20150422_152131120.jpg
 
Last edited:
Get a can of silver spray paint for the sub grill.
 
Back
Top