CrankyGypsy
Jetboaters Captain
- Messages
- 352
- Reaction score
- 297
- Points
- 217
- Location
- Tampa, FL 33615
- Boat Make
- SeaDoo
- Year
- 2008
- Boat Model
- Challenger
- Boat Length
- 18
REMOVING THE WET CORE
i've seen the loose table base mentioned and pictured on here several times. some of them even showing a "fix" for the problem. here is the cause:
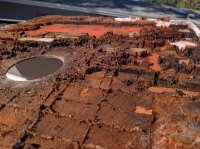
i estimate that at least ten square feet of wood core has either rotted away or been water damaged. the main source of intrusion is the cut out for the table base. secondary points seem to be where a few of the carpet snaps were once located. so, the plan i've come up with is to use an access area to slide coring into the deeper recesses. i'll use some sort of penetrating sealer (ex: Smith's CPES) to strengthen any wood that is still intact and out of reach. then fill gaps and bond layers with a filler-type resin.
in the end, i did not use a penetrating epoxy. instead i replaced the bad sections of wood, which was more economical and practical for my situation.
Sept 17, 2016: REMOVING THE TABLE BASE. the best strategy would be to cut the entire floor off - not gonna do that. that opens up more issues with seat post removal*, limited work area, and structural support of the repair. i want to leave the backside of the floor intact to support my repair. i shimmed the base with wood to prevent the screws from spinning and drilled them out with a bit just big enough to cause the heads to pop off once i got deep enough - this bit was somewhere in the realm of 5/32". i saw that Geoff Cooper used a cutting wheel to remove his.
*on Nov 1 i discovered the seat is not mounted like the table base, as it does not have bolts that go through the floor to nuts. instead, the floor has a square metal plate sandwiched below it rather than wood. it appears, via the parts fiche, this plate is tapped - so removal/install seems simple (though i imagine an impact screwdriver would be needed ...at the very least). i still have no desire to remove that much floor as i may not be able to pry the top layer from the good core without damaging it. the plate is 12-13" square and does not appear to be aluminum or stainless.
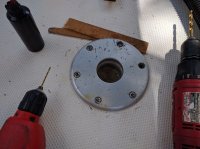
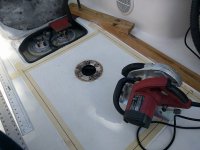
Sept 20: CUTTING THE ACCESS HOLE. tapping the floor with a long piece of metal rod and listening to the sound, i knew the damaged area was fairly large. i chose the cut out (access area) with the plan to cover the repair lines with traction mat. i laid done some masking tape and drew a line 1" from the smooth channel between the traction areas. i used a 1x3 secured with c-clamps as a guide for my circular saw. the blade i used was a new, cheapo 7.25" Irwin Classic 140T (the more teeth, the better) mounted backwards to prevent chipping. i set it at a depth of at least 1/4". the floor is a sandwich: there's the actual gelcoated/topside floor (referred to hereafter as the "floor"), the wood core (referred to as the "core/coring"), and the bottom most part that sandwiches the underside of the coring (referred to as the "backing"). the backing is a thin sheet of fiberglass presumably there to seal water from the backside of the wood. i was careful to leave the backing intact to support my repairs.
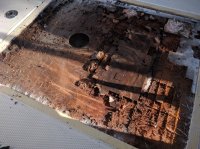
i used a metal paint scraper to carefully remove most of the rotted wood off the backing. there were some chunks still mostly intact that required the use of a limb saw (electric chainsaw) to break them up enough so i could pry it from the backing. there are a lot of naysayers and pessimists when it comes to penetrating sealers. as is always the case with anything, it seems that prep is the determining factor of a positive outcome. the key to this repair will be removing the worst areas of wood and thoroughly drying out what is left. from what i've read, the Smith's brand is the most highly regarded, but even the best isn't going to work on wet wood. i accepted that i must be patient in letting the boat sit for weeks, or even months, to dry.
update: i ended up cutting most of the deck off to ensure a proper repair. i am going to leave everything that i tried as a reference to what doesn't work.
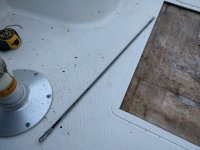
Nov 10: REMOVING THE DAMAGE. i have limited my access area due to not wanting to cut out several areas or the entire floor. this is despite several more square feet of core missing. it has been nearly 2 months since i cut the top of the floor off yet some deeper areas are still not dry even with the initial use of fans (no heat) and dryer weather. i dug around my garage and found an old piece of chrome trim that once fit onto the rain channel of a 1994 Jeep Cherokee (the dimensions are basically a 3/8" by 1/2" u-channel). i cut a length of about 2-3 feet and pushed it in under the floor to probe the damage. pushing it into the wood and pulling it back out would give me a "core sample" showing if the area was wet or dry there. once i got the approximate horizontal depths of the damage, i used this tool to scrape and chip the weaker areas out. then i used an air compressor to blow this debris out where i could vacuum it up - this was done for two reasons: it will allow me to slide in new coring for the repair; and will allow for more airflow to help dry out the deeper areas of damage. this is a fairly tedious and long process. the next photo also shows the additional holes near the seat post i later used to help blow out the core debris.
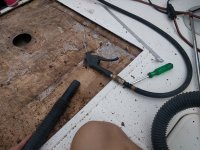
there are points that are very deep, so i used the probe to measure and then mark the floor with a Sharpie. i drilled a few 1/4" holes at the deeper areas. at these holes, i could use compressed air to help blow the debris out to the access area. these are small holes that will be easily repaired and later hidden by the traction mats. still being careful not to drill out the backing, i also did some "core sampling" by using this bit to widen a few of the carpet snap holes. i found a few wet spots and hopefully these larger holes will help them dry quicker. i've read that introducing acetone into these holes can accelerate drying, but i'm not going to do that ...yet.
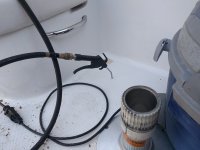
Nov 11: DRYING. i hadn't been using the fans for a month as i mistakenly assumed the weather was dry enough to do the job without them ...this further affirms that a lot of failures with this type of repair likely come from not being patient with the prep. with the debris now out of the way, i started using the fans again (no heat). this time using cardboard to direct the flow to the deeper areas better. i'll try this for maybe a week, using that u-channel trim to probe for still-saturated wood.
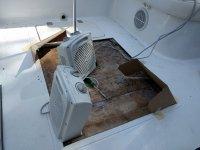
Nov 25: still not dry (or drying fast enough) ...at least not dry enough for me to feel comfortable with the CPES setting up correctly. CPES needs a wood moisture content no greater than 20% (lumber is around 14%). i am hesitant to begin the repair as some wood is too wet for the CPES and if moisture is out of reach of the CPES, the rot will be free to continue. did some more research and decided i needed more surface area, heat, airflow, and/or time. i've read of very wet boats taking several months to dry even when fully exposed - i need to try/add something else. the acetone option doesn't seem viable to me due to it being on the floor - if i was working on a transom, i may have considered it further as a hole at the bottom would allow it all to leak out. lamps pointed toward the floor is something i've been considering.
i abandoned the CPES idea in December as it seems more practical to replace the core than repair it. i never tried to use acetone to dry the wood, so i can't say for sure it won't work (though i doubt it). after spending months unsuccessfully trying to dry a core sandwiched within fiberglass, i strongly feel that any repair like this done with CPES, Git Rot, or RotFix (and etc) is not a good repair ...you just can't get the wood dry enough without complete exposure. trying to dry a wood core is like trying to dry a piece of wood in a ziplock bag.
so i took a 4" hole saw and drilled two holes in what i have determined (so far) to be the two wettest areas. i used two holes i had drilled earlier as the pilots, with the drill set in reverse. once cut, i pried the pieces up with a flat screwdriver fairly easily due to the moisture damage. the wood under the holes was still quite damp. i set the fans back up and could feel a very slight breeze from the new holes.
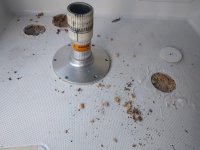
Nov 27: ...two days later, the exposed wood was dried out. finally, i'm getting further. i'm going to take what i have and see if i can make some more progress with increased airflow. i cut the bottoms off of two whey containers and am using them to funnel airflow into the holes from the two Pelonis HF-0020T fans i bought to maintain warm temps on my FRP repair last year (https://jetboaters.net/threads/how-to-beginner-frp-repair-in-the-driveway.8184/). FRP = fiber reinforced plastic.
update: exposing the wood works better than any amount of time and/or mechanical airflow (heated or non-heated) when dealing with cored fiberglass.
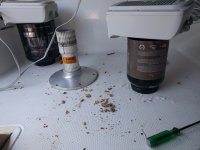
Dec 1: the funneled fans did not work as i had hoped. damaged areas less than 1" from these holes are still much wetter than i expected. i don't doubt it has helped, but it is not doing the job fast enough. i cut several new holes to expose areas i am still finding too wet and marking newly-drilled holes wet or dry. i had to pry so hard to get one of the hole saw cuts up at the port-aft corner that i thought it was going to crack (partly why i've not cut more large areas of the floor up with the circular saw). at this port-aft corner, i found that it was rotting along the channels between the small pieces of balsa. also sketched-up a floor plan to calculate how much replacement core i will need to buy. i bought a very bright LED penlight (Stylus Streamlight) and looked from the large access area - now i can visualize the wood and get a better idea of the dampness and total area. discovered how the pedestals are mounted: metal plate within FRP.
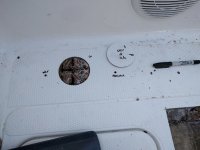

Dec 4: HEAT & FORCED AIR. drilled another hole in front of the port pedestal so i could use an allen key in a drill to route out the remaining section of wet wood there. read somewhere that "heat and forced air" are the best ways to do the job. bought some 4" duct pieces and assembled a funnel so i can keep my space heaters upright to prevent the overheat switch from tripping. i blocked the airflow from coming up out of the large holes and left the access open to give the moisture a way to escape.
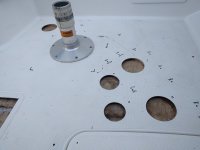
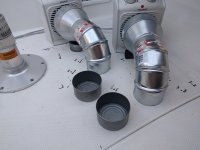
Dec 7: SWISS CHEESE. after maybe seven total hours, the 3" hole at the port-aft is still wet - the wood is just too damaged to dry out. but the port pedestal area seem satisfactory as the wood here is still very light in color as opposed to the dark color of the aft area. core sampling, i found that the areas to either side of the fuel access were still very wet - this despite the boat not being in water since mid-September and me actively trying to dry it! i figure i need a way to allow moist air to escape, so i drilled more 1/4" holes ...a lot of them. trying to follow the channels of the balsa core, i drilled a grid of 2" x 2" - this allows most to connect, giving moisture a path out of there. for the last few hours of the day, i set both funnels on the port side.
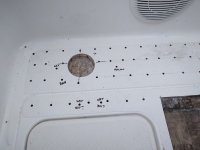
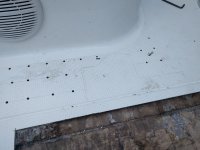
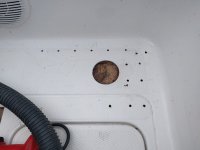
Dec 10: PATIENCE EXPIRED. still no dramatic improvement - nothing beats exposure. there's simply no "cheat" to get the moisture out when it's sandwiched like this - if you think otherwise, you're kidding yourself. i went a little crazy today and drilled several more core samples - all of them wet. forcing warm air into the holes i made in the aft area has done nothing significant. so i used the hole saw and easily removed the dark wood (damaged) beneath. then i routed as much as i could between the holes - i'd rather spend time repairing FRP than waiting for core to never dry. found that it is much easier to use the skinny wrenches, especially with the long ones, as they don't produce the inertia to make them wobble like the larger ones. before i was done blowing and vacuuming all of the debris up, most of the surface area was already dried out. i only have the very aft areas on either side of the fuel door to contend with...
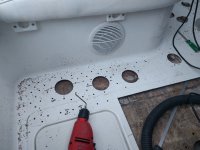
Dec 13: used shortened and/or skinnier allen wrenches in the aft-most holes to route those areas out. most of those holes, i drilled out to 7/16" to use an allen wrench fat enough not to snap off if it binds (that happened). i outlined the area beneath the floor that needs re-cored with a Sharpie, which will give me a pattern for cutting the balsa core. there is one spot i want to route out before i move on to the next phase (red circle in pic).
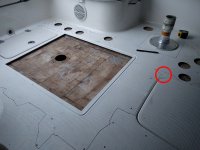
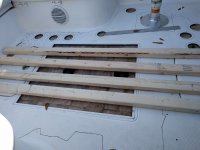
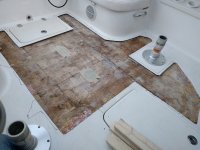
Dec 31, 2016: i finally did what i should have done from the beginning. at least i found what doesn't work. save yourself some time and just rip it all up to ensure a proper, solid fix. i had some 2" x 3" x 8' studs that i used to support my weight while i worked. i used the circular saw with the Irwin Classic 140T blade and a grinder with a cut off wheel (cuts like butter) to remove the floor. after three months, i STILL found a tiny bit of soggy-wet core at the aft-most corners! i left an area around the perimeter for my fiberglass bevel. the rule of thumb is a 12:1 slope - which is very big. the thickness of the original floor glass is around 5/32", so it would require 1.875" on each side of the cut (5 divided by 32 times 12). space is limited in some areas, but I have confidence a solid core bedding, proper surface prep, and meticulous layup will compensate for it. i am going to do a 10:1 with an averaged depth of 5/32" which is about a 1.50" bevel.
some other longshot drying ideas:
(after spending a lot of time trying different options, i doubt anything less than complete exposure will work, but here were some things i came across...)
1) drill holes into the wet areas and insert paper towels as wicks to draw the moisture out. then apply a lamp above the wet areas to get the moisture moving while also using breeze/fans to help wick water out of the paper towels. i found that this did draw moisture from the immediate area only, so would probably require too many holes to be practical.
2) use DampRid (or other chemical dehumidifier). build a tent over many holes and the DampRid with a garbage bag, then sealing it with tape around the base. i'd seal off any exposed adjacent holes and the large access area to prevent outside moisture getting in. the DampRid will remove moisture from within the tent and the lower air humidity of the tent should draw the moisture out of the wood. from my understanding, these chemicals lower and then maintain an air humidity of 50%.
3) silica gel. this can be bought at craft stores to preserve flowers. from what i've seen, it requires a lot of product, the ability to seal out ambient moisture, and up to 14 days to fully dehumidify a flower.
4) the one i would have liked to try: acetone supposedly pushes water from wood and washes it away. sounds far fetched to me and could only feasibly work properly on a transom where gravity is helping to drain it all out.
5) lowering the atmospheric pressure between the glass layers with a vacuum/pump.
variables for drying wood:
(i'll assume these apply to exposed wood only)
the higher the temperature, the faster the drying rate.
the higher the specific gravity, the slower the drying rate.
the higher the air speed, the faster the drying rate.
the lower the relative humidity, the faster the drying rate.
the lower the atmospheric pressure, the faster the drying rate.
wood moisture content (WMC):
fresh cut trees can have a moisture content of 200%+.
wood in buildings usually runs between 5% to 15%.
kiln or oven dried woods are generally below 12%.
air dried lumber and healthy wood have an MC of 12% to 16% (indoors).
wood can reach an MC of 20% in a relative humidity of about 90% (outdoors).
in the right environment (like sandwiched between fiberglass), mold can grow in wood with an MC as low as 20%.
a moisture content of 28% will support decay/rot.
i've seen the loose table base mentioned and pictured on here several times. some of them even showing a "fix" for the problem. here is the cause:

i estimate that at least ten square feet of wood core has either rotted away or been water damaged. the main source of intrusion is the cut out for the table base. secondary points seem to be where a few of the carpet snaps were once located. so, the plan i've come up with is to use an access area to slide coring into the deeper recesses. i'll use some sort of penetrating sealer (ex: Smith's CPES) to strengthen any wood that is still intact and out of reach. then fill gaps and bond layers with a filler-type resin.
in the end, i did not use a penetrating epoxy. instead i replaced the bad sections of wood, which was more economical and practical for my situation.
Sept 17, 2016: REMOVING THE TABLE BASE. the best strategy would be to cut the entire floor off - not gonna do that. that opens up more issues with seat post removal*, limited work area, and structural support of the repair. i want to leave the backside of the floor intact to support my repair. i shimmed the base with wood to prevent the screws from spinning and drilled them out with a bit just big enough to cause the heads to pop off once i got deep enough - this bit was somewhere in the realm of 5/32". i saw that Geoff Cooper used a cutting wheel to remove his.
*on Nov 1 i discovered the seat is not mounted like the table base, as it does not have bolts that go through the floor to nuts. instead, the floor has a square metal plate sandwiched below it rather than wood. it appears, via the parts fiche, this plate is tapped - so removal/install seems simple (though i imagine an impact screwdriver would be needed ...at the very least). i still have no desire to remove that much floor as i may not be able to pry the top layer from the good core without damaging it. the plate is 12-13" square and does not appear to be aluminum or stainless.

Sept 20: CUTTING THE ACCESS HOLE. tapping the floor with a long piece of metal rod and listening to the sound, i knew the damaged area was fairly large. i chose the cut out (access area) with the plan to cover the repair lines with traction mat. i laid done some masking tape and drew a line 1" from the smooth channel between the traction areas. i used a 1x3 secured with c-clamps as a guide for my circular saw. the blade i used was a new, cheapo 7.25" Irwin Classic 140T (the more teeth, the better) mounted backwards to prevent chipping. i set it at a depth of at least 1/4". the floor is a sandwich: there's the actual gelcoated/topside floor (referred to hereafter as the "floor"), the wood core (referred to as the "core/coring"), and the bottom most part that sandwiches the underside of the coring (referred to as the "backing"). the backing is a thin sheet of fiberglass presumably there to seal water from the backside of the wood. i was careful to leave the backing intact to support my repairs.


i used a metal paint scraper to carefully remove most of the rotted wood off the backing. there were some chunks still mostly intact that required the use of a limb saw (electric chainsaw) to break them up enough so i could pry it from the backing. there are a lot of naysayers and pessimists when it comes to penetrating sealers. as is always the case with anything, it seems that prep is the determining factor of a positive outcome. the key to this repair will be removing the worst areas of wood and thoroughly drying out what is left. from what i've read, the Smith's brand is the most highly regarded, but even the best isn't going to work on wet wood. i accepted that i must be patient in letting the boat sit for weeks, or even months, to dry.
update: i ended up cutting most of the deck off to ensure a proper repair. i am going to leave everything that i tried as a reference to what doesn't work.
Nov 10: REMOVING THE DAMAGE. i have limited my access area due to not wanting to cut out several areas or the entire floor. this is despite several more square feet of core missing. it has been nearly 2 months since i cut the top of the floor off yet some deeper areas are still not dry even with the initial use of fans (no heat) and dryer weather. i dug around my garage and found an old piece of chrome trim that once fit onto the rain channel of a 1994 Jeep Cherokee (the dimensions are basically a 3/8" by 1/2" u-channel). i cut a length of about 2-3 feet and pushed it in under the floor to probe the damage. pushing it into the wood and pulling it back out would give me a "core sample" showing if the area was wet or dry there. once i got the approximate horizontal depths of the damage, i used this tool to scrape and chip the weaker areas out. then i used an air compressor to blow this debris out where i could vacuum it up - this was done for two reasons: it will allow me to slide in new coring for the repair; and will allow for more airflow to help dry out the deeper areas of damage. this is a fairly tedious and long process. the next photo also shows the additional holes near the seat post i later used to help blow out the core debris.


there are points that are very deep, so i used the probe to measure and then mark the floor with a Sharpie. i drilled a few 1/4" holes at the deeper areas. at these holes, i could use compressed air to help blow the debris out to the access area. these are small holes that will be easily repaired and later hidden by the traction mats. still being careful not to drill out the backing, i also did some "core sampling" by using this bit to widen a few of the carpet snap holes. i found a few wet spots and hopefully these larger holes will help them dry quicker. i've read that introducing acetone into these holes can accelerate drying, but i'm not going to do that ...yet.

Nov 11: DRYING. i hadn't been using the fans for a month as i mistakenly assumed the weather was dry enough to do the job without them ...this further affirms that a lot of failures with this type of repair likely come from not being patient with the prep. with the debris now out of the way, i started using the fans again (no heat). this time using cardboard to direct the flow to the deeper areas better. i'll try this for maybe a week, using that u-channel trim to probe for still-saturated wood.

Nov 25: still not dry (or drying fast enough) ...at least not dry enough for me to feel comfortable with the CPES setting up correctly. CPES needs a wood moisture content no greater than 20% (lumber is around 14%). i am hesitant to begin the repair as some wood is too wet for the CPES and if moisture is out of reach of the CPES, the rot will be free to continue. did some more research and decided i needed more surface area, heat, airflow, and/or time. i've read of very wet boats taking several months to dry even when fully exposed - i need to try/add something else. the acetone option doesn't seem viable to me due to it being on the floor - if i was working on a transom, i may have considered it further as a hole at the bottom would allow it all to leak out. lamps pointed toward the floor is something i've been considering.
i abandoned the CPES idea in December as it seems more practical to replace the core than repair it. i never tried to use acetone to dry the wood, so i can't say for sure it won't work (though i doubt it). after spending months unsuccessfully trying to dry a core sandwiched within fiberglass, i strongly feel that any repair like this done with CPES, Git Rot, or RotFix (and etc) is not a good repair ...you just can't get the wood dry enough without complete exposure. trying to dry a wood core is like trying to dry a piece of wood in a ziplock bag.
so i took a 4" hole saw and drilled two holes in what i have determined (so far) to be the two wettest areas. i used two holes i had drilled earlier as the pilots, with the drill set in reverse. once cut, i pried the pieces up with a flat screwdriver fairly easily due to the moisture damage. the wood under the holes was still quite damp. i set the fans back up and could feel a very slight breeze from the new holes.

Nov 27: ...two days later, the exposed wood was dried out. finally, i'm getting further. i'm going to take what i have and see if i can make some more progress with increased airflow. i cut the bottoms off of two whey containers and am using them to funnel airflow into the holes from the two Pelonis HF-0020T fans i bought to maintain warm temps on my FRP repair last year (https://jetboaters.net/threads/how-to-beginner-frp-repair-in-the-driveway.8184/). FRP = fiber reinforced plastic.
update: exposing the wood works better than any amount of time and/or mechanical airflow (heated or non-heated) when dealing with cored fiberglass.

Dec 1: the funneled fans did not work as i had hoped. damaged areas less than 1" from these holes are still much wetter than i expected. i don't doubt it has helped, but it is not doing the job fast enough. i cut several new holes to expose areas i am still finding too wet and marking newly-drilled holes wet or dry. i had to pry so hard to get one of the hole saw cuts up at the port-aft corner that i thought it was going to crack (partly why i've not cut more large areas of the floor up with the circular saw). at this port-aft corner, i found that it was rotting along the channels between the small pieces of balsa. also sketched-up a floor plan to calculate how much replacement core i will need to buy. i bought a very bright LED penlight (Stylus Streamlight) and looked from the large access area - now i can visualize the wood and get a better idea of the dampness and total area. discovered how the pedestals are mounted: metal plate within FRP.


Dec 4: HEAT & FORCED AIR. drilled another hole in front of the port pedestal so i could use an allen key in a drill to route out the remaining section of wet wood there. read somewhere that "heat and forced air" are the best ways to do the job. bought some 4" duct pieces and assembled a funnel so i can keep my space heaters upright to prevent the overheat switch from tripping. i blocked the airflow from coming up out of the large holes and left the access open to give the moisture a way to escape.


Dec 7: SWISS CHEESE. after maybe seven total hours, the 3" hole at the port-aft is still wet - the wood is just too damaged to dry out. but the port pedestal area seem satisfactory as the wood here is still very light in color as opposed to the dark color of the aft area. core sampling, i found that the areas to either side of the fuel access were still very wet - this despite the boat not being in water since mid-September and me actively trying to dry it! i figure i need a way to allow moist air to escape, so i drilled more 1/4" holes ...a lot of them. trying to follow the channels of the balsa core, i drilled a grid of 2" x 2" - this allows most to connect, giving moisture a path out of there. for the last few hours of the day, i set both funnels on the port side.


Dec 10: PATIENCE EXPIRED. still no dramatic improvement - nothing beats exposure. there's simply no "cheat" to get the moisture out when it's sandwiched like this - if you think otherwise, you're kidding yourself. i went a little crazy today and drilled several more core samples - all of them wet. forcing warm air into the holes i made in the aft area has done nothing significant. so i used the hole saw and easily removed the dark wood (damaged) beneath. then i routed as much as i could between the holes - i'd rather spend time repairing FRP than waiting for core to never dry. found that it is much easier to use the skinny wrenches, especially with the long ones, as they don't produce the inertia to make them wobble like the larger ones. before i was done blowing and vacuuming all of the debris up, most of the surface area was already dried out. i only have the very aft areas on either side of the fuel door to contend with...

Dec 13: used shortened and/or skinnier allen wrenches in the aft-most holes to route those areas out. most of those holes, i drilled out to 7/16" to use an allen wrench fat enough not to snap off if it binds (that happened). i outlined the area beneath the floor that needs re-cored with a Sharpie, which will give me a pattern for cutting the balsa core. there is one spot i want to route out before i move on to the next phase (red circle in pic).

Dec 31, 2016: i finally did what i should have done from the beginning. at least i found what doesn't work. save yourself some time and just rip it all up to ensure a proper, solid fix. i had some 2" x 3" x 8' studs that i used to support my weight while i worked. i used the circular saw with the Irwin Classic 140T blade and a grinder with a cut off wheel (cuts like butter) to remove the floor. after three months, i STILL found a tiny bit of soggy-wet core at the aft-most corners! i left an area around the perimeter for my fiberglass bevel. the rule of thumb is a 12:1 slope - which is very big. the thickness of the original floor glass is around 5/32", so it would require 1.875" on each side of the cut (5 divided by 32 times 12). space is limited in some areas, but I have confidence a solid core bedding, proper surface prep, and meticulous layup will compensate for it. i am going to do a 10:1 with an averaged depth of 5/32" which is about a 1.50" bevel.


some other longshot drying ideas:
(after spending a lot of time trying different options, i doubt anything less than complete exposure will work, but here were some things i came across...)
1) drill holes into the wet areas and insert paper towels as wicks to draw the moisture out. then apply a lamp above the wet areas to get the moisture moving while also using breeze/fans to help wick water out of the paper towels. i found that this did draw moisture from the immediate area only, so would probably require too many holes to be practical.
2) use DampRid (or other chemical dehumidifier). build a tent over many holes and the DampRid with a garbage bag, then sealing it with tape around the base. i'd seal off any exposed adjacent holes and the large access area to prevent outside moisture getting in. the DampRid will remove moisture from within the tent and the lower air humidity of the tent should draw the moisture out of the wood. from my understanding, these chemicals lower and then maintain an air humidity of 50%.
3) silica gel. this can be bought at craft stores to preserve flowers. from what i've seen, it requires a lot of product, the ability to seal out ambient moisture, and up to 14 days to fully dehumidify a flower.
4) the one i would have liked to try: acetone supposedly pushes water from wood and washes it away. sounds far fetched to me and could only feasibly work properly on a transom where gravity is helping to drain it all out.
5) lowering the atmospheric pressure between the glass layers with a vacuum/pump.
variables for drying wood:
(i'll assume these apply to exposed wood only)
the higher the temperature, the faster the drying rate.
the higher the specific gravity, the slower the drying rate.
the higher the air speed, the faster the drying rate.
the lower the relative humidity, the faster the drying rate.
the lower the atmospheric pressure, the faster the drying rate.
wood moisture content (WMC):
fresh cut trees can have a moisture content of 200%+.
wood in buildings usually runs between 5% to 15%.
kiln or oven dried woods are generally below 12%.
air dried lumber and healthy wood have an MC of 12% to 16% (indoors).
wood can reach an MC of 20% in a relative humidity of about 90% (outdoors).
in the right environment (like sandwiched between fiberglass), mold can grow in wood with an MC as low as 20%.
a moisture content of 28% will support decay/rot.
Last edited:


