• Welcome to Jetboaters.net!

    We are delighted you have found your way to the best Jet Boaters Forum on the internet! Please consider Signing Up so that you can enjoy all the features and offers on the forum. We have members with boats from all the major manufacturers including Yamaha, Seadoo, Scarab and Chaparral. We don't email you SPAM, and the site is totally non-commercial. So what's to lose? IT IS FREE!

    Membership allows you to ask questions (no matter how mundane), meet up with other jet boaters, see full images (not just thumbnails), browse the member map and qualifies you for members only discounts offered by vendors who run specials for our members only! (It also gets rid of this banner!)

    free hit counter

2004-2006 230 Floor Rot Repair

CrankyGypsy

Jetboaters Captain
Messages
352
Reaction score
296
Points
202
Location
Tampa, FL 33615
Boat Make
SeaDoo
Year
2008
Boat Model
Challenger
Boat Length
18
REMOVING THE WET CORE

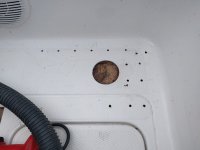
i've seen the loose table base mentioned and pictured on here several times. some of them even showing a "fix" for the problem. here is the cause:
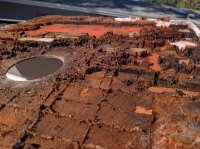
IMG_20160920_170956.jpg

i estimate that at least ten square feet of wood core has either rotted away or been water damaged. the main source of intrusion is the cut out for the table base. secondary points seem to be where a few of the carpet snaps were once located. so, the plan i've come up with is to use an access area to slide coring into the deeper recesses. i'll use some sort of penetrating sealer (ex: Smith's CPES) to strengthen any wood that is still intact and out of reach. then fill gaps and bond layers with a filler-type resin.
in the end, i did not use a penetrating epoxy. instead i replaced the bad sections of wood, which was more economical and practical for my situation.

Sept 17, 2016: REMOVING THE TABLE BASE. the best strategy would be to cut the entire floor off - not gonna do that. that opens up more issues with seat post removal*, limited work area, and structural support of the repair. i want to leave the backside of the floor intact to support my repair. i shimmed the base with wood to prevent the screws from spinning and drilled them out with a bit just big enough to cause the heads to pop off once i got deep enough - this bit was somewhere in the realm of 5/32". i saw that Geoff Cooper used a cutting wheel to remove his.

*on Nov 1 i discovered the seat is not mounted like the table base, as it does not have bolts that go through the floor to nuts. instead, the floor has a square metal plate sandwiched below it rather than wood. it appears, via the parts fiche, this plate is tapped - so removal/install seems simple (though i imagine an impact screwdriver would be needed ...at the very least). i still have no desire to remove that much floor as i may not be able to pry the top layer from the good core without damaging it. the plate is 12-13" square and does not appear to be aluminum or stainless.
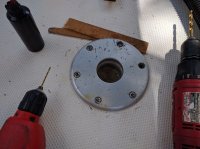
IMG_20160917_131803.jpg

Sept 20: CUTTING THE ACCESS HOLE. tapping the floor with a long piece of metal rod and listening to the sound, i knew the damaged area was fairly large. i chose the cut out (access area) with the plan to cover the repair lines with traction mat. i laid done some masking tape and drew a line 1" from the smooth channel between the traction areas. i used a 1x3 secured with c-clamps as a guide for my circular saw. the blade i used was a new, cheapo 7.25" Irwin Classic 140T (the more teeth, the better) mounted backwards to prevent chipping. i set it at a depth of at least 1/4". the floor is a sandwich: there's the actual gelcoated/topside floor (referred to hereafter as the "floor"), the wood core (referred to as the "core/coring"), and the bottom most part that sandwiches the underside of the coring (referred to as the "backing"). the backing is a thin sheet of fiberglass presumably there to seal water from the backside of the wood. i was careful to leave the backing intact to support my repairs.
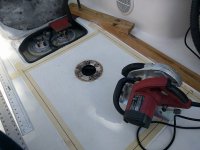
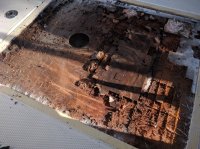
IMG_20160920_162228.jpg
IMG_20160920_170917.jpg

i used a metal paint scraper to carefully remove most of the rotted wood off the backing. there were some chunks still mostly intact that required the use of a limb saw (electric chainsaw) to break them up enough so i could pry it from the backing. there are a lot of naysayers and pessimists when it comes to penetrating sealers. as is always the case with anything, it seems that prep is the determining factor of a positive outcome. the key to this repair will be removing the worst areas of wood and thoroughly drying out what is left. from what i've read, the Smith's brand is the most highly regarded, but even the best isn't going to work on wet wood. i accepted that i must be patient in letting the boat sit for weeks, or even months, to dry.
update: i ended up cutting most of the deck off to ensure a proper repair. i am going to leave everything that i tried as a reference to what doesn't work.

Nov 10: REMOVING THE DAMAGE. i have limited my access area due to not wanting to cut out several areas or the entire floor. this is despite several more square feet of core missing. it has been nearly 2 months since i cut the top of the floor off yet some deeper areas are still not dry even with the initial use of fans (no heat) and dryer weather. i dug around my garage and found an old piece of chrome trim that once fit onto the rain channel of a 1994 Jeep Cherokee (the dimensions are basically a 3/8" by 1/2" u-channel). i cut a length of about 2-3 feet and pushed it in under the floor to probe the damage. pushing it into the wood and pulling it back out would give me a "core sample" showing if the area was wet or dry there. once i got the approximate horizontal depths of the damage, i used this tool to scrape and chip the weaker areas out. then i used an air compressor to blow this debris out where i could vacuum it up - this was done for two reasons: it will allow me to slide in new coring for the repair; and will allow for more airflow to help dry out the deeper areas of damage. this is a fairly tedious and long process. the next photo also shows the additional holes near the seat post i later used to help blow out the core debris.
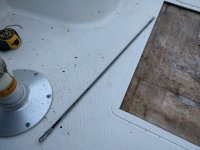
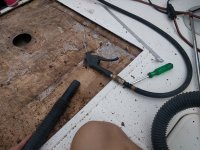
IMG_20161110_161846.jpg
IMG_20161107_154945.jpg

there are points that are very deep, so i used the probe to measure and then mark the floor with a Sharpie. i drilled a few 1/4" holes at the deeper areas. at these holes, i could use compressed air to help blow the debris out to the access area. these are small holes that will be easily repaired and later hidden by the traction mats. still being careful not to drill out the backing, i also did some "core sampling" by using this bit to widen a few of the carpet snap holes. i found a few wet spots and hopefully these larger holes will help them dry quicker. i've read that introducing acetone into these holes can accelerate drying, but i'm not going to do that ...yet.
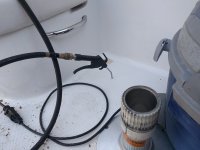
IMG_20161110_152920.jpg

Nov 11: DRYING. i hadn't been using the fans for a month as i mistakenly assumed the weather was dry enough to do the job without them ...this further affirms that a lot of failures with this type of repair likely come from not being patient with the prep. with the debris now out of the way, i started using the fans again (no heat). this time using cardboard to direct the flow to the deeper areas better. i'll try this for maybe a week, using that u-channel trim to probe for still-saturated wood.
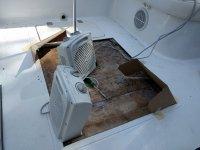
IMG_20161111_110839.jpg

Nov 25: still not dry (or drying fast enough) ...at least not dry enough for me to feel comfortable with the CPES setting up correctly. CPES needs a wood moisture content no greater than 20% (lumber is around 14%). i am hesitant to begin the repair as some wood is too wet for the CPES and if moisture is out of reach of the CPES, the rot will be free to continue. did some more research and decided i needed more surface area, heat, airflow, and/or time. i've read of very wet boats taking several months to dry even when fully exposed - i need to try/add something else. the acetone option doesn't seem viable to me due to it being on the floor - if i was working on a transom, i may have considered it further as a hole at the bottom would allow it all to leak out. lamps pointed toward the floor is something i've been considering.
i abandoned the CPES idea in December as it seems more practical to replace the core than repair it. i never tried to use acetone to dry the wood, so i can't say for sure it won't work (though i doubt it). after spending months unsuccessfully trying to dry a core sandwiched within fiberglass, i strongly feel that any repair like this done with CPES, Git Rot, or RotFix (and etc) is not a good repair ...you just can't get the wood dry enough without complete exposure. trying to dry a wood core is like trying to dry a piece of wood in a ziplock bag.

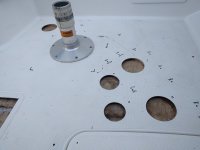
so i took a 4" hole saw and drilled two holes in what i have determined (so far) to be the two wettest areas. i used two holes i had drilled earlier as the pilots, with the drill set in reverse. once cut, i pried the pieces up with a flat screwdriver fairly easily due to the moisture damage. the wood under the holes was still quite damp. i set the fans back up and could feel a very slight breeze from the new holes.
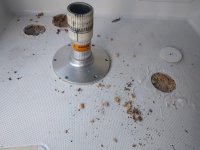
IMG_20161127_101623.jpg

Nov 27: ...two days later, the exposed wood was dried out. finally, i'm getting further. i'm going to take what i have and see if i can make some more progress with increased airflow. i cut the bottoms off of two whey containers and am using them to funnel airflow into the holes from the two Pelonis HF-0020T fans i bought to maintain warm temps on my FRP repair last year (https://jetboaters.net/threads/how-to-beginner-frp-repair-in-the-driveway.8184/). FRP = fiber reinforced plastic.
update: exposing the wood works better than any amount of time and/or mechanical airflow (heated or non-heated) when dealing with cored fiberglass.
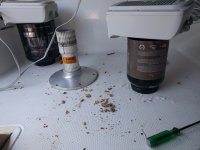
IMG_20161127_103432.jpg

Dec 1:
the funneled fans did not work as i had hoped. damaged areas less than 1" from these holes are still much wetter than i expected. i don't doubt it has helped, but it is not doing the job fast enough. i cut several new holes to expose areas i am still finding too wet and marking newly-drilled holes wet or dry. i had to pry so hard to get one of the hole saw cuts up at the port-aft corner that i thought it was going to crack (partly why i've not cut more large areas of the floor up with the circular saw). at this port-aft corner, i found that it was rotting along the channels between the small pieces of balsa. also sketched-up a floor plan to calculate how much replacement core i will need to buy. i bought a very bright LED penlight (Stylus Streamlight) and looked from the large access area - now i can visualize the wood and get a better idea of the dampness and total area. discovered how the pedestals are mounted: metal plate within FRP.
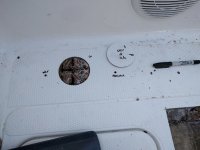
IMG_20161202_115345.jpg
img009.jpg

Dec 4: HEAT & FORCED AIR. drilled another hole in front of the port pedestal so i could use an allen key in a drill to route out the remaining section of wet wood there. read somewhere that "heat and forced air" are the best ways to do the job. bought some 4" duct pieces and assembled a funnel so i can keep my space heaters upright to prevent the overheat switch from tripping. i blocked the airflow from coming up out of the large holes and left the access open to give the moisture a way to escape.
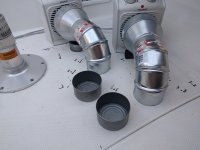
IMG_20161204_155108.jpg
IMG_20161204_161202.jpg

Dec 7: SWISS CHEESE. after maybe seven total hours, the 3" hole at the port-aft is still wet - the wood is just too damaged to dry out. but the port pedestal area seem satisfactory as the wood here is still very light in color as opposed to the dark color of the aft area. core sampling, i found that the areas to either side of the fuel access were still very wet - this despite the boat not being in water since mid-September and me actively trying to dry it! i figure i need a way to allow moist air to escape, so i drilled more 1/4" holes ...a lot of them. trying to follow the channels of the balsa core, i drilled a grid of 2" x 2" - this allows most to connect, giving moisture a path out of there. for the last few hours of the day, i set both funnels on the port side.
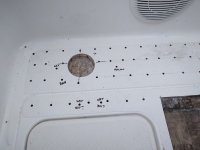
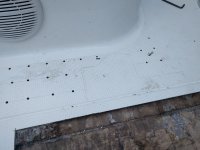
IMG_20161207_170824.jpg
IMG_20161207_170828.jpg
IMG_20161207_170750.jpg

Dec 10: PATIENCE EXPIRED. still no dramatic improvement - nothing beats exposure. there's simply no "cheat" to get the moisture out when it's sandwiched like this - if you think otherwise, you're kidding yourself. i went a little crazy today and drilled several more core samples - all of them wet. forcing warm air into the holes i made in the aft area has done nothing significant. so i used the hole saw and easily removed the dark wood (damaged) beneath. then i routed as much as i could between the holes - i'd rather spend time repairing FRP than waiting for core to never dry. found that it is much easier to use the skinny wrenches, especially with the long ones, as they don't produce the inertia to make them wobble like the larger ones. before i was done blowing and vacuuming all of the debris up, most of the surface area was already dried out. i only have the very aft areas on either side of the fuel door to contend with...
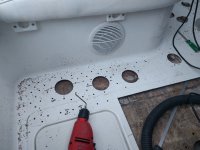
IMG_20161210_170932.jpg

Dec 13: used shortened and/or skinnier allen wrenches in the aft-most holes to route those areas out. most of those holes, i drilled out to 7/16" to use an allen wrench fat enough not to snap off if it binds (that happened). i outlined the area beneath the floor that needs re-cored with a Sharpie, which will give me a pattern for cutting the balsa core. there is one spot i want to route out before i move on to the next phase (red circle in pic).
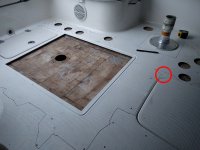
IMG_20161212_173517.jpg

Dec 31, 2016: i finally did what i should have done from the beginning. at least i found what doesn't work. save yourself some time and just rip it all up to ensure a proper, solid fix. i had some 2" x 3" x 8' studs that i used to support my weight while i worked. i used the circular saw with the Irwin Classic 140T blade and a grinder with a cut off wheel (cuts like butter) to remove the floor. after three months, i STILL found a tiny bit of soggy-wet core at the aft-most corners! i left an area around the perimeter for my fiberglass bevel. the rule of thumb is a 12:1 slope - which is very big. the thickness of the original floor glass is around 5/32", so it would require 1.875" on each side of the cut (5 divided by 32 times 12). space is limited in some areas, but I have confidence a solid core bedding, proper surface prep, and meticulous layup will compensate for it. i am going to do a 10:1 with an averaged depth of 5/32" which is about a 1.50" bevel.
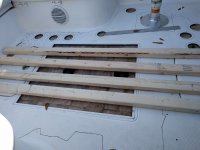
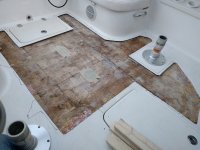
IMG_20161231_144140.jpg
IMG_20161231_172856.jpg


some other longshot drying ideas:

(after spending a lot of time trying different options, i doubt anything less than complete exposure will work, but here were some things i came across...)
1) drill holes into the wet areas and insert paper towels as wicks to draw the moisture out. then apply a lamp above the wet areas to get the moisture moving while also using breeze/fans to help wick water out of the paper towels. i found that this did draw moisture from the immediate area only, so would probably require too many holes to be practical.
2) use DampRid (or other chemical dehumidifier). build a tent over many holes and the DampRid with a garbage bag, then sealing it with tape around the base. i'd seal off any exposed adjacent holes and the large access area to prevent outside moisture getting in. the DampRid will remove moisture from within the tent and the lower air humidity of the tent should draw the moisture out of the wood. from my understanding, these chemicals lower and then maintain an air humidity of 50%.
3) silica gel. this can be bought at craft stores to preserve flowers. from what i've seen, it requires a lot of product, the ability to seal out ambient moisture, and up to 14 days to fully dehumidify a flower.
4) the one i would have liked to try: acetone supposedly pushes water from wood and washes it away. sounds far fetched to me and could only feasibly work properly on a transom where gravity is helping to drain it all out.
5) lowering the atmospheric pressure between the glass layers with a vacuum/pump.

variables for drying wood:
(i'll assume these apply to exposed wood only)
the higher the temperature, the faster the drying rate.
the higher the specific gravity, the slower the drying rate.
the higher the air speed, the faster the drying rate.
the lower the relative humidity, the faster the drying rate.
the lower the atmospheric pressure, the faster the drying rate.

wood moisture content (WMC):
fresh cut trees can have a moisture content of 200%+.
wood in buildings usually runs between 5% to 15%.
kiln or oven dried woods are generally below 12%.
air dried lumber and healthy wood have an MC of 12% to 16% (indoors).
wood can reach an MC of 20% in a relative humidity of about 90% (outdoors).
in the right environment (like sandwiched between fiberglass), mold can grow in wood with an MC as low as 20%.
a moisture content of 28% will support decay/rot.
 
Last edited:

CrankyGypsy

Jetboaters Captain
Messages
352
Reaction score
296
Points
202
Location
Tampa, FL 33615
Boat Make
SeaDoo
Year
2008
Boat Model
Challenger
Boat Length
18
THE REPAIR

i wrote this like a daily diary, so i included what was successful and what was not as i worked through the repair. understanding why something failed is crucial to my learning process and very helpful for future reference. i also later added more detail to previous days as new information was discovered, which i italicized.

Supplies:
0.50" Balsa Core
Arjay J-Core Bonding Compound 4501
(J-Core alternatives: Core Bond or poly resin thickened with fumed silica (Cab-O-Sil))
Vinyl Ester Laminating Resin (2.25 gallons)
MEKP-925 General Purpose
Fiberglass Cloth (8oz) and Chopped Strand Mat (0.75oz & 1.5oz)
Chopped Glass
Gelcoat (FGCI's FGCS White - at least a half gallon)
Mixing Containers and Mixing Sticks (dozens of each)
Microballoons
Sanding Aid (wax additive; surfacing agent) or PVA*
Naphtha (for removing wax additive)
Acetone (lots)
Paper Towels (several rolls)
Kaizen Foam
*note: blaming ignorance or error, i' had issues with this attempt using wax additives. PVA will require a cheap HVLP gun with a 0.8-1.0mm tip or a fresh Preval sprayer, though using a Preval on a project this size would be tedious. see near the bottom of this post for my personal opinion on when to choose wax or PVA.

Hand Tools:
3M 6200 Face Mask (P100 particulate filters for grinding; 6001 organic vapor filters for mixing)
Cheap Layup Brushes
Caulking Tubes & Plungers and Gun
Cheapo 9" x 3/8" Nap Paint Rollers and Disposable Roller Pans (resin)
Wooster Tiz 7" x 1/8" Foam Rollers and Pans (gelcoat)
4" Paint Roller
Various Sanding Blocks and Boards
Sandpaper (40grit to 1500grit)

Power Tools:
Ryobi 4.5" Grinder (fiberglass disc and flap discs)
Makita 9403 (4x24) Belt Sander
Ingersoll-Rand IR-4152 6" Orbital Sander
Husky 30gal Compressor
Shop Vac (6 gallon)

referencing my previous FRP repair: https://jetboaters.net/threads/how-to-beginner-frp-repair-in-the-driveway.8184/

the first few pics show the majority of the floor still intact. on Dec 31 (actual repair start date) i cut a larger area of floor out as i realized my original repair plan of pouring a compound horizontally would be much more difficult and likely unsuccessful.


Dec 18, 2016: SUPPORTING THE REPAIR. the wood core the factory used was 0.50" balsa. most coring options are not very rigid on their own, so i am going to support the repair with Kaizen Foam between the backing and the cross members above the fuel tank to prevent sagging while the resin cures. there are two thick metal bars that span the tank to hold it in place, about 1.50" wide. the fiche doesn't show them, but there are pieces of rubber between the metal and the tank, acting as cushions that will help to keep the Kaizen in place (the fiche also doesn't show the other two bolts and nuts on each end of the cross members). the Kaizen Foam i bought is almost 1.25" wide. after a few trial fitments, i found that the desirable thickness of foam between the cross members and the underside of the backing for my boat was almost 1.50". the test-fitment in the picture is 20" long, but i cut two lengths of the foam to be 1.50" tall and 26" long (max inside width of the fuel tank enclosure is 28"). i added a stainless steel bolt, lock nut, and fender washers as a handle to them so i could move them around easier.

fiche.JPG
IMG_20161218_154328.jpg

Dec 28: i decided to improve on my support idea and add two more strips, one between the cross members and one further to the bow to keep everything level during the repair. after some trial and error, along with some shaping from a grinding wheel, i had two pieces 27" long and approximately 3" tall. i hole sawed an access point for the bow-side support. for the other, i cut it into 9" increments. i came up with a nifty way to cut the Kaizen today: i secured the blade to a magnet with a strong clamp. this allowed for a perfect 90* cut. i also added some foam under the corners of the fuel pump hatch until the repair is complete.

IMG_20161228_154512.jpg
IMG_20161228_163741.jpg

Dec 31: this next picture shows the amount of space i cut out for the repair.

IMG_20161231_172856.jpg

CORING OPTIONS: i am going to go with old fashioned balsa since the rest of my balsa floor is still intact. i know some will say that's a terrible idea and i should go with the 2-3 times more expensive Nida-Core/Carbon-Core (plastic honeycomb, which seems to be iffy depending on brand), Coosa or Divinycell (foam). the only issue with balsa is that it can rot if it gets wet. however, the only way it gets wet is with poor manufacturing choices (ex. Yamaha not sealing the table base hole) or poor owner practices (ex. installing carpet buttons without properly bedding the core beneath). balsa is strong, economical, easy to work with, and it matches what has been there for the past 12 years.

Jan 6, 2017: i chiseled out the remaining chunks of balsa still left in the now larger space. used the drill with the allen wrench trick to route wood out from this perimeter as i plan to cut the core big enough to slide under the fiberglass "overhang" so there isn't such a dramatic shear point between old and new core while i work. starting using the 6" orbital to remove the old balsa/scrim layer still left on the floor backing. "scrim" is the fabric on the backside of the balsa that holds the pieces together. 80grit wasn't cutting quick enough, so i went with 40grit to get things moving along faster. 80grit is the finest we want to prep any surface before laying-in new resin.

Jan 9: MORE POWER & CORE FITMENT. the orbital was not removing the remaining layer of balsa fused to the backing fast enough and my compressor was running non-stop, so i switched to the grinder with a 40grit sanding/flap disc - much better. i removed most of the balsa and generally stopped when i started cutting the scrim layer. i have found examples of core failures in other boat types at the scrim, but this stuff is on solid - this leads me to believe failures were due to poor craftsmanship rather than materials. after i got it ground to where i wanted it, i ran over it with the 40grit orbital to level it a bit better and get under the overhangs. speaking of poor craftsmanship: with that layer of balsa gone, i was able to notice imperfections in the backing - lots of small pinholes in the fiberglass, with some especially gnarly areas near the fuel hatch and on the port side of the ski locker (next pic). i taped these from below before bonding in the core.

anyone claiming that polyester or vinyl ester isn't strong enough for boat repairs (versus epoxy) should note the pic below. this boat is 12 years old and was built with balsa and polyester, plus this shows it wasn't built perfectly. aside from the issue from not sealing the balsa at the table base, the boat is still very solid. a proper build or repair with poly/vinyl is more than sufficient ...and won't interfere with gelcoat adhesion like epoxy (amine blush) sometimes can.

IMG_20170109_143007.jpg

i cut the balsa with a utility knife so dimensions were big enough to allow almost 1/2" to slide under the floor overhangs. to get them to actually slide in, i had to chamfer the corners a bit with the flap disc. where the table base and bolts go, i cut out blocks of the balsa out (this area will be filled with J-Core to prevent water infiltration). before pulling the test-fitted balsa, i outlined the overhangs with a Sharpie - this will give me an idea of the balsa's placement/depth when i bond it in. i also marked the pieces with an arrow and a few with "S" or "P" to make sure they get to the proper side.

IMG_20170109_175653.jpg

the next pic shows the tools i used today. that bottom grind disc is a 36grit fiberglass disc and man, does it cut through glass! i was reluctant to buy it since it is $11, which is 2-3x more than a flap disc. i'm always going to have to be very careful as it can erase FRP in an instant (and flesh!). i used it to rough-in the bevel into the remaining floor around the perimeter, then went at it with a 36grit flap disc, followed by a hand block with 40grit to get it smooth and perfect.

IMG_20170109_153342.jpg

i added backers (cardboard covered in wax paper) under the table hole and the extra hole i cut to support the glass repair there - added a string to the one so i could pull it out. i taped the back of the poorly-glassed factory backing areas near the fuel hatch and the ski locker to prevent resin dripping through ...i left the dozens of pinholes as-is since the mat will keep the resin from dripping through.

Jan 13: BONDING IN THE CORE. i taped off the beveled edges and cleaned the backing with acetone. to help strengthen the bond and fill the holes in the backing, i applied a single layer of 0.75oz mat with vinyl ester (VE) resin: i precut the pieces, painted the backing with VE, laid in the dry glass (it's way too thin to wet out before placing - i tried), added VE and stippled out the bubbles with a brush. as soon as that was done, i mixed up a large quantity of the J-Core. working one section of balsa at a time, i poured the J-Core onto the new layer of glass, and used a spreader to get it where it needed to be. then i put each piece of balsa in, shimmying it a little to let the J-Core settle in. added some chopped glass to the remainder of the J-Core to fill the table base area. when all this was done, i covered the area with wax paper to prevent J-Core from sticking to the weighted panels if it seeped up. i got the old panels of the floor (i already ground the back of them flat) and set them back in on top of the new balsa - i placed cinder blocks (12 of them) on top to help distribute the pressure while the J-Core cured overnight.

IMG_20170114_142917.jpg

additional notes: one strategy is to lay the balsa over a 55gallon drum or similar so it fans out and then pour/brush resin over it. this will seal it from all directions. however, Yamaha does not do this and i don't feel it's necessary if water is prevented from infiltrating in the first place. due to the size of my repair, i would have wasted a lot of resin and made a giant mess. i also felt like i was rushing to get the weights on before the J-Core set ...it was starting to kick a little in the first areas as i put in the last pieces. have everything set up and move at a steady pace - anything larger might have required a partner. i mixed the VE in three or four 8oz batches, while mixing the J-Core in two ~50oz batches. J-Core is less viscous than Core Bond, so i didn't/couldn't trowel it in like tile work. i used J-Core rather than Core Bond because that is what i had purchased for a prior plan because i was looking for a low viscosity and very low exotherm option. i tested the J-Core by sandwiching it between two scrimmed sides of balsa - it certainly wasn't epoxy strength, but it held surprisingly well and will be enough for what i need it to do.

Jan 14:
short day. removed the weights and everything looks great - it still has some give, so i am not putting all of my weight on any single area yet. i used the hand block and orbital, both with 40grit, to level a few high spots in the balsa. i used compressed air and a vacuum to get up the dust. the core is not perfectly level - but from what i could/can tell, there were mild undulations from the factory anyways. within the bevel around the perimeter, i drilled holes (pilots followed by 9/64") about every 8-12" to pump in J-Core because i was originally going to add a bit of filler to it for additional strength. but looking back, i'm wishing i had simply added extra J-Core to the underhangs while laying in the balsa. it would have eliminated the tedious steps of filling the voids and the drill holes ...especially considering the small voids are around the perimeter in areas with a lot of strength. though J-Core isn't super strong on it's own, it will most certainly be fine with the addition of an FRP top in these already solid areas.

IMG_20170114_145028.jpg

Jan 15: FILLING THE VOIDS: went about filling the voids beneath the overhangs/bevel that didn't get excess J-Core during balsa install. J-Core is thixotropic (once it starts to flow, it becomes less viscous), so this proved to be a messy challenge. i mixed up a lot of J-Core then added some chopped glass for strength and to thicken it up a bit. i loaded the caulking tubes and injected it into the holes i drilled for this purpose around the perimeter. there were many times i over pumped and when i pulled the gun up, J-Core would just bubble up and pour out. i started keeping my finger ready to plug it before moving to the next hole. luckily, once it kicked, i used a plastic spreader to easily scrape it from wherever it got - which was pretty much everywhere. again, had i applied a liberal amount of J-Core under the overhangs before inserting the balsa, i probably could've skipped this step.

SMOOTHING TRANSITIONS: also, where the thinnest part of the bevel meets the balsa, there were spots i could slide the corners of a few sheets of paper under - this left a possibility of air getting trapped, plus would make the lay-up and fairing a bigger hassle. i masked-off the bevel and the core with tape, leaving 1/4" between to keep the resin only where it needed to go. i mixed up some VE resin (much less viscous than the J-Core to get into tighter spots) and used a brush to get it under these areas. i pulled the tape as it started to kick, then with another batch of J-Core, i used a brush to dab it onto the same areas and following up with the plastic spreader to give it a nice, gradual slope between the balsa and the bevel ...similar to a fillet. did the same with a few small spots on the rest of the balsa to reduce chances of air pockets and ridges when i lay the glass.

IMG_20170117_142157.jpg

Jan 17: PREP FOR GLASS. everything takes longer than expected. carefully taped off the outside perimeter where the non-skid ends - there's a "ledge" that i am going to maintain with the new gelcoat. to prevent losing this edge from resin runs, tape up and over it slightly. did a final prep sanding around the perimeter to smooth out the recent touch-ups. to make the pieces for layup, i use waxed paper: laying the paper out (tape together for larger sections) and tracing the outline of the first/largest piece of glass. there were three main sections making up the center: the ones near the fuel hatch and the ski locker were 11" wide and spanned from one side to the other; the section in between was the largest, about 14" wide. then i transferred the patterns onto the dry fiberglass with a Sharpie and marking them which side up, where they went, and what layer they were (any ink bleeds will be covered with gelcoat). i forgot what a pain it is to do this with the woven cloth - it moves/pulls along the weave. each new layer was about 3/16" smaller around the edges than the previous. avoid overlapping with the mat (try to butt the edges), but overlap the cloth (maybe 1/2"). the cloth is thinner, so it won't build up so fast, thus trapping air at the overlaps. i cut all the layers and kept them in separate piles. my layup schedule will be (first to last): 1.5oz mat, 8oz cloth, 3oz mat*, 8oz cloth, 1.5oz mat. the 3oz could give me some extra thickness ...like around 1/32". however, using the 3oz, i'll have this option: 3oz is actually a 2-ply (very roughly 1.5oz each). if it looks like the 3oz will put me too thick, i can separate the halves and only use one.

*i ended up separating the 3oz mid-layup - it seemed too thick of material for this large of a project. after doing one piece, i didn't feel like i was in control of it like the 1.5oz. by that, i mean completely wetting it out, minimizing bubbles, and getting each layer on before the last went beyond kicking. so i stayed with what i knew would yield consistent, strong results: proper preparation and patient execution.

Jan 18: GLASS LAYUP. long day. did some touch-up sanding, finished cutting my glass schedule, and masked off parts of the boat. i draped a tarp over the work area to prevent the sun from speeding up the kick and to keep the falling leaves off. placed a fan to prevent dripping any sweat onto the work area, then set up a few lights in case i went into the evening (which i did). i kept a timer running for three reasons: 1) to make sure i stirred my resin/MEKP batches for 1-2mins; 2) to know when the balsa-sealing layer should kick; 3) to see how long it took me to complete.

layup plan: this is a much larger area than i have ever done. so i decided to try something new and use a paint roller to wet the glass out - this worked extremely well ...so well, i am going to roll the gelcoat. i used a fresh, cheapo 3/8" nap roller on a 9" handle along with a disposable paint pan for each layer. i mixed resin in 20oz batches for the 1.5oz mat (took two batches per mat layer) and 12oz batches for the cloth (only one batch per cloth layer). i believe i used a little over a gallon of VE resin on this day of layup. the paint pan spreads the heat out, so it doesn't kick as fast as it would in the mixing tub (16oz has overheated on me in the tub). i measured the resin out in separate mix tubs and covered with lids before starting - i also had a tiny cup with pre-measured MEKP on stand by for each. once the layer of dry glass was stacked within reach in the boat and my other supplies where ready, i started the clock and mixed the first batch to seal the balsa core...

weather: started layup at 80*F with 55% humidity; finished at 75*F with 70% humidity.


to get the best bond between materials, i had been waiting to seal the balsa on the same day as the glass layup. the balsa quickly soaked up quite a bit of resin. i don't remember how much i rolled on ...at least 40oz. the roller gets it on very quick - i gave it 25-30mins (felt like forever) to get tacky before i started mixing the first layup batch. i rolled down a fresh coat of resin and then placed a piece of dry mat. i wetted it all the way out before moving to the next piece. i kept a spreader, a brush, and finned roller (in an acetone bath) on hand for gobs, bubbles, or touch ups. i didn't use the finned roller (for bubbles) much as the paint roller does double duty if i rolled from the inside out. as soon as the entire layer was done, i cleaned and replaced the roller, binned the roller pan, and measured out the next batch(es). as i mentioned, the cloth is a PITA: i quickly found the best method was to lay all the pieces out without re-wetting the previous layer because they NEVER lay right. this allowed me to be finicky with them without worrying about the resin gelling-over because they are delicate. once all the cloth pieces were in position, i mixed the resin and rolled the cloth outward easily. i again broke everything down and set back up for the next layer. i tried one piece of 3oz ...i used a lot of resin, but still had a stressful time ensuring it was wet enough and bubble-free. so, i separated the rest of the pieces for that layer. 3oz worked well in my previous/smaller project, but i won't use this stuff on anything this size again.

it took twice as long as i had figured: four hours from the first mix to the last roll. i was two hours past sunset when i finished, which meant lowering temps and increasing humidity. normally, i would have started pulling masking tape after the kick, but i was exhausted and i wanted to get everything covered ...probably going to regret that. i placed one of those chemical dehumidifiers (small bucket with pellets - though there was no moisture in it when i checked 36 hours later) on the floor and set up one of the Pelonis heaters (low heat with the thermostat set around 75*F), then secured the mooring cover back on. i can finally rest easy knowing rain isn't going to soak into the balsa.

thoughts on rolling gelcoat: as i said, the roller worked much better than expected for the layup. once i got the techniques down, it was very satisfying watching the glass wet out so quickly and evenly with the roller. i had originally figured on spraying the gelcoat, but there is no way i can do enough without the use of an additive like Duratec to slow the kick. i liked Duratec for my engine bay, but it doesn't seem practical (cost wise) for something that is going to get covered with SeaDek. i found before that i can only spray about 2oz of unthinned gelcoat (i always try to avoid thinning when i can, even with Duratec) at a time before i have to tediously clean the gun. i calculate a pro (no screw ups or over spraying) would need a quart (32oz) of gelcoat for this job - that would mean i would have to clean the gun 16+ times ...or buy a pro system that does the mixing during spraying. i looked around the net and didn't find any good visual examples of finished rolled-on gelcoat or even explicit methods, but people have said it works well. since it will be covered with SeaDek and not require a perfect fair, rolling will work fine.


Jan 20: ASSESSMENT. it's had about 36 hours to cure and it looks really good (i'd say great if i didn't know how much sanding was ahead of me). it is absolutely rock solid - i can bounce on it without seeing flex or hearing any creaking ...even the fuel hatch area is stable, which is the first i've seen in my ownership. as i expected, the masking tape is not coming off easily due to the thick coat of cured resin on it (should have pulled it up the other day; note: masking tape has a time frame of about 3 days for easy release). in the next pic, you can see near the locker that those glass pieces didn't fit exactly how i had planned since i was avoiding overlapping sections of the chopped strand mat (this was something i opted for halfway through the layup - adjustments were on the fly). not a big deal, just some finesse-sanding in that area and a lesson learned. overall, i am extremely happy with the results, especially since i still consider myself a newbie to FRP. next, i'll give it a rough sanding to see where i stand, thickness-wise, relative to the existing gelcoat and decide if it needs one more layer of 1.5oz mat since i didn't end up laying the 3oz layer.

IMG_20170120_093156.jpg

Jan 23: ROUGH SANDING. started knocking down the high spots. there's a lot of grueling sanding to be done here, especially around the perimeter where the roller left resin that i didn't clean up. the palm block, the long board, and the pneumatic orbital just aren't getting the job done fast enough, even with 40grit. i've wanted one, so i am going to get myself a belt sander that will do three jobs on this project: 1) make quick work of the excess resin around the perimeter due to the ham-fisted roller; 2) level the new glass in no time; 3) remove what's left of the helm's factory non-skid so i can re-gelcoat the entire area to match. since Dewalt USA isn't currently making belt sanders, i'm going to get the beastly Makita 9403.

work interruption: family in town Jan 20 followed by a three week rescue course starting Jan 30, predominately leaving me the weekends for the boat.


Jan 26: i made an adapter between the new Makita belt sander to my shop vac with 3.5" of standard 1" PVC pipe. i used my bench grinder to thin the wall of one end enough so it would insert into the sander and then the shop vac hose slid over the other end.

IMG_20170126_155945.jpg

the Makita is lethal - wow, what a tool! being very careful, i was able to easily save myself hours (if not days) of sanding. i started out using 80grit in the belt sander and found that being prudent with the trigger, being mindful of it staying level, and always keeping the unit moving prevented taking too much off. once i got comfortable with the 80grit, i switched to the 40grit (because that was what i bought in abundance). the 40grit did an exceptional job of knocking down the remaining non-skid around the seat pedestals. instead of slightly dishing out the patch so the new gelcoat is level with the old gelcoat, i'm going to uniformly level the entire helm portion of the deck in preparation for all new gelcoat - this will leave the ski locker, the foot rest areas in front of the pedestals, the bow floor, and the fuel hatch as the only parts with factory non-skid. i judiciously feathered the trigger and kept a very careful eye on what i was doing to avoid going too deep or knicking adjacent surfaces. i backed off when i could see the pink fiberglass below. the edges of the non-skid were a little tricky/risky, so i left them as these smaller sections were easily knocked down with 40grit on the hand block.

IMG_20170126_155858.jpg
IMG_20170126_160031.jpg

Feb 5: i'm still impressed how rock-solid the new floor is! yesterday, i roughed the floor with 80grit, wiped with acetone, and added a few pieces of 1.5oz mat to help "hide" the very slight sag of the floor in the middle of the span. today i went at leveling the new area of floor with a little more patience: i laid a 4' and 2' ruler between the edges, checking for high spots and knocking them down with various sanding blocks. the following pic shows the blocks i gathered for my last FRP project. today, most of the hand sanding was done with the yellow 3M sheetrock block - it has a nice, soft pad. but the Makita remains the workhorse - i'm getting more comfortable with it, especially with the 40 and 80grit papers worn down a bit. the pair of red blocks with felt pads are 3M Stikits and the yellow pair are Finishing Blocks with velcro from Shopsmith (the Shopsmith paper is expensive, but it cuts faster and lasts longer). i tend to use the Stikits for gelcoat only as the available grits tend to be too fine for much else. note the orbital seems better suited for fairing gelcoat rather than the much harder resin. the Shopsmiths are my favorite, so i highly recommend them.

IMG_20170205_135725.jpg

IMG_20170205_135507.jpg

with the highest spots knocked down, i searched out and roughed up the lowest spots that seemed too low for microballoons. i also removed the gelcoat on the aft-most water channel with a stone on my Dremel, then vacuumed and wiped everything with acetone. after taping the channel off, i mixed up some "peanut butter." I make PB by measuring my resin and adding fumed silica (using a tongue depressor as a scoop, i add 2-3 large mounds per ounce of resin). i stir that for a while to get the lumps out. then i add MEKP and stir for 2 minutes to ensure a good catalyst mix. finally, i add the chopped glass (2-3 pinches per 2oz is what i like) for strength. the fumed silica gives it a more consistent texture, preventing it from being runny between the fibers. i used a stir stick to spread it onto the low spots/channel and then used a 6" plastic spreader to even it out ...it takes a bit of finesse to not drag it all back up. once it was well-kicked, i carefully peeled the tape away from the channel.

Feb 10: went at getting the entire helm area leveled out and scuffed in preparation for fairing. this included removing what was left around the edges of the non-skid texture. the Shopsmith blocks with 80grit and the 3M sheetrock block with 40grit worked well, especially after strategic *braaps* with the Makita. i won't be dishing the new glass out since i'm going to re-gel the entire floor - no need to match heights between old and new gelcoat. after sanding through the non-skid, it's obvious that there are undulations from the factory over the entire span of the floor. this is a relief because it means i should get it more level than the factory if i just take my time, plus i won't be so obsessed about perfection. i sanded everything down as level as possible while maintaining enough edge around the perimeter of the old non-skid. i'm going to want to keep this outline intact so it still matches the SeaDek - it should look pretty darn close to factory when down.

Feb 11: FAIRING COMPOUND. a few more spots cleaned up with the sanding blocks and removing some very stubborn masking tape (went beyond the 3 day removal limit). vacuum, acetone, and masking taped the outer perimeter of the non-skid area, covering up the ledge of the non-skid perimeter.

IMG_20170211_162312.jpg

fairing compound is resin with microballoons (glass spheres that make sanding easier) and i also add fumed silica to mine. it doesn't have much tensile strength, so it is only used to smooth surfaces before gelcoat. i start with the vinyl ester resin and add silica (2-3 big scoops with the stir stick). as with PB, stir this for a while to get the lumps out, then add MEKP and stir well. it takes a good amount of microballoons to get the right consistency. i liken it to the consistency of chocolate pudding before it has set-up. make it as thick as pudding out of the fridge if the first coat needs to go on a non-horizontal surface. do not stir the microballoons very fast as it traps air and will leave bubbles.

i used one of my rigid 2' aluminum rulers as my initial compound leveler. within each "section" of new glass, i poured out some fairing compound and used a 6" plastic spreader to coat the area. then i ran the ruler across this, between the outer edges. the excess scraped up with the ruler was used on the next section. the aft corners were easy (next pic), but it got messy close to the ski locker where the floor undulates a little more - the first layer is usually very ugly in instances like this. i picked a suitable edge-to-edge plane and did the best i could to get the compound where it needed to be. it will need a lot of sanding in these areas, but the next layer of compound will be much easier all around now that i have the basic shape. as it started to kick, i pulled most of the masking tape. going to be cooler overnight, so i set the Pelonis heater around 70* to ensure proper curing conditions.

IMG_20170211_174553.jpg

CARPET BUTTON HOLES: i taped the ones left in the still-intact floor area and enlarged them with a 9/32" drill bit. i mixed up some J-Core and poured it into a large syringe (i drilled the hole bigger to let it flow out better). leaving the tape to prevent a mess from overflow, i injected the J-Core. i wiped each one level, though most of them are slightly below level after cure. this is fine as i plan to dab gelcoat to seal them up when i do the rest of the floor. i didn't bother to tape off the helm area holes because those areas can be re-sanded. the holes in the angled foot rest areas had to be backed with tape due to their composition. i finished these with gelcoat on Feb 17.

Feb 12: MORE FAIRING. sanding yesterday's filler down using the Makita. the filler is going to gum up the sandpaper quickly - factor in the additional heat from the belt and it will fill the paper crazy-fast. the two used 40grit belts from leveling the fiberglass got a lot of it done today, so minimal loss there. note the Makita isn't exactly balanced due to the motor weight on one side. not a problem now that i am aware of it and can adjust for it.

IMG_20170212_132740.jpg

after feathering the edges with the sanding blocks, i vacuumed, wiped with acetone, and taped the perimeter. i mixed up 4oz of the vinyl ester resin with silica and microballoons then used a paint trim guide to spread it where it needed to be. this second layer of filler fine tunes the first rough coat that got the basic shape outlined. i will need 1-2 more applications to fill any bubbles and smooth out the tougher areas near the ski locker. short day because i have to wait for it to cure.

IMG_20170212_154406.jpg

Feb 16: since i am rolling the gelcoat to leave a textured finish (and also covering with SeaDek), i am not being my normal perfectionist self in getting the new floor smooth. i did a total of 3 filler applications with the microballoons and did the final sand/fair (3M sheetrock with 40grit and the Shopsmith block with 80grit) today before vacuuming all the dust up from the past month.

Feb 17: mixed fumed silica into some pure gelcoat and set that in a sealed container for overnight. i am going to use this as a "fillet" for the water channel behind the fuel hatch prior to rolling the gelcoat - this way, i won't need to rough-up the fillet and the bond will be strongest. i mixed up some gelcoat with MEKP and dabbed it onto all the cleaned button holes that were slightly bowled out from cure-shrinkage (no wax or PVA). i used acetone to clean the outside perimeter and seat posts of all tape residue. i had planned to re-mask everything today in preparation for Sunday, but got sidetracked fixing a gnarly chip in one of my wakeboards.

unrelated.jpg

Feb 19: GELCOAT APPLICATION. the big day, finally. i opened the bimini and draped some plastic sheeting to keep the leaves and tree debris off the work area. i pulled the port and starboard bench seats and placed plastic sheeting inside to protect the carpet. i will be rolling from here and the edge of the ski locker, using the seat posts to get there. i cleaned the perimeter and seat post bases with acetone and began laying my masking tape. masking took about 2 hours because i wanted it just right to maintain the non-skid edge. i taped the edge with at least three layers to help shape the "plateau" and then applied paper to the vertical surfaces to guard against splatter. i cleaned the entire floor area with acetone and did not step onto it afterwards.

IMG_20170219_143533.jpg

weather: started layup at 81*F with 53% humidity; finished at 77*F with 54% humidity.

i opted to do the water channel behind the fuel hatch just prior to rolling the rest of the gelcoat. unfortunately, this didn't work as i had hoped. i taped the area around the channel with the intent of pulling it prior to rolling. i used a plastic spreader to apply the gelcoat fillet i prepped the other day (gelcoat and fumed silica the consistency of about ketchup). the heat from the gelcoat melted the glue on the tape just enough to leave small spots of glue residue behind. so i left that area to be finished another day.

for each coat, i used a fresh 7" Tiz roller and a 3.5" (cut in half with a hacksaw). i started with the 3.5" to get around the seat base and then switched to the 7" for the rest of the floor. my first batch was 10oz - i didn't want to go so small that i couldn't do a full coat and didn't want to do so much it would kick. after the first application, i had a bit of waste left over, so the remaining batches were 8oz (perfect amount). with too much in the mixing tub in a prior repair, i had trouble getting the material down before it kicked with a brush. but pouring it into a roller tray immediately after mixing in the MEKP got my enough time to roll a full coat with no worries - each coat took about 13-16mins. it was 80*F, so i mixed my MEKP at 1.25% to get a little more time as well. this was my first attempt rolling gelcoat and there wasn't a lot of info on the internet. i knew it could be done, but i didn't have a lot of details. i chose the 1/8" nap foam roller since it would not soak up and waste gelcoat. also, the foam does not leave behind lint and produces a very fine texture. i was extremely happy with the application. by the end of each application, the foam was starting to let go from the cardboard tube, but it never became an issue. forgoing additional microballoon applications, the gelcoat made the slight imperfections more obvious. still not really that noticeable and i'm not too concerned since i will be applying SeaDek. the "worst" areas, actually, were the clusters of air bubble dimples in the fiberglass where i sanded down the non-skid - so i am blaming the factory on these. i didn't even see them until the new gelcoat went on. i did my best to overfill/seal them during rolling.

from what i had read, i had planned to do at least four coats (i ended up doing a total of six - i guess this is because others were using rollers with a thicker nap). by the fourth application, i could no longer see the dark microballoons beneath. so at the end, i opted to apply a fifth coat just to be safe (in case i missed noticing any thin areas). admittedly, the first coat went on the thinnest ...mostly because i was afraid of running through the first 10oz and not getting full coverage. i was not afraid to load up the roller with the subsequent 8oz batches. i rolled out each coat then replaced the pan and rollers, measured another 8oz of gelcoat, mixed the MEKP for 2mins, then went right at the next application. at this steady pace, the prior coat was just tacky enough to stay put when the fresh, loaded roller went over it. for the final/fifth coat, i incorrectly added 0.50cc* of sanding aid (wax additive; surfacing agent) to the 8oz of gelcoat. i have never used wax before because my first repair was sprayed with Duratec Hi-Gloss additive (provides a full cure). my second repair was brushed, so i simply wiped the tacky skin off with acetone since i was going to be sanding it (very easy and i especially liked not having any "contaminants" in my gelcoat below the waterline). i had originally planned on spraying with PVA up until a week ago when i decided it would be much easier to try out the wax option. PVA should be finely misted (think Preval sprayer - whereas a heavier Windex-type sprayer will spatter, causing dimples and uneven curing) as soon as the gelcoat begins to kick (tacky but firm) - too early and it could dimple and/or stain the gelcoat surface; too late and it may not provide an optimal cure. i've also read that using a brush will apply too much and potentially adversely affect the texture and cure.

*unfortunately, my wax additive amount was incorrect. i did my calculations a couple nights before and converted oz to cc. but when i did the mix, i used the much smaller original number rather than the converted number next to it. stupid Imperial system - stupid me. so i was way under the necessary amount to provide a tack-free surface cure.

IMG_20170219_175049.jpg

as i did with the layup, i ran the stopwatch on my phone to ensure i mixed the MEKP for 2mins and to see how long it took. my first batch was the fillet for the channel at 3pm, followed by five rolled coats. in total, it took 2.25 hours. i had planned for 2hrs, so not a bad estimate. following clean-up, the fifth coat was kicked enough to pull the masking tape. i wanted to get the masking tape up while it was still rubbery to prevent chipping the edges of a fully-cured gelcoat. the multiple layers of tape came up easily and the edge remained well-defined. my new neighbor, who i just found out used to lay fiberglass at a boat repair yard, stopped by and couldn't believe how well the entire repair had come out - we were both very impressed. after admiring my work, the sun had gone down and everything seemed cured enough that any crap the wind blew onto it should come off easily, so i pulled the plastic sheeting and dropped the bimini. it was to get down to 60*F overnight, so i set up the space heater around 70*F+ and put the cover back on.

Feb 22: INITIAL RESULTS: raining on and off today, so not working on the boat. but i did take a look at my work and found it to be slightly tacky ...enough to grab onto dirt/debris easily. i screwed up my sanding aid/wax additive measurement in the final gelcoat batch. i had to convert my measurements from oz to cc a few nights before, but i then forgot to use the new cc amount the day i rolled. the floor looks phenomenal, but it is still slightly tacky since there was essentially nothing to seal it. the texture is fairly fine, almost the texture of an eggshell (but coarser) ...it does not require a lot of sanding to smooth out. i think it's even better than when i sprayed with Duratec.

from my understanding, trying to fully cure this is unlikely to be remedied at this point since the MEKP has evaporated, so there isn't any catalyst left to finish the cure. therefor, the fixes include wiping the tacky layer off and being done with it -OR- re-applying 2+ layers with a final waxed/PVA'd layer. these are only an option if the gelcoat and MEKP aren't to blame (ex: expired, incorrect catalyst ratios, or forgot to add MEKP altogether). otherwise, no amount of time or heat is going to fully cure it (generally speaking). applying heat is said to work on occasion, but it's too big an area to deal with ...ambient 80-88*F Florida heat combined with direct sunlight definitively didn't do it.

OTHER CURING OPTIONS/NOTES: a long-shot option would be to clean up the dirty fingerprints i put on the tacky gelcoat with a light wash of isopropyl alcohol and then brush on PVA - but i'm well beyond the application window of when it has kicked/gelled and not yet hardened (the MEKP has evaporated). to achieve optimal cure, PVA should be lightly/evenly misted in two coats and cannot be applied too thin, too thick, too late, or too early. this wasn't practical for my large area, but instead of surfacing wax or PVA, waxed paper can be draped over the freshly kicked repair and sealed around the edges with tape to lock out the air. covering the gelcoat with packing tape or pressing saran wrap onto it will also work. again, these options are best done before the MEKP has evaporated overnight. one easy way to tell if it is fully-cured is to lightly clean it with acetone: if it becomes sticky again, it's not cured and probably won't ever be.

note the well-defined edge at the ski locker...
IMG_20170222_131932.jpg

NOTES ON GELCOAT THICKNESS: this gets complicated... depending on who you ask, the final desired thickness post-sanding is between 15-25mils (thousandths of an inch), while some say to shoot for a final thickness of 30-35mils. the equivalent of 15-25mils being 1/64" to just shy of 1/32" or 0.38mm to 0.6mm. generally speaking, gelcoat is applied in a thickness between 30-50mils if sanding is required (sanding is always required if a mirror finish is desired). the equivalent to these thicker figures being 1/32" (0.8mm) to almost 1/16" (1.3mm). assuming that a spray coat is about 10mils, four coats should be about right for a newbie (i ended up rolling six with an 1/8" nap foam roller. roughly eyeballing a core sample, this got me near 0.5mm with no sanding. maybe thicker coats or 1-2 more would be optimal? i'd still stick to the shorter nap because of the resulting fine texture). it's usually best to be on the thicker side of the window because this will allow more room for error during sanding and will also increase longevity of the finish due to the slowly decreasing thickness from maintenance compounding and polishing over the years. however, the thicker it remains above 25-35mils, the greater the risk of it eventually spider cracking as it shrinks with age. as for worrying about going too thin, the gelcoat really only has to be thick/opaque enough so the FRP beneath it is not visible. gelcoat's job is to prevent UV and water damage to the substrate (though gelcoat is somewhat permeable to water - moisture is always coming and going). keep in mind that applying a single, very thin layer of gelcoat may not cure correctly since the solvents can evaporate too quickly (i believe this to be my issue on the sixth coat that i applied tomorrow). conversely, applying several heavy coats can trap solvents, thus prevent proper curing - allow the last coat to just lose its sheen before applying the next. apparently you can let non-waxed applications harden for several hours between coats. keep in mind that the prior coats' heat will help kick the following coats, so i would not wait too long.

Feb 23: MORE GELCOAT. it has been four days since i rolled it - twice the normal allowance for cure and shrinkage. it feels cured to the touch, but if i kneel on it, my jeans stick a little since i was so far off with my wax additive. so i went through the tedium of raising the bimini and doing my best to cover my work area from debris again then taping everything off (only one layer). lucky for me, the past week has been extra windy and blowing crud around. j/k, it sucks - the other day was 10mph and today is 14mph! to work on the tacky surface, i kept a section of heavy plastic sheeting under me and wore long sleeves to prevent my arms from sticking. once taped and masked, i acetoned the entire area. this should accomplishes a few things: 1) clean all the dirt prints i left checking for tackiness; 2) dull/scuff the surface without sanding; 3) remove any oils i may have left behind while taping; 4) "soften" the gelcoat up a bit more to help the bond. the forth seems counter-intuitive since acetone normally weakens bonds, but it will evaporate off before i actually roll the final coat.

this time i measured out 8oz of gelcoat, added 7.4cc of slightly-warmed wax additive, and thoroughly stirred it together. then i added my MEKP and stirred for 2mins. instead of 3.3cc for a 1.25% ratio (80*F with 60% humidity today), i measured 3.5cc because of the additional volume of wax. i rolled out this sixth coat just like i had done the other day with no issues and included the water channel (the channel is going to need some extra attention later). i have never used wax before, but my early impressions are very good. the gel was quickly much less tacky than a non-waxed application, so the oak tree debris that magically made it into my work space was not sticking like they had the prior day.

unfortunately, it seems this single coat was not thick enough to get a proper cure. my fix was to generously wipe it with naphtha to remove the wax (couldn't tell, really) and then to patiently wipe the tacky skin away with acetone ...fairly tedious on such a large area. keeping my paper towel very moist with acetone and changing out frequently, i worked in small sections with a circular pattern, Karate Kid style. i didn't have any, but i think the light blue "shop towels" would work best to assure you've got a clean side each time. i had to wipe the small sections about 6-8 times to get it all up as it would smear into already clean areas. but it worked! i can tell that i essentially removed all of the sixth layer of gelcoat because of the particular dust that collected on the "un-waxed" fifth layer. again, i'm laying SeaDek so this doesn't bother me. i am guessing the sixth layer had enough MEKP and wax to re-catalyze and then seal the tacky fifth layer to a full cure ....i lucked out there.


PVA or Wax:
my above failure was apparently due to my last gelcoat application being a single/thin coat (atop of several that i applied a few days prior), so it wasn't able to produce enough heat for a proper cure ...that's my bad and i'm not blaming the wax. my experience with PVA has been positive if i don't apply too early (which can stain the gelcoat surface). i prefer 100% gelcoat with no additives (this includes wax, Duratec, and Patch Aid) for topsides as it ensures the highest UV protection and maximizes longevity.* additionally, if left in the gelcoat, i surmised wax could hamper the bond of future applications - that would be the real nightmare and it is another reason i would try to avoid it ...this is also why i avoid epoxy. however, there is one glaring benefit to the wax additive, especially for outside jobs: it seems to form a barrier quick enough to prevent dust/fallout from easily sticking to fresh gelcoat. ultimately, i would choose wax or PVA on a project-to-project basis: if i knew i'd be sanding away the final layer, i could see myself giving wax another shot. i feel a project like this would have been better suited for PVA since i had planned to leave the surface as-is.

*generally speaking, do not rely on what some might say about the above additives because it may only be short-term exposure. furthermore, even career patch experts may not see their work five+ years later because they are fixing other peoples' boats and aren't necessarily seeing the long-term results first-hand ...there is a reason the best pros warn of thinning gelcoat too much. pure gelcoat, though obviously more finicky, is the optimal way to go every time. the one instance i used Duratec Hi-Gloss (very successfully, i might add), i only did so because i re-gelled the entire engine bay where it would not be tinted by UV exposure. if it does tint over time, no one will ever notice. also, i was "blending" (for lack of a better term) and knew the Hi-Gloss would provide a proper cure even when applied very thin ...presumably, the issue i had with my sixth rolled application here.

APPLYING PVA: preferably, use an HVLP gun with a tip between 0.8-1.0mm and apply after the final application of gelcoat has kicked, but before it has hardened. spray on one light coat, allow to dry a little and then apply a second to ensure full coverage. after cure, rinse with soap and water (or just water). do not try to clean a PVA gun with acetone as the combination will congeal. i have found that 100% PVA should only be sprayed through a Preval sprayer once, otherwise it can clog and spatter on additional usage. however, i have had improved results thinning the PVA down a tiny bit with water to reduce spattering out of the Preval. another nice thing about PVA is that you can see it, so you will know for certain that you've removed it all ...wax, not so much.

well, it seems i have found the photo upload limit.
Finishing Up continues in the next post...


Total Cost: not counting the hand and power tools (most of which i already had), the supplies were just shy of the standard B.O.A.T. price. and that includes loss from learning/experimentation and over-buying quantities to be safe. always err on the side of extra resin and gelcoat - nothing worse than trying to stretch it out in a time-sensitive environment.
Total Hours: current rough approximation is 100hrs from when i gave up on drying the bad wood and decided to replace it with new balsa. keep in mind that there were plenty of hours spent staring, thinking through my plan, testing different options, and learning from mistakes. the Makita belt sander certainly saved a lot of time doing the brunt of the hard/tedious work. all in all, not too bad considering this was my first floor replacement (a relatively massive 16sqft of balsa and glass with 25sqft of gelcoat) and i'm still an FRP newbie ...the next one should take half the time.

Metric-only Catalyst Chart: i pretty much despise (okay, despise is a bit strong) the Imperial system of measurement. aside from the Imperial foot and every U.S. citizen being able to easily relate to body weight in pounds, the system is a pain in the butt ...especially for conversions. then toss in the Stone measurement from our Imperial brothers, and it's even more ridiculous. i used to work in a machine shop when i was attending college and i asked one of the tooling guys why he liked the Imperial system. his answer: "because you can easily make it fractional. a 16th can be halved to a 32nd and halved again to a 64th." i thought this to be a terrible argument since every schematic has these converted to a decimal anyways. enough of my ranting. here is a chart i doctored-up that only lists Metric values for the MEKP to alleviate my own confusion.
cat chart.JPG
 
Last edited:

CrankyGypsy

Jetboaters Captain
Messages
352
Reaction score
296
Points
202
Location
Tampa, FL 33615
Boat Make
SeaDoo
Year
2008
Boat Model
Challenger
Boat Length
18
FINISHING UP

with the repair considered done, i'm moving on to the detail work. this includes drilling/mounting table base holes, inspecting/reinforcing any other wood-related problems, prepping the floor for SeaDek, and replacing the weatherstripping under the fuel and side hatches.

Feb 25:
TABLE BASES. i used a couple carpenter squares and my 4' ruler as a straight edge to align my new SeadDek between the ski locker and the fuel hatch. with it taped into place, i traced the SeaDek's opening for the table base location with a pencil. found the center, pilot drilled it, and then used a 3.25" holesaw. i am also putting a table base in the bow area, so i had a core sample to compare:

IMG_20170225_150946.jpg

Yamaha used 3/8" balsa in the bow floor whereas 1/2" was used in the helm area ...but possibly a thicker backer up front. could just be me, but i think my FRP looks better than theirs. i was concerned the other day that the sixth application of gelcoat was going to make it too thick. obviously, that isn't an issue - i should be within the desirable 15-25mils range. you can also make out the near-eggshell texture of the rolled finish is - again, this is without sanding and would not take much work to knock it down flat. i decided i didn't need the support foam any longer and removed it. the piece near the ski locker almost drove me mad trying to get at it.

IMG_20170225_151559.jpg

there is no way to add nuts to the back of the table base bolts, so i made two plates that i can bring up from below. the plates are very roughly 7.5" x 7.5" and 0.25" thick aluminum. with my drill press, i used a 4" holesaw on the first plate since that's the size Yamaha uses. but i like a tighter tolerance because more material is stronger (duh), so i made the second 3.25" and will use this one under the original table base. i then added the six holes and used my homemade guide to accurately tap the 1/4-20 threads by hand.

IMG_20160917_174713.jpg
IMG_20160917_183740.jpg

i measured the max distance from the ski locker edge to the anchor locker divider to see where the plate had to be. in hindsight, i could've trimmed the side off a bit more to move the table base another inch forward. i aligned the two sections and then pulled the smaller one. with the ruler, i found the center of where my plate needed to be. i marked the floor and then marked the SeaDek. 3.25" holesaw followed by 5/16" drill bit for clearance holes. i cut a 7.25" circle in the SeaDek from the back with a sharp x-acto knife. in the next pic, you can sort of make out how not-flat the deck is (under the lower-right corner of the mounting plate) from the factory.

IMG_20170225_144956.jpg
IMG_20170225_145209.jpg
IMG_20170225_150009.jpg
IMG_20170225_171515.jpg
IMG_20170225_161730.jpg

a few days later, i received the 1/4" cove router to neaten-up the table base hole. i opted to not cut deep enough to expose the black because it seems impossible to get it to look even with this setup - the line between the two colors looked wavy on the piece that i tested on (the circle i cut out). keeping it all grey helped hide the tiny inconsistencies caused by the soft material.

IMG_20170304_194620.jpg

Mar 1: PREP FOR SEADEK. my interior gelcoat is slightly discolored from years of being dirty - more of a yellowed-white than a bright white. a liberal amount of acetone on a paper towel and some elbow grease got the edges around the non-skid white again - this way i'm not trying to clean around the SeaDek after it is installed. i also cleaned the unscathed non-skid so the SeaDek has a contaminant-free surface to adhere to.

MORE ROT FOUND: i also removed the ski locker door and then it's latch - not surprisingly, the wood around the latch is very deteriorated. pffft, i've fixed worse! the same goes for the latch on the cleanout hatch. my plan is to route them out with allen wrenches like i did in the first post, then fill the cavity with J-Core, and re-holesaw them. before i reinstall my ski locker and fuel hatch, i will be adding Knu Konceptz's Kolossus sound deadening (bought a couple years ago; finally getting to it) to the backsides. i may also add it the underside of the port and starboard hatches.

Mar 3: SWIM DECK: i removed the swim deck's table base and found that the lip of the center hole had been sealed with white silicone at the factory (but not the mounting holes). i had to place a crowbar at the inside lip of the base and use a piece of wood to pry/leverage it off. there are only very slight signs of water intrusion, so i am wondering why the factory, at the likely cost of pennies, did not silicone the helm table base (and seal the latches, for that matter)? the discovery today: the swim deck core is not balsa, but plywood.

IMG_20170304_125652.jpg
IMG_20170304_125704.jpg

Mar 4: ROT PROOFING: routed and filled the new bow table base holes and the latch hole in the cleanout hatch. using the discs i cut from the floor back in December (along with paper towels as a gasket and wax paper to prevent sticking), i set up a support from below and poured the J-Core. brushed PVA around the area to prevent any spill or overflow from sticking to the non-skid. for the table base, the J-Core did not flow far enough beneath the floor, so i also used a syringe to slowly pump compound into the small holes - this ensured air had a chance to escape. i used a toothpick on the cleanout hatch to help any trapped air escape. for the swim deck, i will try introducing wood sealer to add an extra barrier of protection to the plywood (it's way too solid to route out) and in the screw holes of all the hatch hinges.

IMG_20170304_123536.jpg
IMG_20170304_133434.jpg
IMG_20170304_134733.jpg
IMG_20170304_153835.jpg

POLISHING: i had a few very shallow nicks in the helm perimeter (the inside corners where the floor meets the interior walls) from the belt sander. i filled these with gelcoat fillet a while back and sanded them smooth to 400 grit today. the sandpaper also removed the slight off-white stain from age in the gelcoat all the way around the helm floor. if i wanted a more mirror-like finish, i'd definitely work up to at least 1000 followed by rubbing compound. but for me, this is fine enough for the interior. i used my Makita 9227C (dial set at about 3.5) with a 6.5" Lake Country Foamed Wool Pad (purple) on a 6" foam backer to polish the inner corners around the non-skid areas. i had tested a few different LC pads a couple years ago and settled on these for both compound and polish - they seem more forgiving to newbies (me) than others. applied 3M Finesse-It II Glaze with the polisher and then buffed it off with a microfiber towel (Microtex Platinum 2in1 Wax & Shine). tomorrow i will seal this with Starbrite Marine Polish with PTEF, using a flannel rag to apply it and then buffing it off with a clean flannel rag before it can dry/streak. i tried polishing the recently gelled floor, but it didn't seem to make a big enough difference to do the whole thing - granted this was in the shade. if i wasn't going to cover 99% of it with SeaDek i may have took the time to compound the helm floor - maybe i will get a little gloss between the pieces with Collinite Fleetwax. very quick testing on the spare piece of SeaDek, i found it to be impervious to blatant applications of PTEF and wax. i had planned to PTEF the polished areas first, but i'm sure the SeaDek will resist any incidental applications if done after install ...this way i don't have to worry about contaminating where the SeaDek needs to stick.

Mar 5: sand and water are able to get under the seat posts (definitely not helping the floor rot situation), so i sealed the bases with a small bead of white 3M Marine Silicone (#08017). I re-drilled the holes i rot-proofed yesterday and installed the original and new table bases in the helm - i may also add a bead of silicone to these. i used string to bring the backing plates up to the underside of the floor so i could get the screws started. and then i began installing the SeaDek, which was a lesson in compromising. all in all i am ecstatic about the outcome - i think the SeaDek looks much better on the areas i redid as the factory non-skid looks terrible between the gaps in comparison (wishing i had belt sanded the bow, too). i'm still working on a few more minor things (hatches) to complete the project, but decided to start prepping the dash for the Perfect Pass and Trail Tech temp meters...

IMG_20170305_112436.jpg
IMG_20170305_150450.jpg
IMG_20170305_153854.jpg
IMG_20170305_172058.jpg

i ran a bead of white 3M Marine Silicone (#08017) around the outside-bottom perimeter of the table base and added a good amount of anti-seize to the screws. 4200 & especially 5200 (which i doubt i will ever use) are overkill here ...and i usually like overkill. once everything was tightened-up and the silicone cleaned-up, i used Permatex's Clear Flowable Windshield Silicone to fill the tops of the screws so water won't get between the head and the base recess. they should be water-tight all around. i used the Permatex because that's what i had laying around at the time plus it is self-leveling, producing a great finish. just have to see how it holds up in this application, though - i ordered a fresh 3oz tube of clear 3M Marine Silicone (#08019) to keep on standby if foot traffic and UV destroy the Permatex.

i used some Thompson's Waterseal to seal all the wood where the hinge hardware for the hatches mount. also used it to add additional sealing to the plywood on the swim deck. i used a needle syringe loaded with the waterseal and filled the hinge holes to the top. i left them to soak up the waterseal overnight (doubt it took longer than a few minutes, though). before re-installing the hinges and screws, i added a dab of the white 3M Silicone to the top of the holes and turned the screws in. i had a ski locker hinge screw broken off when i bought the boat. with some luck, i was able to drill/dig it out and then i routed the wood as i did above and filled it with J-Core. the J-Core actually holds a wood screw well.

-end-
 
Last edited:

Bruce

Jetboaters Fleet Admiral 1*
Staff member
Administrator
Messages
13,326
Reaction score
13,421
Points
857
Location
Royal, AR
Boat Make
Yamaha
Year
2007
Boat Model
SX
Boat Length
23
Wow, that is quite a repair and equally well documented!
 

Scottintexas

Jetboaters Admiral
Staff member
Messages
5,792
Reaction score
6,353
Points
482
Location
Corinth, TX (DFW)
Boat Make
Yamaha
Year
2007
Boat Model
AR
Boat Length
23
I had rot on my clean out hatch cover from a bad seal on one of the t-handle latches

I did a post but on my phone so I can't link it at the moment

I used. Ridrot epoxy and it worked well

You don't think about it but everybody should be checking all latch and table seals
 

swatski

Jetboaters Fleet Admiral 1*
Messages
12,806
Reaction score
18,566
Points
822
Location
North Caldwell, NJ
Boat Make
Yamaha
Year
2016
Boat Model
AR
Boat Length
24
@CrankyGypsy Man, is there anything about those boats you have not tackled yet? Awesome write-up, as always.
So much for Yamaha claims of no-wood-core in their boats, LOL. I always thought it was such a ridiculous claim. Also, makes you want to think twice about wet slipping your boat - there is a ton of wood embedded in the hull and the bilge that provides attachment points for various fixtures.


This should be a "must read" for anyone doing SeaDek install in the cockpit. Sealing those holes in the deck after snaps removal is important!

--
 
Last edited:

CrankyGypsy

Jetboaters Captain
Messages
352
Reaction score
296
Points
202
Location
Tampa, FL 33615
Boat Make
SeaDoo
Year
2008
Boat Model
Challenger
Boat Length
18
thanks guys.
@swatski i just wish i wasn't the guy that HAD to tackle all these things ...and had unlimited time and money. haha.
 

swatski

Jetboaters Fleet Admiral 1*
Messages
12,806
Reaction score
18,566
Points
822
Location
North Caldwell, NJ
Boat Make
Yamaha
Year
2016
Boat Model
AR
Boat Length
24
@CrankyGypsy So, with all this awesome prep, have you considered using pour-able transom compound for the core?
I have used it once to rebuild a transom and parts of stringers, I was beyond impressed with how it turned out.
In your situation, you already basically created a form/liner that you could fill-in with that stuff. It is not cheap, but stronger than pretty much anything else out there, and also light.

I know you do not need any advice! But was just wondering what you're thinking. Thank you for sharing, this is fun to watch!

--
 

Speedling

Jetboaters Admiral
Messages
5,099
Reaction score
4,288
Points
432
Location
Cedar Lake, IN
Boat Make
Yamaha
Year
2008
Boat Model
SS
Boat Length
21
Awesome so far! Doing it right!
 

CrankyGypsy

Jetboaters Captain
Messages
352
Reaction score
296
Points
202
Location
Tampa, FL 33615
Boat Make
SeaDoo
Year
2008
Boat Model
Challenger
Boat Length
18
@swatski i was not aware of the pourable transoms and it's always good to hear of success stories - thanks. i plan to slide in new coring (cheaper than the all-resin option) then use some sort of resin to help fill voids and bind everything together ...i will have to consider your recommendation.
 

swatski

Jetboaters Fleet Admiral 1*
Messages
12,806
Reaction score
18,566
Points
822
Location
North Caldwell, NJ
Boat Make
Yamaha
Year
2016
Boat Model
AR
Boat Length
24
@swatski i was not aware of the pourable transoms and it's always good to hear of success stories - thanks. i plan to slide in new coring (cheaper than the all-resin option) then use some sort of resin to help fill voids and bind everything together ...i will have to consider your recommendation.
With conventional resin, key issue is temperature control. With any significant volumes, poly or epoxy, anything over few ounces will heat up when polymerizing to the point it can easily destroy your cast/form.
The other advantage of pourable compounds is that those are not brittle when set. I took a 5lbs sledge hammer to a piece once, couldn't make a dent. Unbelievable.
What I found is sometimes local chemical companies may have leftovers that you may get for cheap. Shipping can be a major cost with those things because of hazmat.

--
 

CrankyGypsy

Jetboaters Captain
Messages
352
Reaction score
296
Points
202
Location
Tampa, FL 33615
Boat Make
SeaDoo
Year
2008
Boat Model
Challenger
Boat Length
18
@swatski i have an excellent fiberglass distributor nearby (FGCI.com) where i acquired supplies for my previous FRP job. they stock some Arjay products, but in huge 5 gallons. maybe the JCore IF that is the one you think i would want - lightweight and low-temp exotherm? i need something injectable (caulking gun) that can flow a little. i imagine i could also add additional filler to reduce heat and weight, but at the cost of viscosity.

options:
http://fgci.com/bp_subcats.aspx?catID=1695&level=2&cat=PUTTYS, EPOXY AND POLYESTER

under the POLY FAIR & FILL COMPOUNDS, there is something called USC Special Lite that has an ok viscosity and max exotherm of 200*F - the major problem though is it gels in under 5 mins.
 
Last edited:

swatski

Jetboaters Fleet Admiral 1*
Messages
12,806
Reaction score
18,566
Points
822
Location
North Caldwell, NJ
Boat Make
Yamaha
Year
2016
Boat Model
AR
Boat Length
24
@swatski i have an excellent fiberglass distributor nearby (FGCI.com) where i acquired supplies for my hull rebuild. they stock some Arjay products, but in huge 5 gallons. maybe the JCore IF that is the one you think i would want - lightweight and low-temp exotherm? i need something injectable (caulking gun) that can flow a little. i imagine i could also add additional filler to reduce heat and weight, but at the cost of viscosity.

options:
http://fgci.com/bp_subcats.aspx?catID=1695&level=2&cat=PUTTYS, EPOXY AND POLYESTER

under the POLY FAIR & FILL COMPOUNDS, there is something called USC Special Lite that has an ok viscosity and max exotherm of 200*F - the major problem though is it gels in under 5 mins.
I have only used Arjay, which I think may be the same as Carbonecore. That is the one with silicone microspheres, there are other that use milled fiberglass as a filler - I was worried those may not pour as smooth and not penetrate (what at the time was my "form" for creating new stringers). Major advantage is you could pour everything at one time, and if you get the compound locally the cost may not be much more as compared to alternatives. 5gal seems like a lot of compound... until you start pouring.

It is messy, no doubt. But you could experiment a little on a side before a big pour, and do it in stages anyway. I was just very impressed with the final product - it takes the shape of your form, and becomes totally unbreakable, even if it is a fairly thin slab.

--
 

CrankyGypsy

Jetboaters Captain
Messages
352
Reaction score
296
Points
202
Location
Tampa, FL 33615
Boat Make
SeaDoo
Year
2008
Boat Model
Challenger
Boat Length
18
I have only used Arjay, which I think may be the same as Carbonecore.
@swatski just want to confirm it was the ceramic compound you used - grey and grainy, right? after some experiments, I'm not sure J-Core is the best choice for my updated plan. I was leaning toward J-Core for weight savings and flow to tight spaces, but have changed my plan. if you used their CPC (ceramic pourable compound) and it is as strong as you say, I will probably be switching to that. I'm also gonna make some calls to Arjay and FGCI.
 

swatski

Jetboaters Fleet Admiral 1*
Messages
12,806
Reaction score
18,566
Points
822
Location
North Caldwell, NJ
Boat Make
Yamaha
Year
2016
Boat Model
AR
Boat Length
24
@swatski just want to confirm it was the ceramic compound you used - grey and grainy, right? after some experiments, I'm not sure J-Core is the best choice for my updated plan. I was leaning toward J-Core for weight savings and flow to tight spaces, but have changed my plan. if you used their CPC (ceramic pourable compound) and it is as strong as you say, I will probably be switching to that. I'm also gonna make some calls to Arjay and FGCI.
Yep. It is made with ceramic microspheres or something like that. Not the compound made with recycled fiberglass shreds. Flows great, to the point that everything needs to be dammed really well.
Strengthwise - it is crazy strong. Supposedly 12-fold stronger that plywood, but I feel that could be an understatement.
We are skiing OOT right now, but I will look and try to find a scrap that I saved of a cured piece. I'll send it to you if I find it.

--
 

Scottintexas

Jetboaters Admiral
Staff member
Messages
5,792
Reaction score
6,353
Points
482
Location
Corinth, TX (DFW)
Boat Make
Yamaha
Year
2007
Boat Model
AR
Boat Length
23
Sorry you're going through this and wish I was there to help, I think it's worth everybody's time to remove all latches and mountings just to check them as it certainly caught me by surprise,

keep us updated as I've added this to the FAQ
 

Murf'n'surf

Jetboaters Fleet Admiral
Staff member
Administrator
Messages
7,067
Reaction score
6,004
Points
527
Location
Naples Florida
Boat Make
Yamaha
Year
2005
Boat Model
SX
Boat Length
23

4x15mph

Jetboaters Admiral
Messages
1,845
Reaction score
1,075
Points
257
Location
Downingtown, PA
Boat Make
Yamaha
Year
2018
Boat Model
AR
Boat Length
21
@CrankyGypsy , this goes in the hall of fame for write-ups. I was surprised to learn of this problem with wood rot and the culprits (i.e. table mount). This is going to be nice when you have it all finished.
 

CrankyGypsy

Jetboaters Captain
Messages
352
Reaction score
296
Points
202
Location
Tampa, FL 33615
Boat Make
SeaDoo
Year
2008
Boat Model
Challenger
Boat Length
18
@Murf'n'surf my plan was to remove a portion of balsa at the table base hole and fill with compound, effectively sealing the balsa from the outside environment. i had initially been seeing tunnel-vision on using some sort of backing board, plus i hadn't fully realized @swatski was referring to a ceramic pourable compound (Arjay CPC 6011) until recently. the J-Core can be made strong with fillers, but he's saying the CPC is ridiculously strong as-is. so i've been thinking less "traditionally" and running logistics of a new strategy through my head. i may be eliminating the coring altogether - i'd re-patch the access floor back in and then pour compound (i'm making it sound more simplified than what i have in mind). i've got a few experiments i want to try out with all that extra J-Core i have (similar viscosity as the CPC) to make sure my crazy scheme has a chance at working...

@4x15mph thanks. and yes, i am really looking forward to a rock-solid floor!
 

swatski

Jetboaters Fleet Admiral 1*
Messages
12,806
Reaction score
18,566
Points
822
Location
North Caldwell, NJ
Boat Make
Yamaha
Year
2016
Boat Model
AR
Boat Length
24
I can tell you -- from what I see -- the Coosa board is more or less exactly what you get when you cure the Arjay transom compound. Being able to pour it can be a huge advantage, but it comes with its own risks and work. I almost effed up the whole job as my "cast" for one of the stringers burst at a seam and started leaking as I was pouring. I managed to save it and ended up with an UNBELIEVABLE transome restoration job that essentially created a single unibody-like structure w/transom, stringers and part of the stern (it sounded like a bell if you hit the transom with a hammer).
Whichever way you go, it will be better than the original -- the way you do things!

Makes me laugh anytime I hear a sales person brag about no plywood in hull construction in those boats.

--
 
Last edited:
Top