• Welcome to Jetboaters.net!

    We are delighted you have found your way to the best Jet Boaters Forum on the internet! Please consider Signing Up so that you can enjoy all the features and offers on the forum. We have members with boats from all the major manufacturers including Yamaha, Seadoo, Scarab and Chaparral. We don't email you SPAM, and the site is totally non-commercial. So what's to lose? IT IS FREE!

    Membership allows you to ask questions (no matter how mundane), meet up with other jet boaters, see full images (not just thumbnails), browse the member map and qualifies you for members only discounts offered by vendors who run specials for our members only! (It also gets rid of this banner!)

    free hit counter
  • Announcing the 2024 Jetboat Pilot 10th Annual Marine Mat Group Buy for JetBoaters.net members only! This is your best time to buy Marine Mat from JetboatPilot - you won't get a better price - 30% Off! Use Coupon Code JETBOATERS.NET at checkout.

    So if you are tired of stepping on really hot snaps/carpet, or tired of that musty carpet smell - Marine Mat is the best alternative out there! Get in on this now, or pay more later!

    You only have until September 30th to get in on this.....So Hurry!

    You can dismiss this notice by clicking on the "X" in the upper right corner>>>>>>>>

Cracks in the anchor locker hatch

tdonoughue

Jetboaters Admiral
Messages
4,926
Reaction score
4,052
Points
417
Location
The Woodlands, TX 77381
Boat Make
Yamaha
Year
2012
Boat Model
AR
Boat Length
24
Ok, @Glassman and everyone...

So, I found this on my boat:
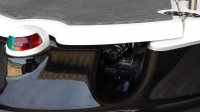
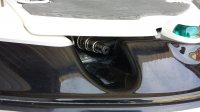
20150531_150611.jpg 20150531_150618.jpg

So, drat. You can't see it too well. But right on the edge of the anchor locker where the ladder emerges, there is a little crack on both sides of the hatch. As if the locker were closed on the ladder while it was half deployed or something. I have no idea how that would happen. Completely flummoxed.

Yes, I know, the black gelcoat is scuffed, too. And, yes, I should buff that out someday. But it will only get scuffed again. See, we actually use that ladder...

So back to the white cracks in the hatch cover. Any ideas on how to fix those? And what might have caused it, so maybe I don't have the same issue again?
 
Do you keep an anchor in there? If so, it probably bounced around and caused the crack.
 
No expert here, but from the looks of those make me think the bow ladder was dropped/slammed open, or too much weight on the ladder. How to fix though I have no idea.
 
I can't really see the "cracks" in the white hatch - it's way too bright of a resolution on my screen. I can see what appear to be chips - I'll bet the cracks emanate from there....and I agree, looks Like the hatch was slammed on the ladder or something.

If they are clear through - crack can be seen on both sides of the hatch - then you should lay-up a bit of glass cloth inside to reinforce and try and keep it from happening again. If the crack is just outside then a gel coat repair is all that is necessary - BUT you want to do something to prevent this from happening again.

Does that hatch have a support strut or spring? If not, it should.
 
It looks like weight from the pull on the ladder but I am not sure either. My hatch does have a "spring" to hold it open but it will slam down. That said I took the ladder out the first year and just use the area for the anchor. We jump off of the front all the time and do open that hatch a lot and I don't have any cracks. That is another reason I am thinking it may be the pulling on the ladder. The initial getting up on the ladder has to have some stress right there where it is hanging out. Glassman is always the best at fixing the problem and his comment on identifying it to insure it doesn't happen again (or make it worse) is key.
 
Yeah, I was afraid of that. I will be going up to the boat shortly and will try to get some better pics.

I was not talking about the gellcoat scuffs on the black. I will probably just cover them with something to prevent that from happening again. These are in the edge of the hatch--as if the ladder were hanging out and the hatch hit it (but I don't think the ladder goes that way, so that is why I am confused).

Ok, better pics coming.
 
Ok, these should be better:
AJAX - WIN_20150610_201647.JPG AJAX - WIN_20150610_201632.JPG AJAX - WIN_20150610_201621.JPG AJAX - WIN_20150610_201610.JPG

The exact spot is still a little fuzzy, but you get the idea. I don't know how it happened because if the ladder is partially deployed, the aft side of the ladder hits the aft side of the hatch. And when fully deployed, the stopper on the top of the ladder keeps the ladder from hitting the hatch. So that is why I don't know how it happened.

It is not a huge crack there, and so far no spider cracks coming from it or anything. Just that little spot that is bashed a bit.
 
Oh, and, yes, the hatch does have a spring that holds it open...
 
Oh, OK.... much better shots...the chips I saw were just that. I think the hatch is flexing under load and contacting the ladder.
By chance, anybody ever dive off that hatch? I'm thinking that the force flexed the hatch into the tube, chipped the edge of the hatch. Sound plausible?

You can fix the chips, but it will happen again unless you fix the problem.

I see two solutions off the bat.
Raise the hatch...shim under the hinge perhaps?
Reinforce the hatch...a pain in the ass in my opinion, but might be the way to go.

Or I'm way off base and it's something else......:confused:

You nailed it. My anchor locker hatch has the same damage. It's caused by the hatch slamming down unexpectedly and by the weight of people boarding onto or diving off of it when the ladder is deployed. I didn't "fix" them just covered them with some black auto door edge liner from pepboys.
 
Ahhhhh... Yes, ok, that makes sense. Yes, kids dive off there, climb up there, etc. All the time. Flexing must be it.

Covering is an ok idea, but unless you reinforce or remove the ladder, the chip underneath will grow, no?

I wonder if I added more rubber 'feet' like the ones pictured that keep it from closing all the way? Otherwise it has to be a piece of metal underneath and that does sound very messy....
 
@tdonoughue I have the same thing but worse on my boat. It noticed it right after it happened. I left the ladder out while at the beach and when I took off I completely forgot to bring it back in. About 1/2 mile across the lake I noticed and that's all it took.
 
Yup I think you found the problem. I don't have this because I took the ladder out. We always jump off of the front. It also sounds like many people have encountered this. Somehow you have to reduce the impact area. You may have to be creative to solve the problem.
 
Ahhhhh... Yes, ok, that makes sense. Yes, kids dive off there, climb up there, etc. All the time. Flexing must be it.

Covering is an ok idea, but unless you reinforce or remove the ladder, the chip underneath will grow, no?

I wonder if I added more rubber 'feet' like the ones pictured that keep it from closing all the way? Otherwise it has to be a piece of metal underneath and that does sound very messy....

The rubber feet may be the ticket. Place them under the hatch above the tube exactly wear the chips are. That will provide a cushion between the two parts.
You may have to cut them to size and epoxy them on. See how that works before fixing the chips.
Then if you think it resolves the problem, fix the chips.
 
I may try and minimize future damage but leave the chips as is. It is custom, custom chipped.
 
Ok, so I ordered 4 more feet. I figure strategically placing those should do the trick. Let you know how it goes.
 
Slight update:

Yesterday, while enjoying my 'me time' on the boat, I brought out the newly-arrived feet... and took a closer look at where the ones were already installed. So I am now back to the drawing board a little bit.

First, I found that one of the feet screws was halfway out. I tried to screw it back in, but it is stripped. So that hole will need repair. Easy enough.

But then, I looked at the feet and how they are positioned against the fiberglass when the hatch is closed. There are two feet in the center which are supposed to touch on the fiberglass on either side of the channel. Those two feet are set aft too far and are only 1/2 touching the fiberglass. Then there are three other feet, one on either side of the forward side of the hatch (at the corners) and one on the starboard aft corner. These are all properly positioned to contact the fiberglass shelves in each of those locations.

The larger problem is that there does not seem to be anywhere to put the additional feet to remedy the problem. I am going to go up today and take a closer look while off the water (supposed to be thunderstorms today, so I don't think I am going out).

The saga will continue...
 
AAAARRRRRGGGHHHH!!! I broke my boat.

<pant, pant pant> Ok. Don't panic. From the beginning. <deep breath>

Ok, when we last left our hero, the front two feet on the hatch don't touch the forward fiberglass all the way:
20150628_181318.jpg 20150628_181252.jpg

See? They need to move about half that distance forward. No problems. So, I unscrewed the one that was stripped. Recalling that the screws are self-tapping (at least the ones I bought for that spot--the stock ones), I moved the foot up a bit and proceeded to screw it in...

CRACK!

Yes, literally:
20150628_181510.jpg

Yes, I should have pre-drilled the hole and not relied upon the 'self tap' screw. Hindsight is 20/20.

ARRRRRRRRGGGHHHHH!!!!

So, I broke out the gelcoat crack filler and filled it in before taking out the screw. Unfortunately, it did not go back into place. So I gooped some more filler on there, smoothed it over (got the original cracks while I was there) and left it covered to dry.

Did I mention: ARRRRRGGGGGHHHH!!!!
 
Sorry to hear this. That sucks!
 
Back
Top