Amar Nanduri
Jetboaters Admiral
- Messages
- 1,252
- Reaction score
- 1,608
- Points
- 252
- Location
- 20151
- Boat Make
- SeaDoo
- Year
- 2011
- Boat Model
- Challenger
- Boat Length
- 18
Figured it out FINALLY. There was a shearing force on the O ring when bolting the cooler back to the engine that is causing the o ring to tear up. Even a slight twist on the cooler when installing the bolts will tear up the O ring.
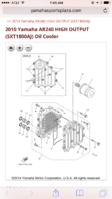
O ring is part no 12 and Conector is part no 11
These are the sequence of steps I followed when switching the O rings or bolting the cooler to the engine when you are doing by yourself sleeping down on the floor of the boat and not screwing up.
1. Always make sure the O rings are lubricated when putting them on both sides of the Connector. Put the Connectors first inside the engine block gently without twisting them. They have to fit in properly.
2. Put the oil cooler firmly on the Connectors and do not move the Cooler. Any twisting movement on the oil cooler will break the O ring.
3. Attach the big bolt 9 first between the Connectors and screw it in a bit so that the load of the oil cooler is on this bolt and not on the Connectors.
4. Screw in the second bolt 9.
5. Now that the load is supported on both 9 bolts go ahead and screw in the 10 bolt.
6. Ran both engines for 15 minutes each without any visible sign of oil.
Remember not to twist the oil cooler when screwing in the bolts. Even a slight twist of a few mm will break the O ring. It will not be easy holding it in place when screwing the bolts. I recommend the help of a second person when bolting the oil cooler.
Picture of oil cooler attached for reference


