LoWeLL216
Jet Boat Addict
- Messages
- 102
- Reaction score
- 100
- Points
- 102
- Boat Make
- Yamaha
- Year
- 2016
- Boat Model
- AR
- Boat Length
- 24

We are delighted you have found your way to the best Jet Boaters Forum on the internet! Please consider Signing Up so that you can enjoy all the features and offers on the forum. We have members with boats from all the major manufacturers including Yamaha, Seadoo, Scarab and Chaparral. We don't email you SPAM, and the site is totally non-commercial. So what's to lose? IT IS FREE!
Membership allows you to ask questions (no matter how mundane), meet up with other jet boaters, see full images (not just thumbnails), browse the member map and qualifies you for members only discounts offered by vendors who run specials for our members only! (It also gets rid of this banner!)
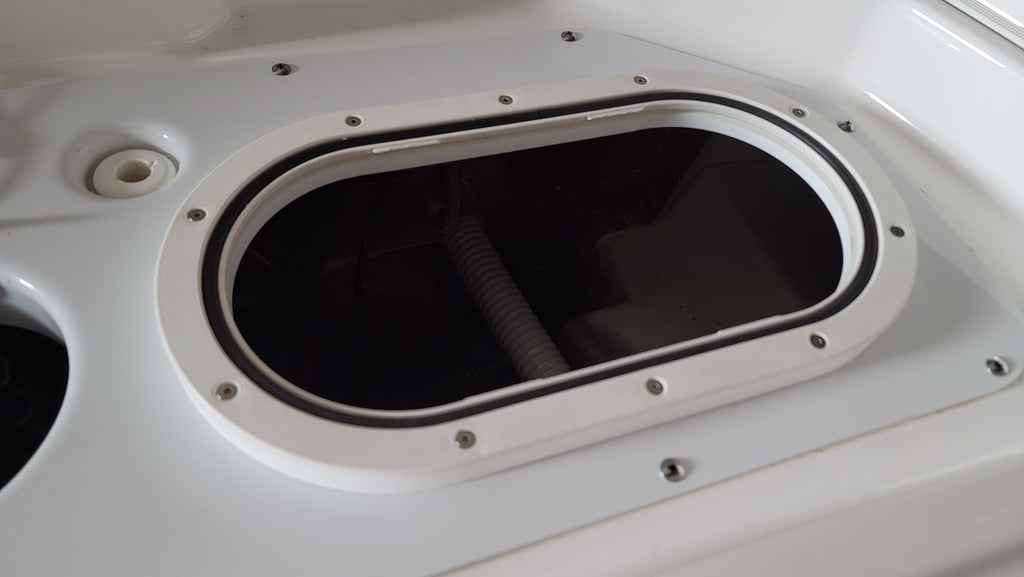
The actual bilge of the boat. You’ll also find that’s where the water box (muffler) is.Stupid question - what's underneath it?
Water gets in there when you come off plane. That compartment is meant to be “wet storage” and it has a drain. The tubing for the drain runs down and exits near the waterline back by the jet pumps. There is no check valve on that tubing so when you come off plane water rushes up the tubing and dumps in your wet storage compartment.
Thanks for everyone's help - I installed the riser this weekend and was shocked at how much it reduced the water.
Link to the riser ?Thanks for everyone's help - I installed the riser this weekend and was shocked at how much it reduced the water.
Link to the riser ?
 jetboatpilot.com
I’d order it from your local boat dealership. I ordered a part from Yamaha Sports Plaza and it took 6 months to arrive. The dealership might be able to use their parts lookup system on a National locator to find one at another dealership. Or you could make a temporary one out of hdpe plastic and some peel and stick gasket material. I wouldn’t run without the cover, and I wouldn’t go 6 months without using the boat either.I lost the cover itself and cannot find the part online anywhere. Any help?

That’s a great video. I have removed the larger tray and resealed and still get a ton of water. Did you do the reseal and add the riser at the same time or separately? I’d hate to spend the money on the riser and keep having the same problem.The cover gives you access down into the bilge area. It is supposed to be removable. Yamaha did a HORRIBLE job at sealing this area up on my 2020 AR240. I was getting gallons of water in my bilge every outing. Water was not splashing over the deck on deceleration. If I went hard reverse, I could get a tiny amount pushing up from the drain, not enough to make any difference. All the water was coming past the clean out ports. How do I know this? I stuck a GoPro video in there and recorded it. Youtube link below.
I would remove the entire cover as seen in the photo. Clean up the area, and reseal. I also added the access port riser from Jetboatpilot. I filled the area with water and plugged the drain with my finger and can confirm it is now water tight up to the top of the access port.
Finally have an answer why the cleanout ports fill with water! I always thought pump pressure was bypassing the seals. The seals are lip seals and should seal better as the pressure increases. Thanks for answering this mystery for me.The actual bilge of the boat. You’ll also find that’s where the water box (muffler) is.
Water gets in there when you come off plane. That compartment is meant to be “wet storage” and it has a drain. The tubing for the drain runs down and exits near the waterline back by the jet pumps. There is no check valve on that tubing so when you come off plane water rushes up the tubing and dumps in your wet storage compartment. That is why you see water on top of the cleanout plugs.
I haven't had any water get into the bilge area so far, but I still purchased the riser and will caulk around the main cover with 3M Marine Grade Sealant anyway. I now understand how the cleanout ports fill with water as well.The cover gives you access down into the bilge area. It is supposed to be removable. Yamaha did a HORRIBLE job at sealing this area up on my 2020 AR240. I was getting gallons of water in my bilge every outing. Water was not splashing over the deck on deceleration. If I went hard reverse, I could get a tiny amount pushing up from the drain, not enough to make any difference. All the water was coming past the clean out ports. How do I know this? I stuck a GoPro video in there and recorded it. Youtube link below.
I would remove the entire cover as seen in the photo. Clean up the area, and reseal. I also added the access port riser from Jetboatpilot. I filled the area with water and plugged the drain with my finger and can confirm it is now water tight up to the top of the access port.
View attachment 170892
You could also have it come from a bad seal on the clean out ports as the video shows above., so it’s worth inspection your seal if you think they’re leaking. Water will also come in from the wet storage overflow/drain tube unless Yamaha has finally started putting check valves on it with newer boats.Finally have an answer why the cleanout ports fill with water! I always thought pump pressure was bypassing the seals. The seals are lip seals and should seal better as the pressure increases. Thanks for answering this mystery for me.
That’s a great video. I have removed the larger tray and resealed and still get a ton of water. Did you do the reseal and add the riser at the same time or separately? I’d hate to spend the money on the riser and keep having the same problem.

.jpg")
.jpg")

.jpg")
Nice job!Fab one up, DIY style, for ~$20-25. Not sure if yours is the same size as mine, but I'm damn near convinced I could have used the scraps and the adhesive to make the second layer, instead of buying 2 boards, and it would have been about half that cost. Might not be worth the hassle though, since they're only $7-10 each. Mine is also 1" thick, vs 3/4" thick.
View attachment 170906
View attachment 170907
View attachment 170908
View attachment 170909
View attachment 170910
