ArmyChief
Jetboaters Captain
- Messages
- 694
- Reaction score
- 545
- Points
- 217
- Location
- North Port, FL
- Boat Make
- Yamaha
- Year
- 2015
- Boat Model
- AR
- Boat Length
- 19
Thanks to @Joe Covelli's post on adding a STBD access hatch for more storage & easier access to electronics/cables.
https://jetboaters.net/threads/sx192-add-access-hatch-to-the-helm-compartment.2869/
Here is my write-up of installing on our new 2015 AR192.
First, start off with the hatch: T.H.Marine-HDS-1317-2-DP (avg cost is $70-75)
You'll need 4200 sealant, a device to cut the fiberglass (I used a rotozip), stainless steel screws/washers/nylon lock nuts (I bought the big $119 kit from West Marine), blue painters tape, half-round file (Harbor Freight ! ), level & a black sharpie.

Step 1:
I wanted the new STBD hatch to be approx the same distance back from the bow as the factory port hatch. It came out to about 6" to the edge of the port hatch.
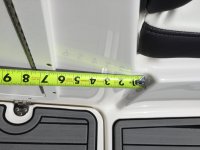
Next, I needed to take into consideration where the hole needed to be PLUS the edge of the new hatch. that came out to about 1 1/4"
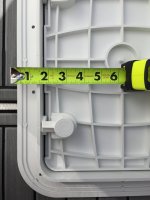
So, that means the forward edge of my hole should be about 7 1/4" from the seat edge (dimple edge like shown above in first picture). I measures the height of the bottom edge of the port hatch, added the additional 1 1/4" and determined the bottom edge of my proposed hole location. Then I took the template (part of the box, see first pic above), taped up the template (leveling).
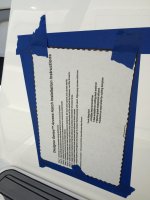
Traced around template with sharpie and then cut out (scariest part....)
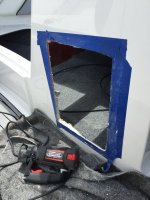
Note: cut the corners in a little and polish up with file. If you follow template exactly, you will need to use machine screws and washers in the corners.
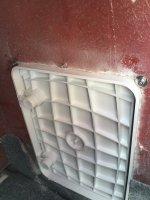
Remove blue painters tape
File and dry test fit.
Mark screw holes with sharpie.
Drill pilot holes (smaller than screws if using tapping, larger if using machine with nylon lock nuts)
Apply sealant (don't use too much )
)
Screw in hatch
Ta Da!

In my opinion this should be included from the factory. It adds much needed storage and easier access to your electronics.
Plus, having the hatch allows easy access to the next item installed...the sub-fuse panel
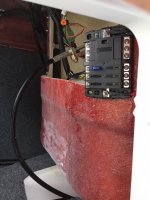
^^^ This is another write-up..coming soon
Thanks and hope you enjoyed the write-up
https://jetboaters.net/threads/sx192-add-access-hatch-to-the-helm-compartment.2869/
Here is my write-up of installing on our new 2015 AR192.
First, start off with the hatch: T.H.Marine-HDS-1317-2-DP (avg cost is $70-75)
You'll need 4200 sealant, a device to cut the fiberglass (I used a rotozip), stainless steel screws/washers/nylon lock nuts (I bought the big $119 kit from West Marine), blue painters tape, half-round file (Harbor Freight !

Step 1:
I wanted the new STBD hatch to be approx the same distance back from the bow as the factory port hatch. It came out to about 6" to the edge of the port hatch.

Next, I needed to take into consideration where the hole needed to be PLUS the edge of the new hatch. that came out to about 1 1/4"

So, that means the forward edge of my hole should be about 7 1/4" from the seat edge (dimple edge like shown above in first picture). I measures the height of the bottom edge of the port hatch, added the additional 1 1/4" and determined the bottom edge of my proposed hole location. Then I took the template (part of the box, see first pic above), taped up the template (leveling).

Traced around template with sharpie and then cut out (scariest part....)

Note: cut the corners in a little and polish up with file. If you follow template exactly, you will need to use machine screws and washers in the corners.

Remove blue painters tape
File and dry test fit.
Mark screw holes with sharpie.
Drill pilot holes (smaller than screws if using tapping, larger if using machine with nylon lock nuts)
Apply sealant (don't use too much
Screw in hatch
Ta Da!

In my opinion this should be included from the factory. It adds much needed storage and easier access to your electronics.
Plus, having the hatch allows easy access to the next item installed...the sub-fuse panel

^^^ This is another write-up..coming soon
Thanks and hope you enjoyed the write-up

