• Welcome to Jetboaters.net!

    We are delighted you have found your way to the best Jet Boaters Forum on the internet! Please consider Signing Up so that you can enjoy all the features and offers on the forum. We have members with boats from all the major manufacturers including Yamaha, Seadoo, Scarab and Chaparral. We don't email you SPAM, and the site is totally non-commercial. So what's to lose? IT IS FREE!

    Membership allows you to ask questions (no matter how mundane), meet up with other jet boaters, see full images (not just thumbnails), browse the member map and qualifies you for members only discounts offered by vendors who run specials for our members only! (It also gets rid of this banner!)

    free hit counter

Detailed 2016 242 LS $1k Audio Upgrade

@Markk , your putting these on backside of the fiberglass, not as a space Ron the frontside? If so, are they difficult to feed through some other opening and hold in place while attaching speaker?

Yes, putting on backside to spread out load on fiberglass. They won't fit through holes, but pretty easy to get them there from other openings like the storage areas. It's not hard to get 1-2 screws started. Once they're in its easy to drill like normal.
 
Yet another but distinct audio upgrade so I thought I would share. My self inflicted budget was $1k and I came really close to that. Long and detailed post so I will will lead with the photos and the rest of the detailed info is below.

New Speakers
View attachment 37447
View attachment 37448
View attachment 37449
View attachment 37450
View attachment 37451
View attachment 37452

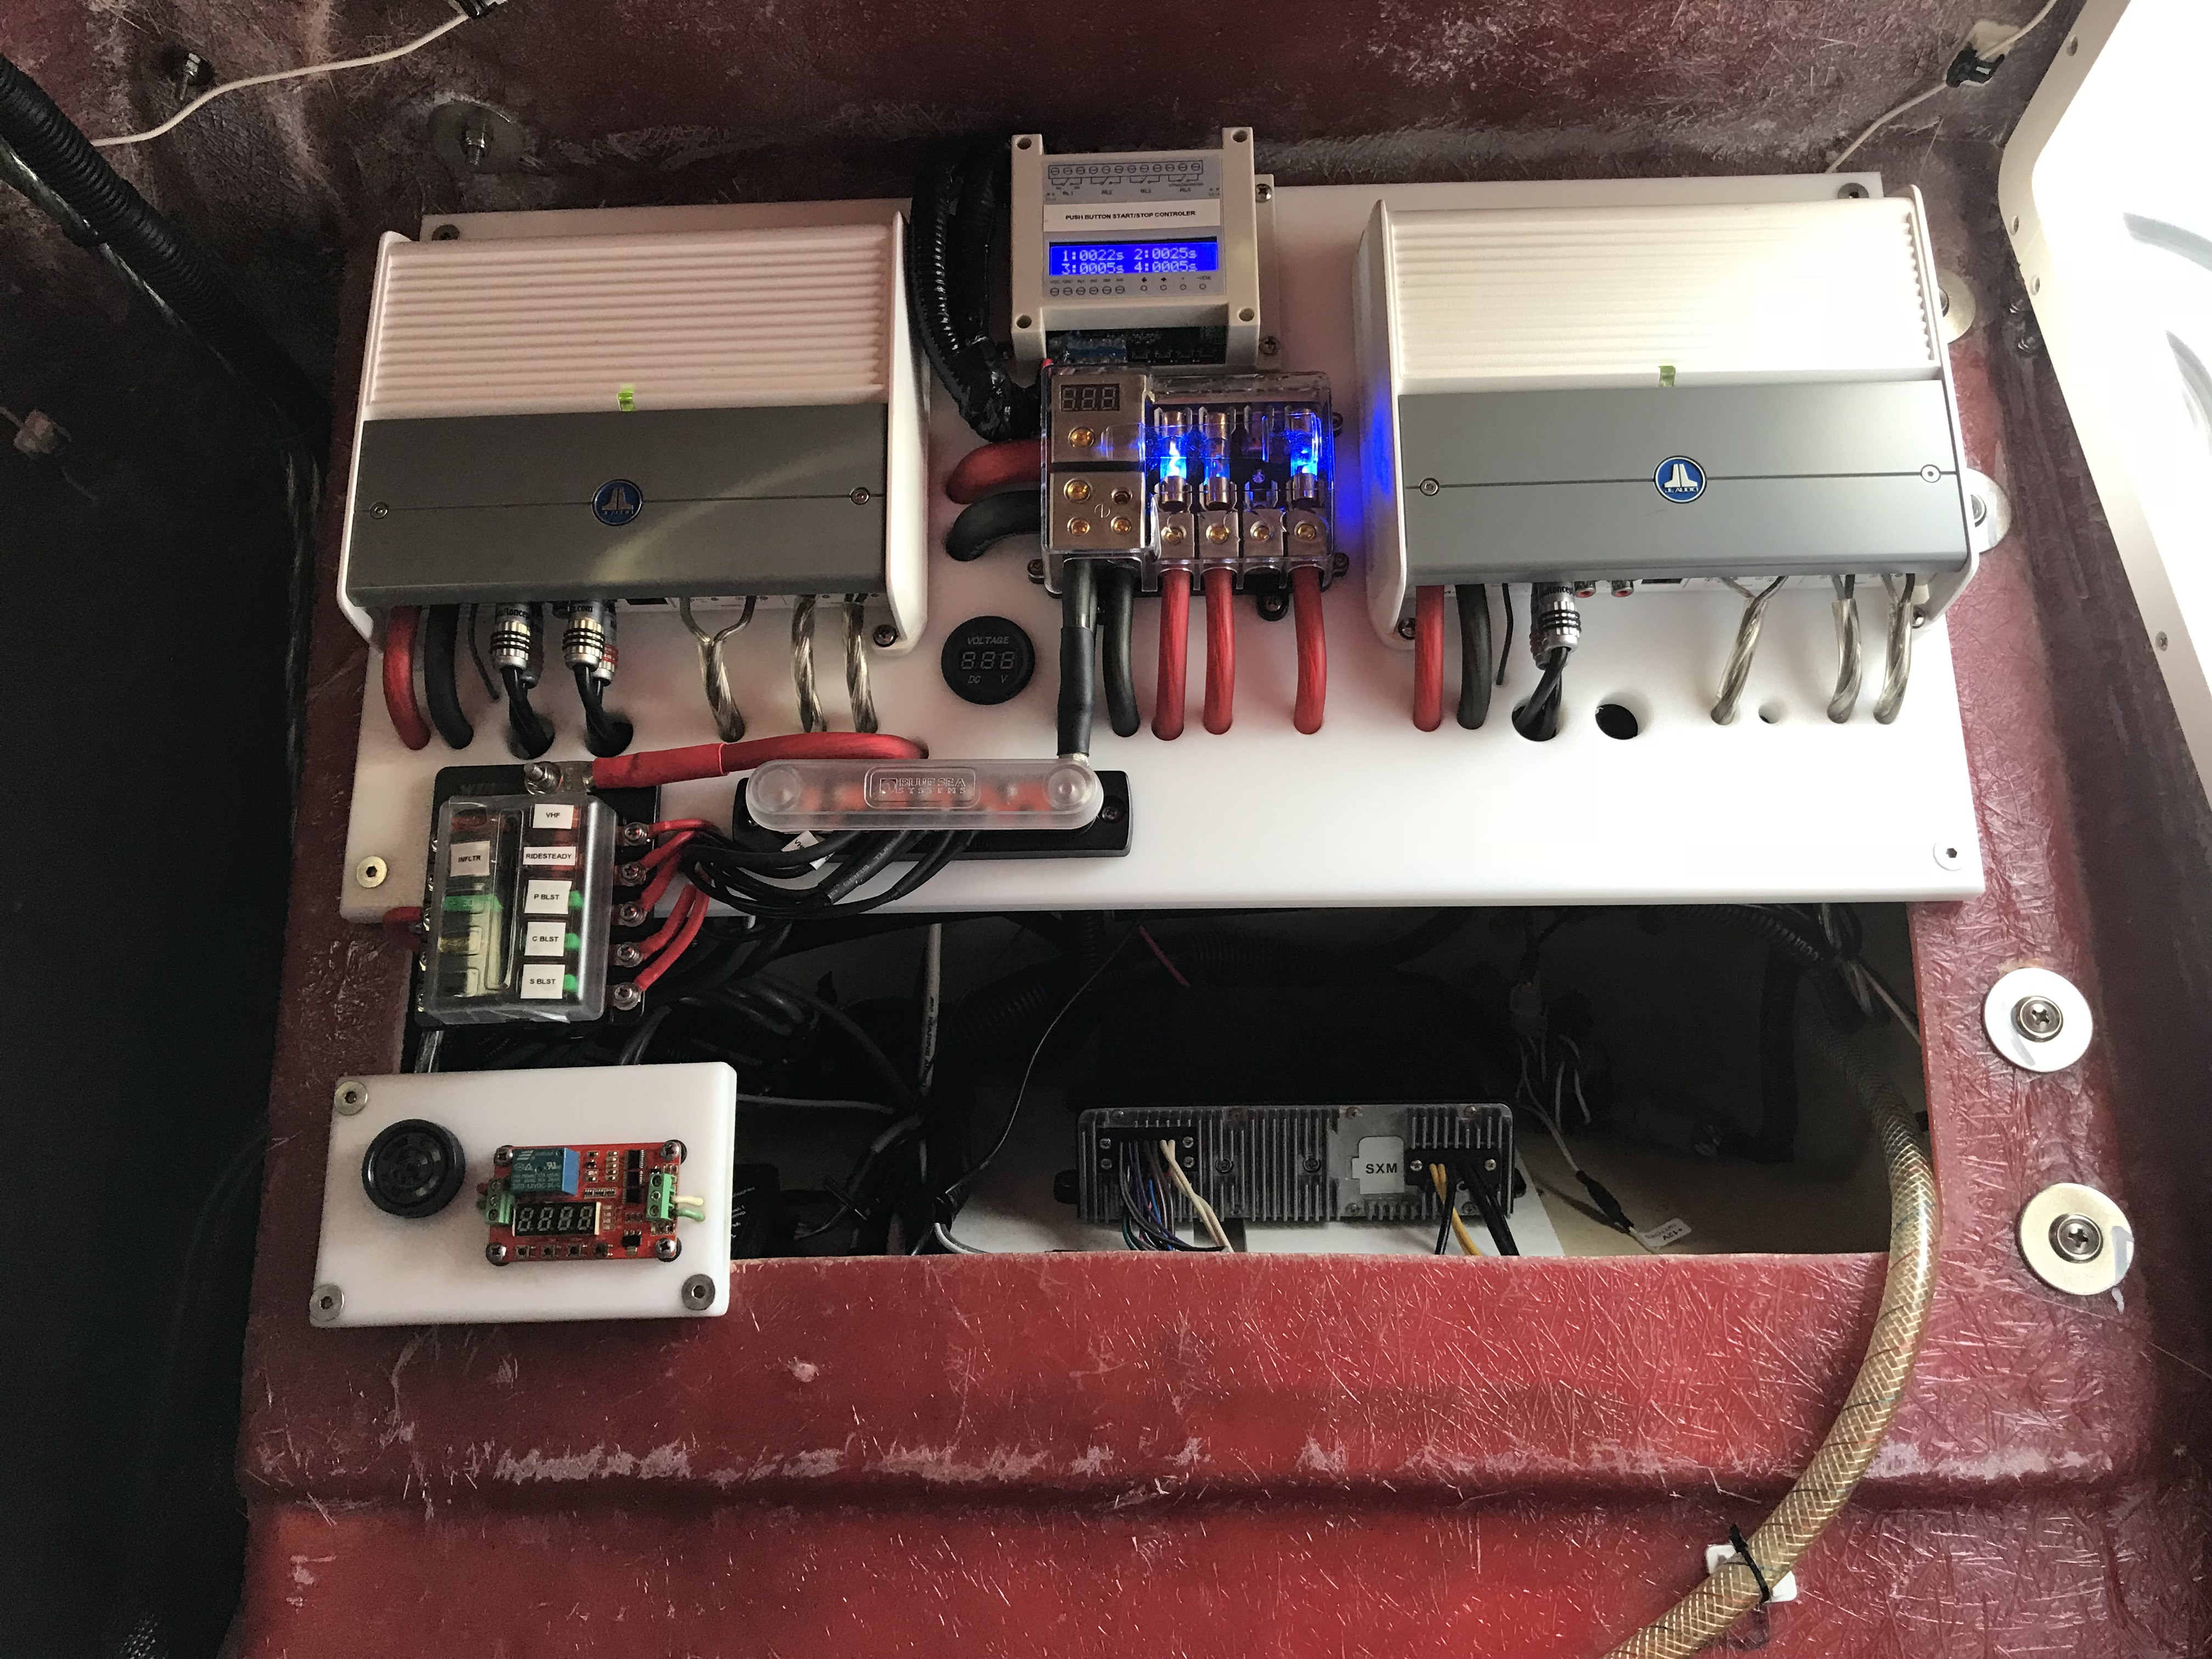
Amp Board
View attachment 37453

Some of the install remnants
View attachment 37454

Parts
  • 2 JL Audio m400/4 amps
  • 1 Polk DB 1040 Sub (matches factory Polks and grilles)
  • 1 Pair Polk DB 6x9s (matches factory Polks and grilles)
  • 20 each feet power and 20 feet ground 0 AWG KnuKoncepts Kolossus Fleks Marine Power Wire (perhaps overkill given 90% efficient class D amps but with a nearly 20 foot run over or near the gas tank I did not think the chance of melting wire at a smaller gauge was somewhere I wanted to cut corners or save money)
  • 110 feet 14 AWG KnuKoncepts marine speaker wire (perhaps overkill for the stock speakers but since running no splice runs from the new amps might as well go 14 gauge)
  • 10 feet 12 AWG KnuKoncepts marine speaker wire (only needed 5 feet .. recommend 10 gauge for powerful subs or longer runs)
  • 1 Knukoncepts large waterproof 0 AWG fuse holder for positive battery switch side of run
  • AudioPipe combined power and ground block for amp side
  • 5 feet each 4 AWG power and ground cable for fuse and ground block to amps
  • KnuKoncepts speaker terminals (they have the tiny ones for the stock Polk DBs), power terminals, fuses
  • 10 feet sump pump hose as protection conduit for power and ground wire where ran over gas tank and around engine bay access to batteries and switches
  • 1 foot small PVC hose to trim factory cutout in helm compartment where cables run through for protection of wiring
  • 1 sheet HDPE (Starboard) 3/4" x 24" x 36"
  • Stainless Steel Fasteners picked up from local hardware store to fit everything exactly right
  • 25' latex tubing (more than enough)
  • No I am not connected to KnuKoncepts in anyway. They simply sell superior craftsmanship and performing wiring products. Note the speaker wire is difficult to strip so be gentle with a sharp blade on the outer casing to score the wire then flex it to pull the outer casing off.
Unique Install Details
  • Cut custom 2 inch increased outside diameter backing rings out of the HDPE for all speakers (new and stock) to give a something for the screws to bite into and to help reduced fiberglass deflection. Used counter sunk set screws to hold them in place.
  • New holes in fiberglass for the sub and 6x9s were cut very clean by first mounting the backing rings with the set screws and then using a trim router with a bearing straight bit to follow the backing rings as templates. Super clean cutouts this way but HUGE mess. Cleaned up with a shop vac connected to a dust deputy so as not to clog the filter. Respirator and disposable painters suit were worn and are highly recommend by me when cutting fiberglass.
  • Ran new speaker wire to everything except rear deck and tower. Zip tied to stock harness for secure wiring install.
  • Center compression crimps on all speaker and poor wire terminals that were not a screw connection
  • Tinned all wire after stripped and prior to termination by dipping in molten solder inside of a one inch copper pipe end cap
  • Added latex tubing drip lines for all mid cabin cupholders and used a cable wall flange and silicone to make a drip line for the small storage tray behind the throttles since it is over my new sub.
  • Custom HDPE amp board with through hole wiring management, back of the board zip ties, and all edges and holes front and back round over routed to prevent any sharp edges for anyone reach into the helm or on the wires as they are run through the holes.
  • Added digital voltage gauge for the start battery (the red and round led gauge in the photo since the power and ground distribution block I choose had a built in gauge and is of course wired to the house battery. This allows me to check on the start battery since the connext only shows the house.
  • The two circuit boards are for my custom push button start system ... https://jetboaters.net/threads/push...video-and-full-instructions.9371/#post-160607
Wiring Details
  • Amp 1 connected to front speaker RCA output from head unit
  • Amp 2 connected to pre out from Amp 1
  • Rear speakers still connected to stock head unit (note that will have to splice plus and minus on stock rear cabin wiring as the rear deck were run in series from the factory with these)
  • Tower tweeters still connected to stock head unit
  • Sub connected to bridged channel one and two from amp 1
  • Stock 6 inch and new 6x9s each connected to own amp channel from amp 1 or 2
  • Main power wire run to house battery switch with line water proof case mounted 150 amp fuse 12 inches from switch
  • 2 group 31 AGM batteries (1 start, 1 house)
  • NOCO Genius 2 bank 10 amp each bank on board charger
Results
  • Huge improvement in sound quality and volume
  • Before the upgrade we could barely hear the speakers at cruise except for the tower and now very full range and loud sound at cruise.
  • Still some headroom in amps with head unit balance a little to the rear so the rear deck gets the power it needs from the head unit.
  • Tower tweeters no longer overwhelm and are actually a benefit with this setup (head unit balanced a little to the rear)
  • Stock speakers including the rear deck are much louder and cleaner with full range sound (high pass amp crossover set at 80 hz)
  • 6x9s really help out the mid bass (high pass amp crossover set at 50 hz)
  • Seems very power efficient so far. Three hours with amps on at various levels yesterday and still plenty of house juice left.
  • Should have gone with a better sub and better sub location for better sound. Since the location is already cut I will likely upgrade the sub to the mm um series which will have the same mounting holes and I will be able to use the DB grill. Polk mm um sub also requires less mounting depth
  • Sub location (same as 242x but opposite side) causes outer hull deflection and I am going reinforce by epoxy encasing a couple of 24 inch lengths of aluminum flat bar behind the sub to the hull.
  • Nice part is can always upgrade to the mm um series for any of the speakers in the future with minimal effort in the future if desired or add another amp, tower cans, and another sub. Think I will enjoy it for now given I have spent more time doing mods than on the water so far.
Hope this post helps someone out with ideas or helps someone looking to attempt their first marine audio upgrade.

Edit- Important fact that I should add for how I mounted the amps and did the wiring. I am one of those annoying lean fitness types that can squeeze in the helm. I face the bow stick my right leg and arm in, squat while squeezing my hips/butt/torso/head through, pull my left leg in while crouched, spin 180 degrees on the balls of my feet, sit on the throwable pfd as a cushion, realize I forgot the tool I needed on the swim deck, curse and repeat.

@Mainah does your AudioPipe display voltage constantly or only during power on sequence. Just got mine wired and the display goes away about 10 seconds after power on.
 
Mine displays during power on and any time there is significant draw.
 
Another update. Well beyond the 1k upgrade that this use to be. I have said that I was still not happy with the bass. I decided to go much further this time. My plan was to add another Polk 1040 mm on the Port side and build in hull sealed fiberglass speaker boxes for them both. I started with making the shape of the box working in the speaker hole with high density thick closed cell foam. I then filled any remaining gaps with spray foam. Next was a good coating of epoxy. So far so good but working with the chopped strand mat in the speaker hold turned out to be so difficult and messy I abandoned that quickly as it would have ended up with lots of air pockets and causing issues. Instead I let the epoxy cure and added more spray foam to the inside and outside of each box and another coating of epoxy with a brush. After curing I found a couple of spots where air still mighth leak so yet a bit more spray foam and then one last final very liberal coating of epoxy including pouring it from the top in a couple of spots. Last step was lining the inside of the boxes with MLV while the epoxy was still quite tacky. I went through half a gallon of epoxy and half a box of latex mechanics gloves in the process. Not what I originally planned, not pretty, and perhaps just a bit shy of optimum air volume but solid and sealed just the same.

I am now happy with the very hard hitting tight bass and no rattles. It sounds just as good at low volume as at high volume. I only got one photo of the enclosures because I did not want my phone anywhere near all that stickiness and I was always burning daylight to get it done. Given the amount of time and effort I highly recommend true free air subs over what I did if you are using the in hull locations.

I now have 2 pairs of mid cabin polk mm 651 powered from the jl amps, a pair polk mm 651 in the bow power from the head unit, a pair of polk mm 651 on the swim deck powered by the head unit, the factory tower tweets powered by the head unit, and two Polk 1040 mm subs power by bridged channels from the amps. The biggest difference I made in sound was adding the amps and adding speakers above the captain and co-captain cupholders.

IMG_0020.jpg IMG_0088.jpg IMG_0084.jpg IMG_0082.jpg
 
Last edited:
Another update. Well beyond the 1k upgrade that this use to be. I have said that I was still not happy with the bass. I decided to go much further this time. My plan was to add another Polk 1040 mm on the Port side and build in hull sealed fiberglass speaker boxes for them both. I started with making the shape of the box working in the speaker hole with high density thick closed cell foam. I then filled any remaining gaps with spray foam. next was a good coating of epoxy. So far so good but working with the chopped strand mat in the speaker hold turned out to be so difficult and messy I abandoned that quickly as it would have end up with lots of air pockets and casing issues. Instead I let the epoxy cure and added more spray foam to the inside and outside of each box and another coating of epoxy with a brush. After curing I found a couple of spots where air still much leak so yet a bit more spray foam and then one last final very liberal coating of epoxy including pouring it from the top in a couple of spots. Last step was lining the inside of the boxes with MLV while the epoxy was still quite tacky. I went through half a gallon of epoxy and half a box of latex mechanics gloves in the process. Not what I originally planned, not pretty, and perhaps just a bit shy of optimum air volume but solid and sealed just the same.

I am now happy with the very hard hitting tight bass and no rattles. It sounds just as good at low volume as at high volume. I only got one photo of the enclosures because I did not want my phone anywhere near all that stickiness and I was always burning daylight to get it done. Given the amount of time and effort I highly recommend true free air subs over what I did if you are using the in hull locations.

I now have 2 pairs of mid cabin polk mm 651 powered from the jl amps, a pair polk mm 651 in the bow power from the head unit, a pair of polk mm 651 on the swim deck powered by the head unit, the factory tower tweets powered by the head unit, and two Polk 1040 mm subs power by bridged channels from the amps. The biggest difference I made in sound was adding the amps and adding speakers above the captain and co-captain cupholders.

View attachment 71161 View attachment 71162 View attachment 71163 View attachment 71164


Adding the updated helm photo that every seems to like.

 
Are we just gonna gloss over this beer tap? Did I miss the thread on that?
 
Yet another but distinct audio upgrade so I thought I would share. My self inflicted budget was $1k and I came really close to that. Long and detailed post so I will will lead with the photos and the rest of the detailed info is below.

New Speakers
View attachment 37447
View attachment 37448
View attachment 37449
View attachment 37450
View attachment 37451
View attachment 37452

Amp Board
View attachment 37453

Some of the install remnants
View attachment 37454

Parts
  • 2 JL Audio m400/4 amps
  • 1 Polk DB 1040 Sub (matches factory Polks and grilles)
  • 1 Pair Polk DB 6x9s (matches factory Polks and grilles)
  • 20 each feet power and 20 feet ground 0 AWG KnuKoncepts Kolossus Fleks Marine Power Wire (perhaps overkill given 90% efficient class D amps but with a nearly 20 foot run over or near the gas tank I did not think the chance of melting wire at a smaller gauge was somewhere I wanted to cut corners or save money)
  • 110 feet 14 AWG KnuKoncepts marine speaker wire (perhaps overkill for the stock speakers but since running no splice runs from the new amps might as well go 14 gauge)
  • 10 feet 12 AWG KnuKoncepts marine speaker wire (only needed 5 feet .. recommend 10 gauge for powerful subs or longer runs)
  • 1 Knukoncepts large waterproof 0 AWG fuse holder for positive battery switch side of run
  • AudioPipe combined power and ground block for amp side
  • 5 feet each 4 AWG power and ground cable for fuse and ground block to amps
  • KnuKoncepts speaker terminals (they have the tiny ones for the stock Polk DBs), power terminals, fuses
  • 10 feet sump pump hose as protection conduit for power and ground wire where ran over gas tank and around engine bay access to batteries and switches
  • 1 foot small PVC hose to trim factory cutout in helm compartment where cables run through for protection of wiring
  • 1 sheet HDPE (Starboard) 3/4" x 24" x 36"
  • Stainless Steel Fasteners picked up from local hardware store to fit everything exactly right
  • 25' latex tubing (more than enough)
  • No I am not connected to KnuKoncepts in anyway. They simply sell superior craftsmanship and performing wiring products. Note the speaker wire is difficult to strip so be gentle with a sharp blade on the outer casing to score the wire then flex it to pull the outer casing off.
Unique Install Details
  • Cut custom 2 inch increased outside diameter backing rings out of the HDPE for all speakers (new and stock) to give a something for the screws to bite into and to help reduced fiberglass deflection. Used counter sunk set screws to hold them in place.
  • New holes in fiberglass for the sub and 6x9s were cut very clean by first mounting the backing rings with the set screws and then using a trim router with a bearing straight bit to follow the backing rings as templates. Super clean cutouts this way but HUGE mess. Cleaned up with a shop vac connected to a dust deputy so as not to clog the filter. Respirator and disposable painters suit were worn and are highly recommend by me when cutting fiberglass.
  • Ran new speaker wire to everything except rear deck and tower. Zip tied to stock harness for secure wiring install.
  • Center compression crimps on all speaker and poor wire terminals that were not a screw connection
  • Tinned all wire after stripped and prior to termination by dipping in molten solder inside of a one inch copper pipe end cap
  • Added latex tubing drip lines for all mid cabin cupholders and used a cable wall flange and silicone to make a drip line for the small storage tray behind the throttles since it is over my new sub.
  • Custom HDPE amp board with through hole wiring management, back of the board zip ties, and all edges and holes front and back round over routed to prevent any sharp edges for anyone reach into the helm or on the wires as they are run through the holes.
  • Added digital voltage gauge for the start battery (the red and round led gauge in the photo since the power and ground distribution block I choose had a built in gauge and is of course wired to the house battery. This allows me to check on the start battery since the connext only shows the house.
  • The two circuit boards are for my custom push button start system ... https://jetboaters.net/threads/push...video-and-full-instructions.9371/#post-160607
Wiring Details
  • Amp 1 connected to front speaker RCA output from head unit
  • Amp 2 connected to pre out from Amp 1
  • Rear speakers still connected to stock head unit (note that will have to splice plus and minus on stock rear cabin wiring as the rear deck were run in series from the factory with these)
  • Tower tweeters still connected to stock head unit
  • Sub connected to bridged channel one and two from amp 1
  • Stock 6 inch and new 6x9s each connected to own amp channel from amp 1 or 2
  • Main power wire run to house battery switch with line water proof case mounted 150 amp fuse 12 inches from switch
  • 2 group 31 AGM batteries (1 start, 1 house)
  • NOCO Genius 2 bank 10 amp each bank on board charger
Results
  • Huge improvement in sound quality and volume
  • Before the upgrade we could barely hear the speakers at cruise except for the tower and now very full range and loud sound at cruise.
  • Still some headroom in amps with head unit balance a little to the rear so the rear deck gets the power it needs from the head unit.
  • Tower tweeters no longer overwhelm and are actually a benefit with this setup (head unit balanced a little to the rear)
  • Stock speakers including the rear deck are much louder and cleaner with full range sound (high pass amp crossover set at 80 hz)
  • 6x9s really help out the mid bass (high pass amp crossover set at 50 hz)
  • Seems very power efficient so far. Three hours with amps on at various levels yesterday and still plenty of house juice left.
  • Should have gone with a better sub and better sub location for better sound. Since the location is already cut I will likely upgrade the sub to the mm um series which will have the same mounting holes and I will be able to use the DB grill. Polk mm um sub also requires less mounting depth
  • Sub location (same as 242x but opposite side) causes outer hull deflection and I am going reinforce by epoxy encasing a couple of 24 inch lengths of aluminum flat bar behind the sub to the hull.
  • Nice part is can always upgrade to the mm um series for any of the speakers in the future with minimal effort in the future if desired or add another amp, tower cans, and another sub. Think I will enjoy it for now given I have spent more time doing mods than on the water so far.
Hope this post helps someone out with ideas or helps someone looking to attempt their first marine audio upgrade.

Edit- Important fact that I should add for how I mounted the amps and did the wiring. I am one of those annoying lean fitness types that can squeeze in the helm. I face the bow stick my right leg and arm in, squat while squeezing my hips/butt/torso/head through, pull my left leg in while crouched, spin 180 degrees on the balls of my feet, sit on the throwable pfd as a cushion, realize I forgot the tool I needed on the swim deck, curse and repeat.

Can you help guide me which wire I use at the helm for the amp power on wire? I have everything wired I just can figure out what blue wire it is you have running into your amp?
 
There is a blue wire going from the polk box in the helm to its wiring harness that terminates at the connector. I spliced, soldered, and heat shrinked a new blue wire to it to feed to the amp. Quick splicies may work but I don’t like them on small awg wire.
 
There is a blue wire going from the polk box in the helm to its wiring harness that terminates at the connector. I spliced, soldered, and heat shrinked a new blue wire to it to feed to the amp. Quick splicies may work but I don’t like them on small awg wire.

Awesome thanks a bunch I figured that was it but the fact it was connected to the block confused me. Thanks!
 
Thanks for the great write up @Mainah . I've never done anything like this, so I'm hoping to copy your amp board as close as possible. Looking at the king starboard, would the 1/2" thickness work, and what are you using to fasten the amp board to the fiberglass behind the helm? Is it difficult to remove if you need to access the area behind it? Thanks again.
 
Last edited:
One other idea for mounting the board - I used stainless hinges on the top, and stainless screws on the bottom. This way when I need access, I just remove the screws on the bottom and flip it up.
 
One other idea for mounting the board - I used stainless hinges on the top, and stainless screws on the bottom. This way when I need access, I just remove the screws on the bottom and flip it up.

Great idea. Thank you.
 
Thanks for the great write up @Mainah . I've never done anything like this, so I hoping to copy your amp board as close as possible. Looking at the king starboard, would the 1/2" thickness work, and what are you using to fasten the amp board to the fiberglass behind the helm? Is it difficult to remove if you need to access the area behind it? Thanks again.

I used and recommend 3/4 thickness but folks have gotten away with 1/2. I used large stainless allen recess machine bolts to bolt through. Others have modified this design and used hinges which is how I would do it if I did it again. Someone also found a newer version of the distribution block I used that takes mini anl fuses which are preferable IMO.

Good luck

Thanks for all the info. Really appreciate you sharing your experience.
 
This is a fantastic write-up Mainah. I have a few questions:

- did you buy all KnuKonceptz wires and connectors on Amazon?
- I’m using Polk amps and they have built in fuses. Do you think I should still use in line fuses?
- in my 212X, the stock amp is under the port seat right beside the batteries. I was planning on adding the 2nd amp in the same area. Think I should move everything behind the helm and mount on a board?
- I really like the idea of adding the Wet Sounds WS420SQ equalizer to allow multiple zone controls. What are your views on this?
- I was already leaning towards swapping the Polk sub for a JL IB sub. Sounds like you recommend this as opposed to all the challenges you went through.

Many thanks.

First off very well formatted reply/questions.

-I bought direct from knuknoceptz
- Yes on the fuses IMO
-I choose the helm as I felt there would be better airflow and space to allow for heat dispation. Further from the engine and hopefully drier. I also planned on using my robust main lines for a sub panel. To be honest this is a it all depends kind of thing. I can also fit in the helm.
-I don’t have a ws420 at this time as things balanced out well for me but can see it’s purpose be useful.
-I still prefer the performance of a sealed enclosure but the time/money/hassle/performance tradeoff is a real consideration. In hindsight I would have gone all JL including two IB. That said I do smile a bit when my bass hits hard, low, and tight with half the power the subs can handle.

Hope to see a post from you with where you ended up and thoughts. Photos or it did not happen;-)
 
Super. Thx. I’ll definitely take lots of pics and then post.
 
A few more thoughts and questions Mainah:
- I’ve decided to move the amps behind the helm. In addition to your rationale, i think it will make the wiring of the WS420SQ easier and the RCA cable tuns will be much shorter.
- did you run your power wire around the engine bay or did you remove the cover for the gas tank and run it there? I’m worried that 20ft may not be long enough if I ran around the engine bay.
- I’m also thinking of running 4G wire instead of 0G. If you were to do it again, would you still run 0G?
- in your case, why did you not connect all your speakers to the amps? If I understand properly, you still run some directly from the HU.
- do you have a view on the JL MX series subs vs. the M series?
- what kind of RCA cables did you use? I’ve seen posts that indicate that quality doesn’t seem to matter much. I’d appreciate your views.
- did you buy your Audiopipe distribution block from Amazon? Model PDCP1414! I can’t find it anywhere else.
- do you have a list of speaker terminals, power terminals and fuses you bought from KnuKonceptz? I think know what to buy but I’m not sure
- I assume you bought the latex tubing to run drains for the cubholders? What diameter did you get?
- lastly, what diameter is the sump pump hose. Do you remember where you bought this?

Sorry for all the questions but you’re clearly an expert based on all the posts I’ve read.
 
Back
Top