• Welcome to Jetboaters.net!

    We are delighted you have found your way to the best Jet Boaters Forum on the internet! Please consider Signing Up so that you can enjoy all the features and offers on the forum. We have members with boats from all the major manufacturers including Yamaha, Seadoo, Scarab and Chaparral. We don't email you SPAM, and the site is totally non-commercial. So what's to lose? IT IS FREE!

    Membership allows you to ask questions (no matter how mundane), meet up with other jet boaters, see full images (not just thumbnails), browse the member map and qualifies you for members only discounts offered by vendors who run specials for our members only! (It also gets rid of this banner!)

    free hit counter

How to add a Shutoff Valve to your boat's cooling system

@gmtech16450yz
Please report back where you are picking up your pressure readings. Also, on my MR-1 motors, I could peg those temp gauges if I beat on the boat. Not sure about your 1.8's.
 
@gmtech16450yz
Please report back where you are picking up your pressure readings. Also, on my MR-1 motors, I could peg those temp gauges if I beat on the boat. Not sure about your 1.8's.
Really? 220+ where did you tap into the cooling water? Was it after the exhaust cooling? 220 is pretty hot, especially for a boat with waste cooling.
 
10,000 rpm for a while will get them around 210 according to the YDS monitoring "engine temperature". What warms them further is backing off the throttle to idle after running hard. At idle the pump does not deliver enough water flow to carry away the heat quickly. I have learned that running at about 7000 rpm for a few minutes keeps the water flowing and cools the engine faster (after beating on it).
 
210 is fine. That's normal engine temp. 230 is getting hot and it's time to do something about it.
 
10,000 rpm for a while will get them around 210 according to the YDS monitoring "engine temperature". What warms them further is backing off the throttle to idle after running hard. At idle the pump does not deliver enough water flow to carry away the heat quickly. I have learned that running at about 7000 rpm for a few minutes keeps the water flowing and cools the engine faster (after beating on it).
That should be in the manual, IMO.
I tend to "monitor" the temps at the pissers with my hand after WOT runs, surfing etc, and run the boat/engines at high idle until the water is not very hot.


EDIT: I would love to have temp gauges!

--
 
@gmtech16450yz
Please report back where you are picking up your pressure readings. Also, on my MR-1 motors, I could peg those temp gauges if I beat on the boat. Not sure about your 1.8's.

Just noticed this. Didn't I mention the results in the other thread? I'll go there after and check. I picked up the pressure readings off the flush hoses between the deck fittings and the t's. It worked perfectly, they follow engine rpm very closely and max out right under 30 psi. The temp gauges also were perfect, my engines were running around 130-150 degrees even doing WOT for 30 minutes. The water temps were only 61 degrees though. I doubt the temps will get much higher with higher lake water temps though.
 
@gmtech16450yz
Please report back where you are picking up your pressure readings. Also, on my MR-1 motors, I could peg those temp gauges if I beat on the boat. Not sure about your 1.8's.

Here's what I put in that other thread...


The gauges worked awesome, as I thought, the lower ranged temp gauges are perfect. Highest temps I saw were under 150, "normal" seemed to be around 135-140 degrees. That's with 61 degree water temps. Interesting thing was that the port engine ran 5-10 degrees hotter most of the day. It's possible that the gauges aren't that accurate and the engines themselves actually aren't that far apart temp wise. The same was actually true for the water pressure gauges also, the port engine showed higher pressures than the starboard side. The explanation for that could actually be the fact that I opened up the nozzle on the starboard jet to equalize the engine rpms. A little less nozzle restriction could certainly explain the lower pressure readings. The cool thing is that 0-30 psi gauges are PERFECTLY matched to what our engines run at. Once you're over 3000 rpms or so the pressure starts reading. At 6800rpm the pressure reads about 20 psi, at 7800 the port side was reading about 28 psi and the starboard side was at 26 psi. So my idea of easily being able to make sure your pump pickup or coolant screen isn't plugged by simply glancing at the pressure gauges will work perfectly. Yay!
 
i am going to add 3/4" ball valves with 5/8 hose fittings thru clean out area by swim platform seems like this is the closes to saltwater want to be able to flush out engines will still in water. this will be my first project on my 05 ar230 just getting into jet boating after test ride went well. thanks for great info from forum.
 
i am going to add 3/4" ball valves with 5/8 hose fittings thru clean out area by swim platform seems like this is the closes to saltwater want to be able to flush out engines will still in water. this will be my first project on my 05 ar230 just getting into jet boating after test ride went well. thanks for great info from forum.
Why not put them in the engine compartment for easier access?
 
was looking at y behind left side of engine very tight to get in there will have to lay on engine to do job looked into access plate on transom if i can get my arms in there thought may be easer to operate shutoff after install. frost on everything this morning in northeast waiting to warm up a bit no rush just want best spot not positive were that is yet thanks for imput.
 
Yep. I made the same evaluation and came to the same conclusion on mine. Yes, cleaner install if in the engine compartment, but those close quarters for the install would be... unpleasant. And cause words that would get me banned from the forum.
 
Since our boats have an open vs. closed loop cooling system, there is a potential of flooding the engine through the exhaust if there is not a positive exhaust pressure pushing out and preventing water from entering there. While underway, and the engines are at high revs, there is no danger of that, but when an engine fails or you are being towed, the risk increases dramatically. Therefore, the owner's manual tells us to operate at no-wake mode to return to port. That way the water is not moving at a rapid rate and is less likely to jet up into the exhaust. However, operating at no-wake speed is painful if you are several miles from port and need to get back because of an inoperable engine. There are many that have shared their painful stories of operating for over 5 hours to get back to port. Since I am inpatient and would be poking my eyes out if I had to travel that far in no-wake mode, I decided to install a valve that would simply cut off the potential for water to enter the engines through the exhaust. Some others carry an automotive clamp or vice clamp with them to achieve the same thing. I worry about the damage the clamps may cause to the hose, so I opted for the valve and I like the clean look and convenience of just turning a valve.


This is actually a very simple and inexpensive mod. The hardest part is working in such a small area, especially if you have big hands like I do. Because of the little space I had to work in, it took me about and hour of work time to complete this project.

Supplies:

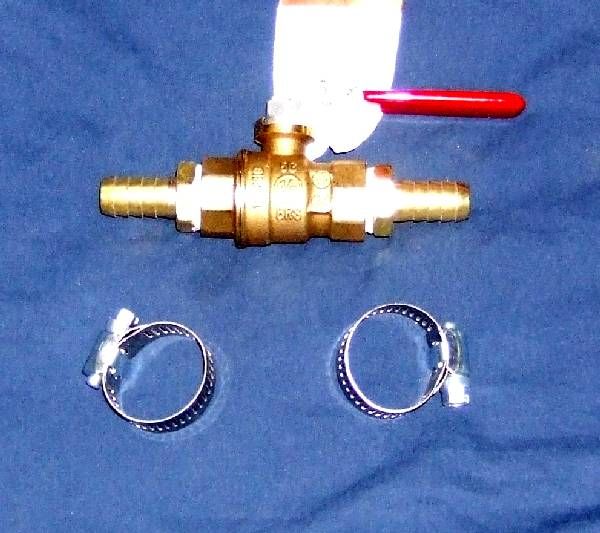
2 brass shutoff ball valves (1/2 inch or 5/8 would probably fit tighter)
4 barb fittings (same size as ball valve)
4 hose clamps
1 roll of plumbers tape
1 hose cutter (anything that can make the cut in the hose)
1 6" - 1' piece of 1/2 hose - It may have been 5/8 in so check hose size. (You may not need. This is incase you do not have enough hose exposed after cut to allow the barb fitting to fit all the way before hitting the fitting on the other end of the hose.

shutoff1_zps6bef12d9.jpg


1. Locate the hose at the rear wall of the engine compartment at the bottom left of each engine.


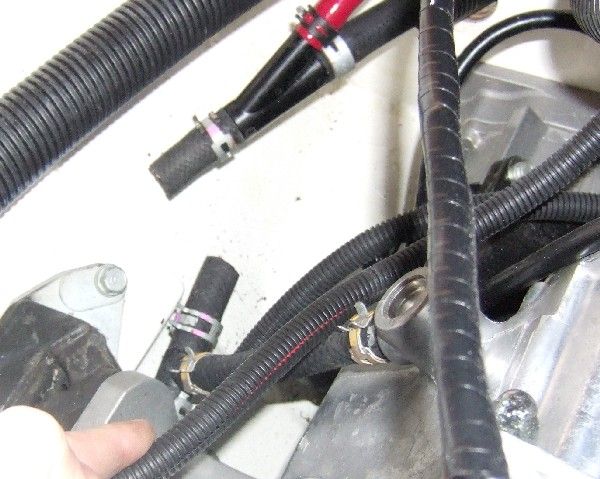
2. Cut the hose before the "Y". It is about 4 inches long. If you cut exactly in the middle, you might be able to use the cut hose and not replace it with longer pieces when you are installing the barb fittings.

shutoff2_zps12a722d6.jpg


3. Wrap the threaded end of the barb fittings with plumbers tape.

4. Screw the threaded end of the barb fittings into each end of the valve and ensure a tight fit.

5. Make sure the clamps are in place but loose over the existing cut hose.

6. Insert the barb end of the fittings between the cut ends of the hose. You will know if you need to replace the cut hose if the barb end hits the fitting from the other side and does not fit in all the way. If that is the case, cut a piece of hose long enough to fit the barb fitting without hitting the fitting on the other side.

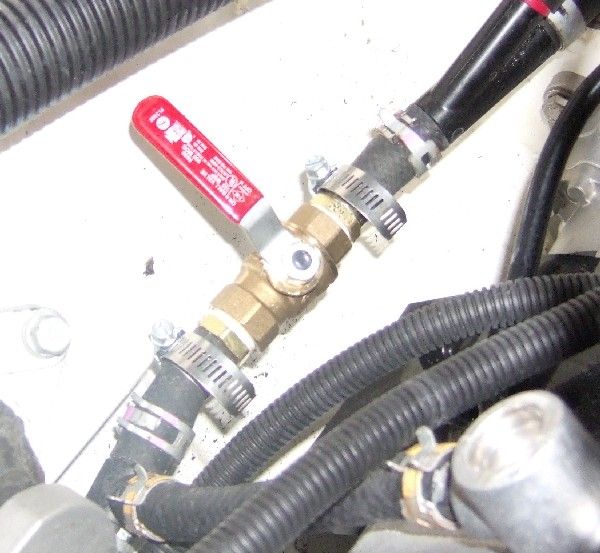
7. Slide the clamps into place and secure.

shutoff4_zpsf74767fb.jpg
My boat will be in Salt water for several weeks, pulling her out of the water during our vacation will be nearly impossible, so if I use this method or the vice grip method, how do I proceed to flush the motors? Sorry I am new to Jet Pump boating, I have always been able to trim my outboard out of the water while still docked and flush with fresh water.

Thanks
 
Is there links to all the parts needed?
 
Did you send them an e-mail? What I found seems a little sketchy and I would have to send them an e-mail with my info.

Yep that is the way they work, I would suggest using PayPal with them but they have been around for a long time and are a reputable company.
Tow valves can be found on this page: http://www.islandracing.com/212230232.html
 
Back
Top