• Welcome to Jetboaters.net!

    We are delighted you have found your way to the best Jet Boaters Forum on the internet! Please consider Signing Up so that you can enjoy all the features and offers on the forum. We have members with boats from all the major manufacturers including Yamaha, Seadoo, Scarab and Chaparral. We don't email you SPAM, and the site is totally non-commercial. So what's to lose? IT IS FREE!

    Membership allows you to ask questions (no matter how mundane), meet up with other jet boaters, see full images (not just thumbnails), browse the member map and qualifies you for members only discounts offered by vendors who run specials for our members only! (It also gets rid of this banner!)

    free hit counter

2016 240 Ballast Setup Question: Valves?

@swatski The one you posted is dead nuts simple and may be the best way to go. I do agree with @KXCam22 though in that probably a unneeded complexity. Here are a couple of other options if you decide to go with timing ....

https://www.amazon.com/DROK-Digital...8&qid=1489771603&sr=8-18&keywords=timer+relay

https://www.amazon.com/THC15-DC12V-...UTF8&qid=1489771816&sr=1-6&keywords=12v+timer

https://www.amazon.com/FAVOLCANO-CN...UTF8&qid=1489771816&sr=1-4&keywords=12v+timer

https://www.amazon.com/Baomain-H3Y-...d=1489774321&sr=1-19&keywords=12v+relay+timer

Choose your own switch/dial and housing DIY option ... This is the simple method of what I would do if I did this but requires more electrical components and soldering but is a self contained solid state IC with wire leads.. https://www.amazon.com/Timer-Delay-...TF8&qid=1489771816&sr=1-10&keywords=12v+timer

Last option would be a Raspberry Pi or Arduino with a motor control shield and get your own potentiometers. This is what I would do if I did this because I could control with hardware switch on my phone plus monitor fill levels and other cool stuff. Requires programing the board and plenty of wiring so perhaps not the best option for most.

I have decided when I do mine to keep it simple on the control side and just install 4 rocker switches. I will go all out on the power distribution and relay side but thats just who I am. On the plumbing side I am not too far off from @swatski in my thinking and can't wait to see what he does.
 
Out of experience and not wanting to blow up $300-$600 bags, venting is the best way to go and you always know when they are full and empty. Just my $.02. This is a case of less is better in my opinion.
 
That is my plan exactly! No valves, no vents, one intake and one pump per bag/compartment.
If warranted, I am open to adding vents later.


That is the reason I brought this up. I have done some testing with up to about 1,800 of over the deck/seats bags and was not impressed. I would think he boat can take at least twice that amount (I ran 1,800 lbs of ballast in my 190 and she did fine). I hate those bags sitting in plain sight but consider those an unavoidable reality. But I do want to use all hidden compartments I can.
I think @jcyamaharider and @KXCam22 both load ski lockers and extra bags up front, and then equalize with the swim deck. I plan on an aux pump/intake dedicated for the swim deck bags.
I know the jet intakes need to be in the water... And unfortunately I need my wake to have a very deep pocket (to ever go ropeless), too.

Thank you for sharing your experience, it's been super useful!

--
For reference...I have a custom 1,100lb bag under the port seat and a Fly High 1,100lb bag in the ski locker that are both plumbed with separate intakes and pumps. I also put a 750lb bag on the lower swim deck, favoring the port side but not all the way over. If I have a light passenger load, I also put a 400lb on the port seat. I use the Wake Wedge and put out a really nice surf wake. However, I have found that with the ski locker bag full, my wave suffers. I find that half full works the best (5-600lbs). Any more and it brings the stern too high, even with all that weight in the back. I also keep the ski locker bag pulled all the way back in that compartment.

I have a quick disconnect on the bag in the locker so that I can remove it when using the boat for other things. I intend to switch the quick disconnect to one of my smaller bags since I never fill it.

I find that I need close to 3,000lbs in the boat with at least 75% of that in the stern to get good push (and a decent sized pocket). I moved bags around quite a bit in the beginning, and tried to add more weight to the bow but it always had a negative effect on the wake. When I was researching a few years back, I found that the 230 boats seemed to get much more benefit from bow weight. The 240's like junk in the trunk.

Your boat may be different, but I found a great path for the ski locker ballast hose under the port seat along the inside wall. I pulled the carpet up a bit and found a channel that runs along the deck that leads from the engine all the way to the ski locker (a couple inches below deck level which keeps the other bag from sitting on it). Up at the ski locker there is an opening large enough to feed the hose through. I was able to drill a hole in the front of the engine compartment leading into that port side compartment down low and feed the hose all the way up to the locker without any other holes drilled. Once installed, I folded the carpet back down and the hose is completely hidden and protected.
 
I find that I need close to 3,000lbs in the boat with at least 75% of that in the stern to get good push (and a decent sized pocket). I moved bags around quite a bit in the beginning, and tried to add more weight to the bow but it always had a negative effect on the wake. When I was researching a few years back, I found that the 230 boats seemed to get much more benefit from bow weight. The 240's like junk in the trunk.
Great info - thank you! That is one of the issues - I don't think we know if those new "keeled" hulls will behave more like the 230s or the 2010+ 240s (with regards to the ski locker weight).
One thing is for sure though, the available room in rear lockers (under the seats) is WAY smaller, so if those new hulls do "like junk in the trunk" it is not going to be pretty, lol, it will have to go somewhere - up on the seats or swim platform.

Reading @Addicted comments, I'm also thinking the 1,180 lbs bag (88" long) is probably an overkill for the ski-locker, and there is no way it would inflate to full capacity as the front part of the locker gets pretty shallow past about 65-70".


@KXCam22 @jcyamaharider Regarding the timer modules, I'm sure I will be able to hear the pumps, but need something to make the system operable by others. I also really want the system to be as automated as possible while running on simple switches. I would worry about cracking bulkheads or fiberglass more than loosing a bag, but even with vents same size as intakes compartments can get overfilled and damaged. So, timers are mostly for convenience - but I figured those may also help to dial in the wake, as timing would make it easy for rough fill/empty gauging.
I am open to the idea of installing vents but only after I have everything up and running. There will be a bigger risk with no venting.

--
 
@swatski Good info on the locker getting small towards the front. I did not look close enough to see that. In which case an standard 800 lb class bag may save some money. I can say that a 3/4 full locker made a difference in the length of the wake and people ballast in the rear (junk in the trunk) does increase amplitude from my limited experience with my current boat. Given the other comments most likely putting ski locker weight to the rear of the locker would be best. Not much we can do about the under cabin seat space and 400lbs per side may just be all we can do. That leaves the swim deck and seats which I why I plan on the 4th pump. Personally I am going to vent but I like your plans for the intake location. I am torn on the through hull ball valves. I would only use them if I could thread them on to the through hulls other wise they are just as prone to a hose coming off which is the only real reason to have them. I am interested to see your through hulls because something tells me they are going to be less likely to leak than a submarine.
 
Mainah,
I you want to make a cheap power distribution block and are not worried about it looking beautiful, a simple way to do it with a 1/4" ring terminal on the end of your main power wire(#6) and then ring terminal on the end of the fuse holders that connect to power the relays, then use a 1/4" bolt to bolt it all together, and tape it up to insulate it. You would use these fuse holders. If the main power wire is short enough you don't even have to fuse it with a main fuse. Cam.
s-l300.jpg
View attachment 52450

@KXCam22 I am loving this distribution block idea!!!!!!
upload_2017-3-17_22-24-3.png

--
 
Another idea is to find a car being scrapped and pull the distribution block from under the hood or the one inside. It would, however, require some splicing.
 
Another idea is to find a car being scrapped and pull the distribution block from under the hood or the one inside. It would, however, require some splicing.
Wait...! I have a beautiful 2013 Passat TDI that's going back into the dealer next week, after they dick-ed me around for half a year. Hmm...
I'm kidding of course. But I do like @KXCam22 idea better I think. As I'm planning my next moves, a big one will be cleaning up the electric behind the dash, and real estate there is at a premium. What is neat about the "KXCam bolt-based distribution block" -- it saves A LOT of space. Basically, several of those can be fit in a panel (cut out of starboard or a cutting board) and fed by a single 2/0 line run direct from aux battery, as @Mainah proposed. And one can even leave just some pre-drilled HOLES to fit more "distribution blocks" in the future, if warranted.

--
 
I would suggest that the car power distribution block, while handy, would not be a good choice. All cars run a very undersized electrical system with very small wire - a financial choice. You need something with much larger electrical capacity or it will melt and cause a fire. You would be better to buy a small fuse block at an autoparts store. This was Lordco for $26. That is what I use, but then you have to mount it somewhere. Mine is in an electrical junction box. You could also mount the relays in the box.

upload_2017-3-18_8-43-48.png

As for the easy automation, here is an approach that would work. Stay with the switches, use the relays, add vent lines with check valves and route the vents like my install (easy to visually tell full). Then add my vacuum switches at the bags and wire in series with the relay coils. This gives you positive empty, as the switches will cancel the relay once the bag has shriveled up empty. The vacuum switches are cheaper than any pump timers and only require a couple $$ of fittings to attach at the bag. Keep in mind that the switches are only at the proof of concept stage (process condition verified, switch bench tested but I cant get on the water until may to live test). Cam.
 
Thanks for the heads up on the auto distribution block, Cam.
 
I put a large rubber mat on top of my 800lb locker bag, then store stuff on top. It just rises and falls as the bag is used. With a long 800lb i have about 12in height left. I put my rope bags and a pair of skis there as my starboard compartment has an 1100 jammed in there. I can get about 90% fill into the 1100 before the seat cushion pops up. Cam
 
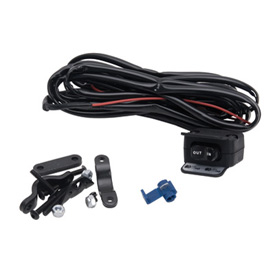
I'm trying to decide on the location of the auxiliary pump switch. I think I will have it installed as a "wired remote" (e.g. winch remote switch), hidden/stored in the compartment where the pump will be mounted. That way I can pull it out and operate the aux pump from anywhere on the swim platform or back of the boat. Since I am not certain on the exact size and shape of the swim platform and/or rear seat top bags, it will be convenient to have a 1" hose with a quick connect (and maybe a manual valve) where the anchor light used to be. The remote switch /wand would be stored in the rear wet storage compartment when not in use.
upload_2017-3-18_23-6-28.png

I'm looking for a housing for the aux pump switch that would be similar to a remote control switch for operating a winch (e.g. Warn), otherwise I will make one up with some soft conduit.
upload_2017-3-18_23-9-34.png
war_08_win_rep_min_roc_swi.jpg


--
 
@swatski - Great idea for the remote switch. Cheap copper wound winch motors like those for atvs are not any different than ballast pump motors except our ballast pumps are even less of a load which is a good thing. A wired or rf wireless winch remote would be perfect to do what you have suggested. You will likley need to get a winch contactor (potted relay with posts for ring terminals) or a 40a bosch relay would be cheaper and someone here can advise on the wiring if needed.

On second thought there may be a key difference in the winch switches .. I think most are momentary (you have to hold them down) and I would think we would prefer latching. One way around that would be to build a latching relay setup but then you are adding more complexity.
 
Last edited:
I would still use the generic ballast switch from wakemakers for the aux remote, just need to come up with some neat looking housing and wire/wand connection, want the OEM looks for everything as much as possible.

That dedicated aux pump will be super fast for re-positioning bags in the back, with only ~5ft hose (1" internal dia) fill/drain route!

--
 
My aux hose is about 18' long so it can reach all over the boat. I have a similar aux air pump, which needs to reach all over plus get to the water line for air refills. It has a remote switch but I haven't required one for the aux ballast. Cam.
 
My aux hose is about 18' long so it can reach all over the boat. I have a similar aux air pump, which needs to reach all over plus get to the water line for air refills. It has a remote switch but I haven't required one for the aux ballast. Cam.
Yes, fill/drain 5ft is just the intake-to-pump hose run inside the stern. The external part for plugging into the quick connect on top of the stern will be whatever.
Love the idea of the aux air pump! Do you have a deck/hull mounted outlet?
If I wanted a stationary type built into a stern compartment, would it make sense to get an air pump that fills and drains?

EDIT: Actually the 2016s have a 12v outlet inside the port stern compartment, I keep forgetting about it. The only issue with an air pump there would be when the bag(s) block access. An external port with a quick connect or a retractable hose would solve that.

--
 
Last edited:
The big air pump draw about 20a so i wired mine to the battery with relay and switch. I only air fill and rely on phat friends to empty. Uses long hose under a seat cushion. It is actually the handiest addition to the boat there is. Cam.
 
Last edited:
I did some mock-ups with test bags in the ski locker today. The big 1,180 lbs that I was planning on using there is definitely out, there is no way it would be filled to capacity. Here are the two inflated bags I stuffed in there: a 550 lbs (50"x16"x16") and a 350 lbs (50"x13"x13") in front of it - pushed all the way up the locker. I think this may be the best combo for that space (at 900 lbs) or, alternatively I think one 800 lbs (65"x18"x18") Sumo would fit as well:
upload_2017-3-19_20-8-34.pngupload_2017-3-19_20-8-57.png

Here is the 550 bag on top of the seat - for size reference:
upload_2017-3-19_20-11-26.png

And this picture shows this bag will NOT fit all the way up front in the ski locker - as the locker floor bows up towards the front:
upload_2017-3-19_20-12-47.png

--
 
FINALLY, placed my order with Wakemakers (ouch - $$$$) and a bunch of ancillary items from knukonceptz and the like.

I also spent the weekend doing some planning and prep work.

Here is the rear wet storage back wall that I will run intake hoses through (red arrow) and may need to cut an access hole (X in a circle) if necessary, but I will also be installing a speaker (5" hole further out), so that might be enough.

upload_2017-3-27_22-19-38.pngupload_2017-3-27_22-21-49.png
upload_2017-3-27_22-21-23.png

I also needed to clean up the underseat compartments, especially the port side - move the batteries, charger, and the EPA vapor lock/canister, along with the fuel hose. It kicked my a$$.
Here are some before and after:
Before
upload_2017-3-27_22-36-32.pngupload_2017-3-27_22-40-59.png
upload_2017-3-27_22-39-7.pngupload_2017-3-27_22-37-37.png

And after
upload_2017-3-27_22-42-32.png
upload_2017-3-27_22-42-56.png

Still need to build a carpeted battery enclosure, but that's pretty strait forward. The worst was relocating the fuel hose and the EPA canister as I needed to modify the bulkhead a bit.

--
 
Fuel line/EPA canister remodel:
EPA canister temporarily removed, fuel hose still in the original location - looking at it from inside the port storage (battery) compartment
upload_2017-3-27_23-23-36.png

And here is before and after view from inside the engine bay:
upload_2017-3-27_23-24-48.pngupload_2017-3-27_23-26-7.png

--
 
Back
Top