• Welcome to Jetboaters.net!

    We are delighted you have found your way to the best Jet Boaters Forum on the internet! Please consider Signing Up so that you can enjoy all the features and offers on the forum. We have members with boats from all the major manufacturers including Yamaha, Seadoo, Scarab and Chaparral. We don't email you SPAM, and the site is totally non-commercial. So what's to lose? IT IS FREE!

    Membership allows you to ask questions (no matter how mundane), meet up with other jet boaters, see full images (not just thumbnails), browse the member map and qualifies you for members only discounts offered by vendors who run specials for our members only! (It also gets rid of this banner!)

    free hit counter

2020 210 FSH additional deck drains.

FSH 210 Sport

Jetboaters Admiral
Messages
6,010
Reaction score
7,056
Points
437
Location
Tranquility Base
Boat Make
Yamaha
Year
2020
Boat Model
FSH Sport
Boat Length
21
I had been eyeing the 19’ series of the FSH’s deck drains, @Can0n11 one on either side of the aft cock pit. I have found on many occasions that I end up with water pooling in the corners when out fishing or when washing the boat if it is not sitting perfectly level, so I decided to add two additional 1.5” deck drains to compliment the single center line mounted 1.5” drain. In addition to water pooling in the corners, I also wanted the extra deck draining capacity.

While I was adding the deck drains it occurred to me to get the rod holders that are right above the two aft storage areas’s hooked up to a drain so that when washing the boat water is not running down into those storage compartment.

I bought the L head drains from Marine East, and the Stainless steel scuppers from Gem Lux who makes most of the stainless hardware on the boat for Yamaha. The universal rod holder drain I bought from T-H Marine.

Where the thru hulls went through, there are two layers of glass, so I foamed that gap shut with water soluble sealing foam to make for easier removal if that need ever arises. We had to use a 3” hole saw to allow the nut on the thru hull room to be installed, the outside hole saw was 1.5”.

Big shout out to my friend Jim who‘s many years of marine experience and his help made this project possible.

Port side interior L head drain:

2140894E-24F6-4B80-B1B1-15171B8951E4.jpeg

Port side exterior drain:

A1243F9A-A995-4F31-B70D-78DF10F6B100.jpeg

6442B58B-5530-40D5-927C-F46586CF76C5.jpeg

Port side internal plumbing: You can see the foam added in the nut area.

A2E96F42-DB1F-40D1-91B0-838966DF2534.jpeg

That vertical piece of clear vinyl goes up to the rod holder above this compartment:

39DABFFC-3442-4C2C-BDB9-388E97251AB3.jpegCC156ED9-DE26-4F13-B2F5-6EAF7B70B45B.jpeg

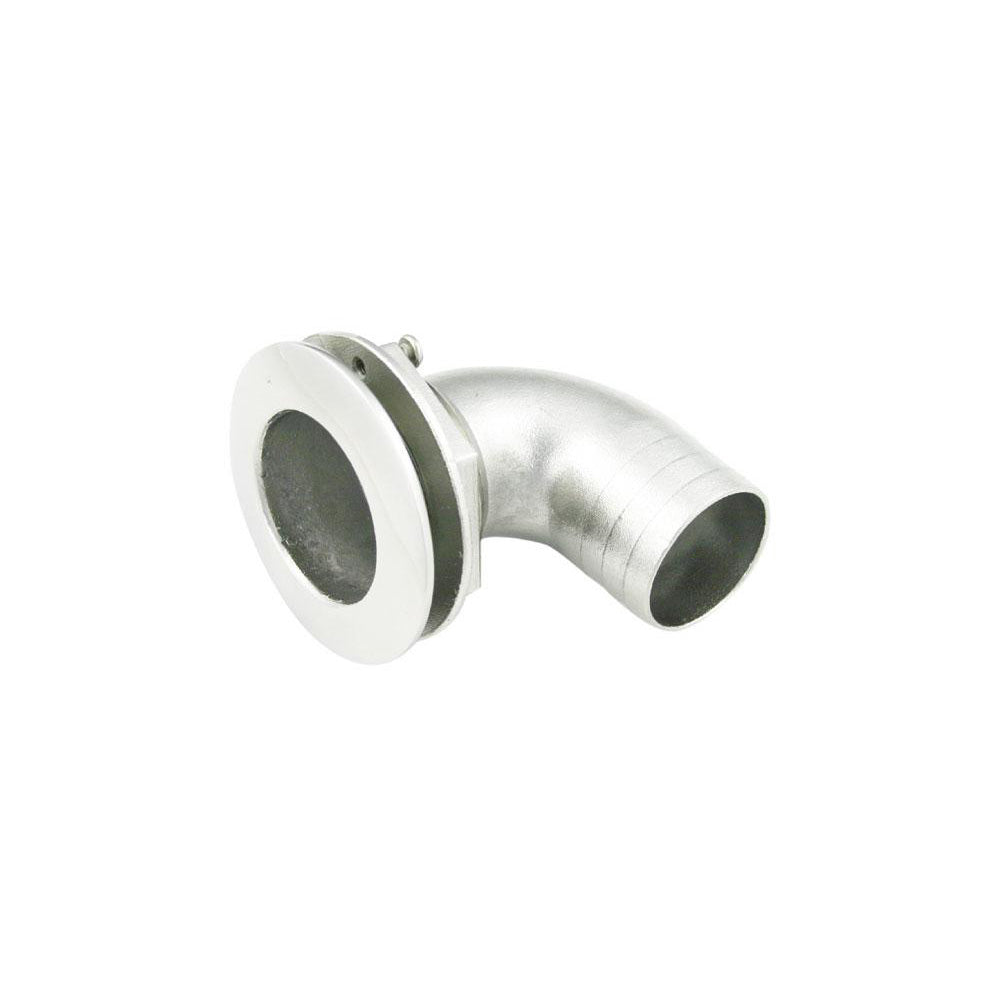
Starboard side internal L head drain: Yes that is a rub mark from the hole saw.. future gel coat repair.

A0682AEB-06A3-4C19-B5AD-721B9BC8D505.jpeg

Starboard side external drain:


7E749194-8D7C-49B9-9B93-98DB31D54560.jpeg

822B3C81-18E3-4BA6-BBC6-5176E5594841.jpeg

Starboard side internal plumbing: In this pic you can see where I added the foam.

B88102EA-FB98-401F-A8E7-B61A68C32454.jpeg


We were not able to get the external drains in the exact same place on the port and starboard sides due to the internal stuff. I don’t feel bad about that at all since the OEM drains on the 19’ series are not the same from side to side either.

CCDBF12D-ABBA-41EC-8DAC-B23570DB09BB.jpeg

B056E621-6C1C-432D-AE4F-A9BC81CE5DFA.jpeg


This project was about a pain in the neck, literally to accomplish but the juice should be worth the squeeze. Fun fact, I do not believe that piece of starboard in front of the live well comes out very easy, if you do this to your boat, just leave it alone and drill in front of it.
 
Last edited:

FSH 210 Sport

Jetboaters Admiral
Messages
6,010
Reaction score
7,056
Points
437
Location
Tranquility Base
Boat Make
Yamaha
Year
2020
Boat Model
FSH Sport
Boat Length
21
Awesome job, I've played with the idea and hate the fact of the port side list. Drives me nuts especially while washing down and pooling.
Thanks man! If you need the parts let me know and I will link them into the post above. I think it was like $50 or $60 for each stainless scupper, $20 each for the L head drain, and maybe $15 for the rest of the pieces for both sides. I did not mention above, I just bought a couple of 1.5” pvc barbed T’s and drilled a hole in them for the 1/8” npt to 3.8” barbed fitting for the rod holder drain.

If you are on the water, just fill your live well up and the list goes away. When I retrieve the boat I make sure the live well is full, and I fill the 5 gallon bucket and sit it on the deck right in front of the live well and the boat goes on the trailer much more level. The list issue I have is like yours, when I’m washing down the boat and perhaps hitting the deck with a brush all the water and debris settles in the corner. The L heads are set flush with the deck, on the 19’ series those corner drains sit in a depression to help with the draining as my center line one is, so there will still be a little bit of water that has to go out the center drain but way less than before. As I mentioned above, I also did it for the oh snap situation if I stuff the bow, or am just in big water and water is coming onto the deck, I want that water out as quickly as possible.

I also mounted another bilge pump in the hull just ahead of the drain plug, that will be another post but here is a sneak peak. That T shaped mount drops right down into the V of the hull just ahead of the drain plug. I was going to run the outlet out the lower clean out tray drain that is not needed, but I was not able to find a check valve that will not provide too much resistance, so I think I‘m just going to run the outlet on the other side of the pilot water outlets.

BF8F7610-F767-4DE1-9778-30EB0EC98C0F.jpeg7067071D-5D73-44D8-877A-5EA5A4906F9F.jpeg0E0A1D7E-33EF-4BA4-B1DE-4FC1DF0F1D91.jpeg
 

Dumbassbass

Jet Boat Junkie
Messages
283
Reaction score
467
Points
147
Location
Port Clinton, Ohio - Western Basin Lake Erie
Boat Make
Yamaha
Year
2020
Boat Model
FSH Sport
Boat Length
21
I keep the livewell full while I'm out but my frustration is mostly doing the pre-trip cleaning, I wet slip and rain is my biggest problem. I have the full mooring cover but I should really have it altered to be able to cover the trolling motor. I use the console cover most of the season.
 

Dixemon

Jetboaters Lieutenant
Messages
595
Reaction score
540
Points
157
Location
Low Country Ga.
Boat Make
Yamaha
Year
2020
Boat Model
FSH Sport
Boat Length
21
Nice work. Thats definitely an issue with the fsh. Every time i open my engine hatch and see that ugly ass drain tube disecting my motors. I wonder why the hell didn't they put side drains in. Yeah, and you have to be perfectly level and trailer jacked to the moon to get good drainage while washing. Good mod! If you have time to list the parts out that would be great 🤙
 

FSH 210 Sport

Jetboaters Admiral
Messages
6,010
Reaction score
7,056
Points
437
Location
Tranquility Base
Boat Make
Yamaha
Year
2020
Boat Model
FSH Sport
Boat Length
21
Here you go @Dixemon. The hose clamps, 1.5” barbed splice, 3/8” barbed x 1/8” npt I bought at ACE hardware.

90° thru hull scupper: 1.5”

L Head drain: Part number 6740W 1.5” short

Drain hose: 1.5”
 

drewkaree

Jetboaters Fleet Admiral
Messages
5,614
Reaction score
19,880
Points
682
Location
West Allis & Fremont, WI
Boat Make
Yamaha
Year
2019
Boat Model
AR
Boat Length
21
Thanks man! If you need the parts let me know and I will link them into the post above. I think it was like $50 or $60 for each stainless scupper, $20 each for the L head drain, and maybe $15 for the rest of the pieces for both sides. I did not mention above, I just bought a couple of 1.5” pvc barbed T’s and drilled a hole in them for the 1/8” npt to 3.8” barbed fitting for the rod holder drain.

If you are on the water, just fill your live well up and the list goes away. When I retrieve the boat I make sure the live well is full, and I fill the 5 gallon bucket and sit it on the deck right in front of the live well and the boat goes on the trailer much more level. The list issue I have is like yours, when I’m washing down the boat and perhaps hitting the deck with a brush all the water and debris settles in the corner. The L heads are set flush with the deck, on the 19’ series those corner drains sit in a depression to help with the draining as my center line one is, so there will still be a little bit of water that has to go out the center drain but way less than before. As I mentioned above, I also did it for the oh snap situation if I stuff the bow, or am just in big water and water is coming onto the deck, I want that water out as quickly as possible.

I also mounted another bilge pump in the hull just ahead of the drain plug, that will be another post but here is a sneak peak. That T shaped mount drops right down into the V of the hull just ahead of the drain plug. I was going to run the outlet out the lower clean out tray drain that is not needed, but I was not able to find a check valve that will not provide too much resistance, so I think I‘m just going to run the outlet on the other side of the pilot water outlets.

View attachment 173763View attachment 173764View attachment 173765
Looking forward to seeing how this mounts in. I can picture it in my mind's eye, but seeing the real-life example is always helpful and gives others ideas to play around with. As for the black piece of foam, I can't wait for the details in your next thread about it, fess up, what's it for? 😄
 

FSH 210 Sport

Jetboaters Admiral
Messages
6,010
Reaction score
7,056
Points
437
Location
Tranquility Base
Boat Make
Yamaha
Year
2020
Boat Model
FSH Sport
Boat Length
21
Looking forward to seeing how this mounts in. I can picture it in my mind's eye, but seeing the real-life example is always helpful and gives others ideas to play around with. As for the black piece of foam, I can't wait for the details in your next thread about it, fess up, what's it for? 😄
That piece of foam holds the bilge pump and it’s “mount” in place in the V of the hull. The weight of the PVC board, the 3/4” discharge line and the pump keep it down, and the piece of foam keeps it centered and steady in the V. A low tech way to mount the bilge pump in the lowest part of the bilge, but still be able to remove it easily for service.

I was going to glue a piece of PVC board horizontally into the V to mount the pump on but you’d need Hobo Kelley arms to reach it.
 

FSH 210 Sport

Jetboaters Admiral
Messages
6,010
Reaction score
7,056
Points
437
Location
Tranquility Base
Boat Make
Yamaha
Year
2020
Boat Model
FSH Sport
Boat Length
21
Update:

So last Saturday went out fishing / testing. Happy to report the added deck drains worked well! Washed down the deck with three guests on board and very little water pooled in the corners, what little was left went out the OEM center deck drain.

On the 19’ boats, as well as the 21’ boats, the OEM deck drains are set below the deck level in a molded in depression and have a channel(s) molded into the deck, the drains I added on my boat are set as close as possible to the deck level as there is no molded in depression for them and are at the top of the sloping channel leading to the OEM deck drain, this leaves a i y bit of water that has to go out through the OEM centered mounted drain. However the majority of the water flows out the side drains I added which is a huge improvement, and will make washing down the deck on he water work so much better.

Once the weather warms up enough my plan is to run a couple of tests to see how much faster these added drains will remove a large amount of water from the deck. I’ll plug all three drains the put a set amount of water on the deck, probably 50 gallons then remove the plug from the OEM drain and see how long it takes for the water to drain out, then repeat the test and unplug all three drains.

I kinda get why Yamaha didn’t put side drains on the 21’ boats, but, it sure would be nice if the boat had come with them.
 

TeenGee

Jet Boat Addict
Messages
216
Reaction score
208
Points
117
Location
Florida Space Coast
Boat Make
Yamaha
Year
2022
Boat Model
FSH Sport
Boat Length
21
Update:

So last Saturday went out fishing / testing. Happy to report the added deck drains worked well! Washed down the deck with three guests on board and very little water pooled in the corners, what little was left went out the OEM center deck drain.

On the 19’ boats, as well as the 21’ boats, the OEM deck drains are set below the deck level in a molded in depression and have a channel(s) molded into the deck, the drains I added on my boat are set as close as possible to the deck level as there is no molded in depression for them and are at the top of the sloping channel leading to the OEM deck drain, this leaves a i y bit of water that has to go out through the OEM centered mounted drain. However the majority of the water flows out the side drains I added which is a huge improvement, and will make washing down the deck on he water work so much better.

Once the weather warms up enough my plan is to run a couple of tests to see how much faster these added drains will remove a large amount of water from the deck. I’ll plug all three drains the put a set amount of water on the deck, probably 50 gallons then remove the plug from the OEM drain and see how long it takes for the water to drain out, then repeat the test and unplug all three drains.

I kinda get why Yamaha didn’t put side drains on the 21’ boats, but, it sure would be nice if the boat had come with them.
I like your idea. Looks great. My 2022 210 FSH hasn't been delivered yet so I have a couple of questions.
How high above the water line are the overboard scuppers?
Do you get any water back-flowing out the deck drains onto the deck?
Do you think installing those drains through the deck would help drain more water?
 

FSH 210 Sport

Jetboaters Admiral
Messages
6,010
Reaction score
7,056
Points
437
Location
Tranquility Base
Boat Make
Yamaha
Year
2020
Boat Model
FSH Sport
Boat Length
21
I like your idea. Looks great. My 2022 210 FSH hasn't been delivered yet so I have a couple of questions.
How high above the water line are the overboard scuppers?
Do you get any water back-flowing out the deck drains onto the deck?
Do you think installing those drains through the deck would help drain more water?
The scuppers are just above the waterline, if you are standing on a side in the rear the scuppers are partially submerged.

No water coming back onto deck through the scuppers even when waves hit the side of the boat-scuppers doing their job.

“Do you think installing those drains through the deck would help drain more water?” Probably, but, there is not enough height between the deck and the water line. Due to the boats construction we had to mount them at slightly different heights and fore/aft locations not unlike the 190 FSH series -see pics above.

Over last weekend I was at a fishing tournament where it was snowing and I used the electric wash down system I installed to wash the slushy snow overboard when it began to pile up and make the deck slippery. In Normal wash downs whether on water or off has been much improved, very little water can pool in the corners, and most dirt and debris flow right out the drains.

The next time I wash the boat I’ll run a test of how fast water is removed from the deck by plugging the drains then adding water then removing the plugs. I’ll compare the stock drain vs. all three drains.
 

FSH 210 Sport

Jetboaters Admiral
Messages
6,010
Reaction score
7,056
Points
437
Location
Tranquility Base
Boat Make
Yamaha
Year
2020
Boat Model
FSH Sport
Boat Length
21
View attachment 173747


View attachment 173745

What did you use to tighten the nuts?
Did you apply any sealant to the outside of the scupper?
TIA.
My friend tightened the nuts by hand then I believe used a screwdriver and a small hammer to tighten the nuts, while I held the scuppers from the outside. He put 3M 4200 on the flange of the nut. My friend who used to work on all kinds of boats and installed many below the waterline thru hulls while the boats were in the water used this same method to install these above the water line deck drains, this is for a single hull application, if it was for a double hull application he would have used the sealant on the outside as well.

We did not apply any sealant on the outside relying on the silicone gasket that was provided with the scupper. If I was to do this install again I would apply either 3M 4200 or silicone sealer on the outside and not use the silicone gasket. The shape of the hull made it difficult to get the silicone gasket fully compressed with the limited space to tighten the nut.
 

TeenGee

Jet Boat Addict
Messages
216
Reaction score
208
Points
117
Location
Florida Space Coast
Boat Make
Yamaha
Year
2022
Boat Model
FSH Sport
Boat Length
21
Thanks.
I was hoping you had something other than a screwdriver and hammer. I tried pump pliers but couldn't get a good bite on the nut. I'm going to reach out to my friends with many tools and see what they have.
I installed mine with the gasket and sealant. the gasket squeezed out along the upper side of the scupper and it looks messy. I am going to reinstall the scupper without the gasket and only use sealant.
It was a pain to get the hose onto the 1.5" fittings. I was able to stretch the hose using an exhaust pipe expander I hadn't used in 20 years. The hose went on relatively easy after stretching.
I connected the drains from the 2 cup holders and the other 4 rod holders to the scupper. I even ran a drain from the 2 cupholders in the forward seats to a drain that I ran to the anchor locker.
It may be a losing battle, but I want to eliminate as many leak paths into the bilge as I can.
 

FSH 210 Sport

Jetboaters Admiral
Messages
6,010
Reaction score
7,056
Points
437
Location
Tranquility Base
Boat Make
Yamaha
Year
2020
Boat Model
FSH Sport
Boat Length
21
Thanks.
I was hoping you had something other than a screwdriver and hammer. I tried pump pliers but couldn't get a good bite on the nut. I'm going to reach out to my friends with many tools and see what they have.
I installed mine with the gasket and sealant. the gasket squeezed out along the upper side of the scupper and it looks messy. I am going to reinstall the scupper without the gasket and only use sealant.
It was a pain to get the hose onto the 1.5" fittings. I was able to stretch the hose using an exhaust pipe expander I hadn't used in 20 years. The hose went on relatively easy after stretching.
I connected the drains from the 2 cup holders and the other 4 rod holders to the scupper. I even ran a drain from the 2 cupholders in the forward seats to a drain that I ran to the anchor locker.
It may be a losing battle, but I want to eliminate as many leak paths into the bilge as I can.
The only tool I can think of that would be able to reach in there would be a socket driven crows foot open end wrench. And you’d have to enlarge the hole in the inner hull. Really as long as you have sealant 4200/5200 inside and out and the nut is snug it’s not going anywhere. I also used DAP water based expanding foam to fill the void around the nut to seal up that gap to keep debris and water out.

Using a heat gun on the hose and a spritz of silicone spray makes getting the 1.5” hose on wayyyyy easier. If you are using the spiral wound hose you just have to figure out which direction to turn it and it will “turn on” …it’s a tough job no matter what but you will be happy with the results.

That’s awesome you ran drains from the forward cup holders to the anchor locker! I had thought about doing that as well but I just put caps on the drains and use a microfiber towel to remove water from them. And speaking of the anchor locker…did you see my post in @drewkaree thread? https://jetboaters.net/threads/replaced-my-anchor-locker-drain-fitting-due-to-leaks.32891/ Having the FSH, and after a quick initial look I thought my anchor drain was good…but when I looked recently I found it was not.

84A8E78B-4E4B-4A06-9154-31ED39B1EE4A.jpeg

B0361F1F-A339-43D6-99B2-FA9D7EF089BF.jpeg

Here is the pics of the fix.

3FAB4538-F156-49D7-A694-768EAE1ECC82.jpeg

005BEA2D-89B6-4DD4-8217-FF65BEDF9FE9.jpeg

AD3F2D2A-3F28-4840-8354-145AD51466D5.jpeg

F3192440-E8F6-4DFD-8DFD-6A9F862B0BE3.jpeg

62FAC8A2-C4ED-4C93-8A88-3971B952A051.jpeg

4356D5D5-7B09-4A77-A569-BFDAFD14646C.jpeg

And I now run this plug in the anchor locker drain all the time to keep water from entering the anchor locker. Recently I used my anchor, a rarity, for an overnight stay. When I got home and removed that plug a little water came out and I put the plug back in and left the hatch open to dry out the rode… I’ve had that plug in now for some time running at all speeds and it stays put. Would’ve liked to been able to put it on the inside but there isn’t room.

37F9D968-68F0-4DDE-AED5-41491DAA6494.jpeg

5C2A0099-3E67-427D-8D9C-2766168CF606.jpeg
 

drewkaree

Jetboaters Fleet Admiral
Messages
5,614
Reaction score
19,880
Points
682
Location
West Allis & Fremont, WI
Boat Make
Yamaha
Year
2019
Boat Model
AR
Boat Length
21
Thanks.
I was hoping you had something other than a screwdriver and hammer. I tried pump pliers but couldn't get a good bite on the nut. I'm going to reach out to my friends with many tools and see what they have.

------------------------

It was a pain to get the hose onto the 1.5" fittings. I was able to stretch the hose using an exhaust pipe expander I hadn't used in 20 years. The hose went on relatively easy after stretching.
I know @FSH 210 Sport had a devil of a time with difficult positions for things, so I'm not sure if this will work, but this is what I used for the nut on my scupper: https://www.amazon.com/gp/aw/d/B07DYMX616?psc=1&ref=ppx_pop_mob_b_asin_title


As for the hose, take a heat gun and carefully heat it up (hair dryer works, but takes longer, and is more fiddly), and spray everything with a soapy water mixture, and it should go on quite easily.
 

FSH 210 Sport

Jetboaters Admiral
Messages
6,010
Reaction score
7,056
Points
437
Location
Tranquility Base
Boat Make
Yamaha
Year
2020
Boat Model
FSH Sport
Boat Length
21
I know @FSH 210 Sport had a devil of a time with difficult positions for things, so I'm not sure if this will work, but this is what I used for the nut on my scupper: https://www.amazon.com/gp/aw/d/B07DYMX616?psc=1&ref=ppx_pop_mob_b_asin_title


As for the hose, take a heat gun and carefully heat it up (hair dryer works, but takes longer, and is more fiddly), and spray everything with a soapy water mixture, and it should go on quite easily.
The heat gun is your friend for both putting hoses on and taking them off! The OEM black drain/bilge hose is rock hard until you put some heat on it then it becomes quite pliable.
 

TeenGee

Jet Boat Addict
Messages
216
Reaction score
208
Points
117
Location
Florida Space Coast
Boat Make
Yamaha
Year
2022
Boat Model
FSH Sport
Boat Length
21
I removed and reinstalled the scuppers omitting the silicone gaskets. During the initial install, I used an exhaust pipe expander I have from back in the days before stainless steel exhaust systems. When I removed them, the drain lines were still sufficiently expanded to slide off easily after removing the hose clamp. I put the expander back into the disconnected drain line to make sure it went back on easily. I found a tool at the local Ace Hardware that looked a lot like the one from Amazon. I did have to grind the outside of the jaws a little to get them around the nut and inside the 3" hole on the inner hull. The entire job took about 2 hours.
Thanks for your help.
 

Attachments

Top