• Welcome to Jetboaters.net!

    We are delighted you have found your way to the best Jet Boaters Forum on the internet! Please consider Signing Up so that you can enjoy all the features and offers on the forum. We have members with boats from all the major manufacturers including Yamaha, Seadoo, Scarab and Chaparral. We don't email you SPAM, and the site is totally non-commercial. So what's to lose? IT IS FREE!

    Membership allows you to ask questions (no matter how mundane), meet up with other jet boaters, see full images (not just thumbnails), browse the member map and qualifies you for members only discounts offered by vendors who run specials for our members only! (It also gets rid of this banner!)

    free hit counter

We bought a cheap boat, but we now have to B.O.A.T.

zipper

Jetboaters Fleet Admiral 1*
Staff member
Administrator
Messages
8,154
Reaction score
22,376
Points
862
Location
Northern Vermont Lake Champlain
Boat Make
Boston Whaler
Year
1995
Boat Model
Other
Boat Length
18
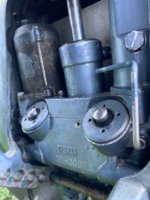
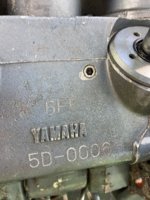
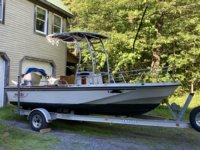
We sold our Yamaha AR230 a year ago. Wife wanted to go fishing and the Zodiac was too small and the Sailboat is the wrong platform. She found a 1995 Boston Whaler Outrage 18. Asking price was $12,500. They accepted our $8500 offer 3 weeks ago and took her home. We noticed an issue with the tilt/trim assembly at the sea trial, a reason for our low offer. Well it did not last long, gulped some air tilting it up last week and I could not get the 1985 Yamaha 115 hp V4 to tilt down. The release screw on the old motor was broken and I had no way to purge the air in the pump. I tried bleeding by releasing air and fluid from fittings, to no avail. The release screw was the key and none were available in the US. A new unit was quoted at $3600. Um, no, too much for an old motor. I found the only used one from a 2007 motor on EBay in the US in NY for $925 plus tax and shipping. Ordered yesterday and it arrived this morning. Making the swap as soon as I can get the old top cylinder (shock) pin out, it is corroded too, so I ordered a replacement pin as I am going to drill this one out, I hope. Been hitting it with a 2# hammer and a punch and it has barely moved, I don’t want to mushroom the pin.
Anyway our first B.O.A.T. repair with this boat.
A couple of pics of what I am talking about.

The boat
D24C2D0A-03DF-44D3-9E09-8FC446B91387.jpeg

The old tilt/trim asm.

1AFC7193-4170-4FB1-BC65-832CB61F8B47.jpeg

Looking for a 6E5 model

5E9FCB07-8629-434C-B813-3EC466ED4FF8.jpeg

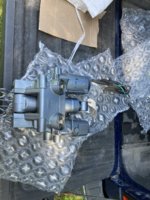
Found one from 2007 in NY, fits the B.O.A.T. (Break Out Another Thousand) perfectly.

FC71ABB5-87EE-46CA-9266-3B2F6C4FD22D.jpeg

FedEx ground got it here in 24hrs.

B10EA8B3-9933-44F0-97C3-E8CD1F1B481E.jpeg

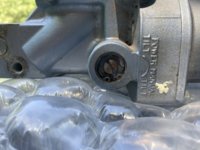
Good release screw

37D4EFD8-F7AF-4A3A-9A72-A0BE3CCAD8B1.jpeg

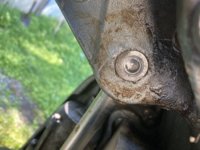
Now to get the pin out. Keep drilling larger holes in the pin. It will not matter that the hole is not exactly centered.
D7EED28C-9554-4D44-84DC-F432FD06E246.jpeg
 
Last edited:
Have you tried heating the casting surrounding the pin?

Also, I have Kroil to be the best penetrating oil on the market. It also comes in aerosol form AeroKroil.
 
Well I beat that pin in round 1 last night. I first drilled a 5/8” hole into the pin about 1 1/2”s deep. Stuck a pin punch in the hole and hit it with a big ball peen hammer and moved it about a 1/4” in an hour of hammering, not happening! So I took out the big hammer and gained an inch, that was all for the night.

Came in had dinner and a few beers and had an epiphany! That can happen when you walk away, free your mind and relax.

I bought a ball joint press 30 years ago and have replaced a few since. I employed it for this task and I had it out in 20 minutes this morning with no hammering.

A few pics along the way.

275BBDCA-3107-4997-8A68-B8A9DF86DB02.jpeg

My set up for a two handed swing with the sledge hammer, I did not feel good about my aim, so I did not ask the wife to hold the punch, lol.

70389017-DEAB-4EA4-A62A-2AFBC6AC1F5E.jpeg
FA3F98A6-4BD6-4079-9711-BE9A4BC1BB95.jpeg

This approach was not working!

So I took out the OTC 7249 3 in 1 service kit.
A perfect “off label” use of this tool.

E88D7E6B-93C8-4310-B2F4-2A3602626767.jpeg

7A6ECCEF-133A-439D-8889-9BDC8E6F96E5.jpeg
4CB3F90A-DA8C-4D0C-8BC4-88D15D8A4060.jpeg

I used a 3” long, 3/8” extension as a punch for the ball joint press. Done in 20 mins.


477C971B-4CCA-4D9F-B020-AC0598C3D6DF.jpeg

I am happier than a pig in poop since I got the pin out this morning as well as the 6 ss bolts out of the aluminum housing without breaking any.

Off to a hot day in the blueberry field.
 
Last edited:
Have you tried heating the casting surrounding the pin?

Also, I have Kroil to be the best penetrating oil on the market. It also comes in aerosol form AeroKroil.

Yes, I applied heat but was very careful not to overheat the aluminum. Did not work.
 
Catching up, but as I was reading I was thinking, 'he needs a press...' And that is a nice one that you have. May have to find one of those. Mine is a counter-top version that presses down. Yours would be much more useful.

Nice work.
 
I found the problem with the old hydraulic pump. The little “gear” on the pump that engages the motor sheared off. This was in addition to the broken release screw. Very glad I found the newer replacement on EBay.

DE79C755-67EF-4AEC-973B-57C9FEA5DDB2.jpeg

603AF3F1-32DB-48B0-A4B6-2A1E61F51CFD.jpeg
 
Last edited:
Might want to hold on to some of those parts that are not sheared off...
 
I released the starboard side motor bracket this morning, pushed it over 1” and swapped out the tilt/trim hydraulic assembly.

A07F8073-ED63-40E7-AF9E-F63D653D38D1.jpeg

The newer one being tested after install, waiting on a new pin to arrive.

 
I released the starboard side motor bracket this morning, pushed it over 1” and swapped out the tilt/trim hydraulic assembly.

View attachment 184808

The newer one being tested after install, waiting on a new pin to arrive.


Looks you are almost back in business!
 
Last time out I noticed a little cavitation. I checked the prop and there was what I consider too much play and wobble within the hub.

I looked up the hub parts for this motor and the quicksilver black diamond prop and the kit we bought at West Marine today was quite different than the old parts shown and made a big difference.

B01D4D98-9D8F-4CE6-AA75-AE8942587FFE.jpeg

Amazing what the correct parts will do.


New pin for the tilt comes tomorrow.
 
Last edited:
I don't know. What is this hangup with the right parts? I mean, you really should be more flexible...

(still scratching my head over how you figured that out... other than just being damn good.)
 
I am a curious guy. When I see something that does not look right to me, I question it. I took apart that loose hub after seeing the play and wobble. The parts did not fit right. In the photo p/n 1 bottomed out on the big brass thrust washer, creating the forward/aft 3/16" of play. The new p/n 1 is half that length. P/n 2 was also different and did not fit p/n 1 tight so that created the wobble. P/n 2, plastic, is the part that shears away if the prop strikes something hard, saving the motor from damage. They did not fit right in my eye. So I looked up the hub kit for this 1985 Yamaha with the QuickSilver Black Diamond prop and found several at our local West Marine. I should have taken a picture of the new one for reference, but NO. Anyway, it's fixed.

20220810_063725.jpg
Here is a picture of the correct parts.
1F8C7B56-43EC-4B58-8C63-213B865F2B3E.jpeg
 
Last edited:
Pin came yesterday. All finished. Back in business.

545E3E89-9C7D-4259-A46C-ED4B13E2725B.jpeg

D4C2BB70-330F-4663-BE7E-78979EC4160E.jpeg

Very happy I can still get parts to keep this 37 YO motor running.
 
Last edited:
Well, we attempted a test run and fishing and maybe the beach on Saturday. Launched the Whaler, started right up, idled out from ramp in a no wake zone, made it 200' out and the motor sputtered and died. Sounded to me like water in the fuel/carburators. Got the boat back to the dock at the ramp and hauled her out. I was feeling bummed...then I saw the guy launching next to me in a go fast boat with twin Yamaha 450R's having issues with one of his motors and he had to haul out and diagnose his issues next to us in the parking lot. Anyway I digress.

Brought her home and started looking for the problem. Found a lot of water in the fuel water separator and the carb bowls, lines etc. The boat had been sitting in the driveway during the previous tilt trim repair and through some heavy downpours. The boat was not always jacked up high in the bow, due to the necessity to raise and lower the motor. So water did pool forward on one occasion, but I jacked it up in the storm when I noticed this happening.

So I started looking around for a way that water could enter the 67 gallon tank and found a pretty likely source of water ingress in the 37 YO fuel filler hose. It was rotten and cracked. Pretty sure I found the problem. We ordered 4 LF of 1 1/2" fuel hose to replace the old one.

0BDC45F1-B162-454B-9743-D0160D4A70F6.jpeg

1EDE5B8F-C559-4577-B4EE-6B0C4A93D418.jpeg


Now to get the water out of the tank. I disconnected the feed line to the water separator, attached the squeeze bulb to that line from the tank and started pumping/siphoning the fuel from the tank. I got 2 gallons of water out in the first 5 gallon can I filled. The other 3-5 gallon cans I filled after the first one were pure treated fuel.

EC93A52B-4E1D-4305-905A-892725C2F427.jpeg

C59D5E58-E622-486F-A322-7DADEDF972F5.jpeg

Anyway, I got the water out and runs good now. Changed the spark plugs, did a compression test 100-105-100-95 on the old girl, not bad for a 37 year old. And ran her on the hose.

 
Last edited:
Well done! Fingers crossed the next attempt is a flawless one and you put some old fish on the boat! The motor sounds really good! Did you check / change the lower gear case oil ?

Whats that blue thing for on the vent line? It looks new.
 
Last edited:
Repair complete. We went out today without any issues to report.


Anchored at Thayer Beach for lunch near another Yamaha, lol.

9705383F-25FA-4F2A-BF3F-DE23ECA90151.jpeg

Admiral at the helm.

3C33B2CC-33E0-492A-9513-627413AE4CA9.jpeg
 
Last edited:
Replaced the fuel filler hose this morning. Out on the sailboat now.

85A85129-E781-49C3-89FA-ACDD09FFC456.jpeg
 
A chronic issue with these older 18' Outrages is water entering the bilge area from the fuel filler hose opening as well as the wiring opening on the starboard side. Water drains into these openings and residual moisture will pool in the drain passages on top of the fuel tank. The foam core will absorb some of this water. I have been drying the boat out since we bought it.
I installed the new fuel filler hose yesterday to replace the 37 yo cracked, rotted original. Now I am going to modify the drain pattern by using a piece of starboard I had left over when I modified the table holder in the port helm locker on our Yamaha 07 AR230.
I am building a dike around those holes and sealing them with 4000UV. It will look like this, and then I will screw the covering panel back on and remove the critter screening a PO had installed.

E720F9A6-3D9C-4B12-8421-02B539EFDECA.jpeg

23F3AD4C-9DF3-4BBE-9319-702A3EDB1E71.jpeg

It should keep the rain out.

That piece of starboard I saved has been useful as I used a piece on the Beneteau as a faceplate for an instrument.

20220821_070526.jpg

A little piece of the 07 Yamaha in the Bene and the Whaler for the rest of their lives.
 
Last edited:
Done.

A6D6033B-E1E2-4539-AF7F-F4773E14345A.jpeg

2D32D509-2496-4DA1-99C3-8EADEBACB3B9.jpeg

9EDD8093-7EAA-4D48-BAD7-B29272C0E8E5.jpeg

843D41B8-30E4-4C51-A558-B86BA3CC1FE8.jpeg
 
Back
Top