• Welcome to Jetboaters.net!

    We are delighted you have found your way to the best Jet Boaters Forum on the internet! Please consider Signing Up so that you can enjoy all the features and offers on the forum. We have members with boats from all the major manufacturers including Yamaha, Seadoo, Scarab and Chaparral. We don't email you SPAM, and the site is totally non-commercial. So what's to lose? IT IS FREE!

    Membership allows you to ask questions (no matter how mundane), meet up with other jet boaters, see full images (not just thumbnails), browse the member map and qualifies you for members only discounts offered by vendors who run specials for our members only! (It also gets rid of this banner!)

    free hit counter
  • Announcing the 2024 Jetboat Pilot 10th Annual Marine Mat Group Buy for JetBoaters.net members only! This is your best time to buy Marine Mat from JetboatPilot - you won't get a better price - 30% Off! Use Coupon Code JETBOATERS.NET at checkout.

    So if you are tired of stepping on really hot snaps/carpet, or tired of that musty carpet smell - Marine Mat is the best alternative out there! Get in on this now, or pay more later!

    You only have until September 30th to get in on this.....So Hurry!

    You can dismiss this notice by clicking on the "X" in the upper right corner>>>>>>>>

Enlarging pre-drilled holes

ScarabMike

Jetboaters Admiral
Messages
2,223
Reaction score
2,061
Points
302
Location
Green Cove Springs, FL
Boat Make
Yamaha
Year
2022
Boat Model
AR
Boat Length
19
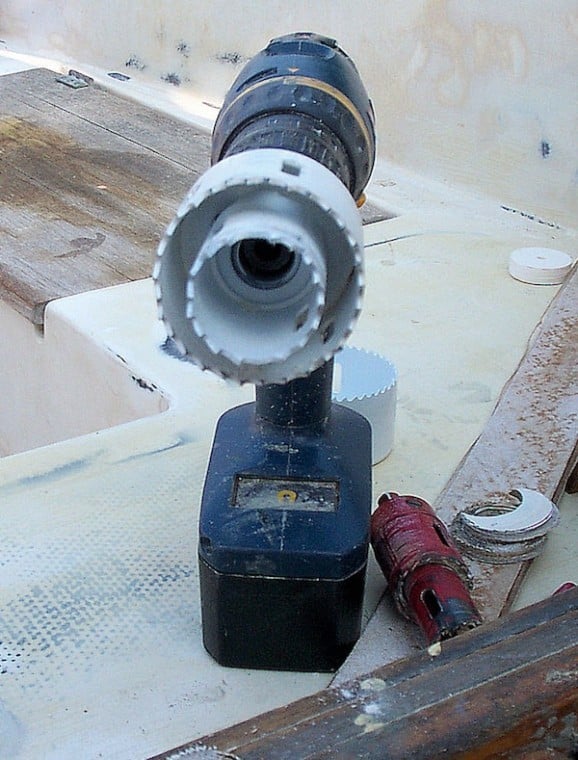
What is the best way to enlarge holes on our boats? I want to upgrade the dash remote for my radio, and Im afraid to use the dremel.

I did use it to enlarge the stock USB port to one with a 3.5mm Aux jack in it. Ive already ran the Sony data cable, and remote lead to the dash, just need this done to complete the install.
 
A trim router following a template is the easiest and safest. I use hole saws and also a jigsaw when needed too. But a trim router is a great way to enlarge speaker mounting holes. The dash is irregular and may be hard to use a trim router. If the widening is small, I use a sanding drum on my dremel. I always finish the edge of any cut with a bevel with the sanding drum too, so it won't crack or spider.
 
I never thought about using the sanding drum. It will take longer, but you dont have to worry about creeping outside the stencil lines.

A trim router following a template is the easiest and safest. I use hole saws and also a jigsaw when needed too. But a trim router is a great way to enlarge speaker mounting holes. The dash is irregular and may be hard to use a trim router. If the widening is small, I use a sanding drum on my dremel. I always finish the edge of any cut with a bevel with the sanding drum too, so it won't crack or spider.
 
It will take longer and be sure to keep the shop vac running no matter what your cutting with. A second set of hands to pull the dust away is helpful and safer!
 
Are the current and desired holes round? If so you may be able to find a round object that will fit in the current hole to serve as a guide for a larger hole saw for the new hole. For example when I enlarged the factory swim deck stereo control hole to fit a through mounted Fusion stereo control I used a large socket that fit snugly in the factory hole as the guide. I used a 1/4 shaft to 1/2" socket adapter to mount the socket where the drill bit would normally fit in the hole saw. You could use a second hole saw as the guide if the existing hole is larger.

Another option if you have screw holes where you want to mount is to screw a piece of wood over the opening and use it for the hole saws drill bit guide then drill through both the wood and the fiberglass. I did this when I enlarged the drain plug hole.

When I switched from 6.5" round to 6x9 speakers I used an air powered body saw to cut the new holes. I found it to be quite controllable.
Ill be going from the 3" oem non alpha numeric remote to the 4" remote.

This..
83282_L1
to this
x158RMX60ML-f.jpeg


The location on my dash is flat, and will fit it with no issues. I can get a vacuum hose behind it using the cubby behind the bow seat. Unfortunately I have to do this solo, so I might duct tape it and just keep in on. I think Ill be more comfortable using the sanding drum. I dont mind it being slow as long as I have less chance of messing the dash up.
 
I used a Dewalt hole cutting tool for cutting the speaker holes in the boat larger. The speakers (Polks) came with a mounting plate that I wasn't going to use, and it worked perfectly as a guide for the hole cutter. I clamped it into place and then ran the bit around the edge, then shop vac'd up the dust. Was super fast and accurate.
 
If it is a round hole, I have made perfect holes with a hole saw on the end of a drill. It is important to put tape around the lines/outline first. For other holes that I needed to enlarge, I used a dremel with a fiberglass bit. It makes dust but I just have a vacuum nearby and a wet towel under the area. I also wear a mask
 
Ill be going from the 3" oem non alpha numeric remote to the 4" remote.

If you have a 3" and a 4" hole saw install the 3" hole saw into the 4" hole saw where the drill bit guide would go and drill away. This will make way less dust than using a sander to expand the hole and you will have a perfect 4" hole.

I finally found a picture to illustrate
4eb9ffec1af2d.image.jpg
 
Bruce is just mounting the 3" on the arbor that normally would contain the pilot bit. He then uses the 3" hole saw as a guide...in a 3" hole. If you don't have a pretty exact match to the existing hole, this won't work well. And remember...whether a drill bit, or saw blade, running it in reverse will etch through the gelcoat without cracking and splintering it much better. I pretty much run a hole saw in reverse until the teeth start to contact the glass itself. Don't try to use a hole saw without a stabilizing guide of some sort. You can even cut out a guide from plywood or mdf and use double sided tape to affix it to the work, then run your correct size hole saw with the guide holding the position. If your going to buy a tool, get a trim router and the next 50 holes you drill you will be utilizing the perfect tool, when used with a template guide that you make for it. A pattern following bit runs against the template and cuts a matching hole in the work.
 
@Bruce Ive never seen that before. Can all hole saws do the same thing? I see a trip to Lowes coming up.

You need the two hole saws and two arbors that attach the hole saw to the drill. The arbor is designed to have a pilot drill bit sticking out the front and the hole saw screws to it. It is common to only have one arbor for a set of hole saws. With such large hole saws you will likely need an adapter to attach the second arbor into the pilot but hole. I would go to a tool store and see what fits. They may even have hole saws available to rent.

Once you find the combination to make your double hole saw it will cut the hole in a matter of seconds.

Here is a picture of an arbor.

Arbor_Main.jpg


If your going to buy a tool, get a trim router and the next 50 holes you drill you will be utilizing the perfect tool, when used with a template guide that you make for it. A pattern following bit runs against the template and cuts a matching hole in the work.

A trim router will make way more fiberglass dust and take many times as long to cut the hole.
 
A trim router does it all in one single step. It cuts a perfect flush home and trims the fiberglass smooth in the same pass. It will make dust...any cutting will. A splintered cutting that a saw does makes less dust, but also splinters the work more. A professional install shop would use a trim router, because it is more precise, cleaner, and faster.
 
Just found this on the net.

That is exactly what you need. But you can do the same with locally available tools. May be able to rent them.
 
I cut all the bigger, or odd shaped holes in my boat with this:

Dremel Model # 565 4-Piece Multi-Purpose Cutting Kit


shopping
 
I always use a hole saw but its important to:
  1. Use blue 3m tape on the surface to be drilled
  2. run the drill in REVERSE until your through the bulk of the gelcoat, then change to forward
Never had any problems, and should give you a nice clean cutout.
 
Back
Top