
Zackdadams
Jetboaters Lieutenant
- Messages
- 314
- Reaction score
- 484
- Points
- 157
- Location
- MS Gulf Coast
- Boat Make
- Yamaha
- Year
- 2021
- Boat Model
- FSH Sport
- Boat Length
- 25
I've decided to add powered trim tabs to my FSH 252.
The following is a tutorial from my project.
Parts:
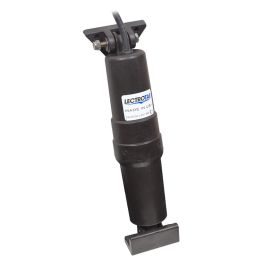
Tabs: Lectrotab Model TA9x12 - Aluminum Alloy
Pistons: Lectrotab Model S-BK-16 - Short Trim Tab Actuator - 23' Cable
 www.hodgesmarine.com
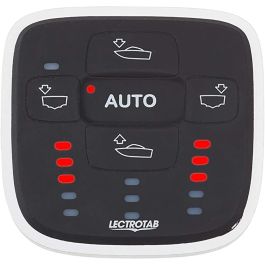
Controller: Lectrotab ALC-1 - Automatic Leveling Control - Single Actuator
 www.hodgesmarine.com
.jpg")
.jpg")
I researched a few brands, and ultimately chose Lectrotab.
I really liked their product selection, and controllers.
I originally ordered multiple different size tabs, but ended up sending them all back.
The 9x12 tabs fit the best for me, and didn't interfere with the ratchet straps.
These tabs also fit perfectly under the lighting.
Initially I also ordered the standard Lectrotab pistons, but they were too long.
I went with the automatic controller, which is manual also.
Alternatively, you can use the manual controller.
Part 1: The Trim Tabs
Before I began drilling holes, I removed the rear cup holders, and rear access panel.
Using an endoscope, I checked all areas where the tabs, pistons, wiring, etc will mount.
I was satisfied it would be a clean, safe install.
The only thing in the area is the underwater lighting wire.
.jpg")
.jpg")
Step 1: Assemble the Tabs
The assembly is very straight forward.
You'll want to remove and flip the piston brackets, as we'll be mounting them under the boat, rather than on the transom.
Using blunt object (I used a drill extension) knock out the center pin.
Flip the bracket, and reinstall the pin.
Attach the piston to the tab, and use Loctite on the bolts.
.jpg")
.jpg")
Step 2: Mounting the Tabs
To begin, I held one tab in place, and used a 4' level under the boat to check for clearance.
I decided on a good location for the tab and piston, that didn't interfere with lighting, ratchets, etc.
Mask off the area using painters tape.
Measure from the bottom outer edge over 7".
Using a torpedo level, draw a straight line upwards.
This will be the corner of the trim tab.
These particular tabs have a removable mounting plate.
Mark the center hole, and drill a small pilot hole, and countersink, to ensure the gel coat won't split.
Install the first screw to hold the bracket in place, then drill the remaining pilot holes.
Remove the plate, and countersink all holes.
Install all screws to ensure a good fit.
.jpg")
.jpg")
Once you like it, remove all the screws and painters tape.
Wipe the area down with isopropyl, and prepare for 5200 adhesive.
Shoot 5200 in each screw hole, and apply a decent amount behind the plate.
You'll want it to ooze out completely around the plate, to ensure a water tight seal.
Reattach the mounting plate to the tab, and reinstall the screws.
Afterwards, wipe the excess 5200 away with Simple Green or similar.
.jpg")
.jpg")
Step 3: Mounting the Pistons
Once the tabs are attached, hold a 4' level under the boat and the tab.
The idea is for the tabs to be slightly above the bottom when not deployed.
Apply painters tape to the general area the piston will mount.
(Note: The Piston rotates, for better alignment.)
Holding the piston, tab, and level in place, I decided on a location, 1/8" above the 4' level.
I drew a line around the piston mount, and removed the mounting bracket.
.jpg")
.jpg")
Repeating the same steps as the trim tab bracket, I drilled, countersunk, and attached the piston bracket.
Afterwards, drill the center hole in the bracket for the piston wire.
Finally, remove the bracket and tape.
Run the piston wire up through bracket, and then the hole.
.jpg")
.jpg")
Once the entire length of wire is fed into the hole, prepare for 5200.
Shoot 5200 into each hole, and a generous amount under the bracket.
Hold the piston up near the area, and also apply 5200 around the wire.
Finally reattach the bracket to the hull, and reassemble the piston.
Clean the excess 5200.
.jpg")
.jpg")
Now on to wiring!
The following is a tutorial from my project.
Parts:
Tabs: Lectrotab Model TA9x12 - Aluminum Alloy
Pistons: Lectrotab Model S-BK-16 - Short Trim Tab Actuator - 23' Cable
Lectrotab 12 V Short Trim Tab Actuator - 23' Cable
Lectrotab 12 V Short Trim Tab Actuator 2339 Cable12 V Short Trim Tab Actuator 23 CablenbspIdeal for limited vertical height applications such as swim platforms, Lectrotab short trim tab actuators are precisionengineered to combine quiet op...
Controller: Lectrotab ALC-1 - Automatic Leveling Control - Single Actuator
Lectrotab Automatic Leveling Control - Single Actuator
Lectrotab Automatic Leveling Control Single ActuatorAutomatic Leveling Control Single ActuatornbspAs wind shifts, water conditions change or passengers move about, the Automatic Leveling Control ALC will automatically adjust your trim tabs to...
I researched a few brands, and ultimately chose Lectrotab.
I really liked their product selection, and controllers.
I originally ordered multiple different size tabs, but ended up sending them all back.
The 9x12 tabs fit the best for me, and didn't interfere with the ratchet straps.
These tabs also fit perfectly under the lighting.
Initially I also ordered the standard Lectrotab pistons, but they were too long.
I went with the automatic controller, which is manual also.
Alternatively, you can use the manual controller.
Part 1: The Trim Tabs
Before I began drilling holes, I removed the rear cup holders, and rear access panel.
Using an endoscope, I checked all areas where the tabs, pistons, wiring, etc will mount.
I was satisfied it would be a clean, safe install.
The only thing in the area is the underwater lighting wire.
Step 1: Assemble the Tabs
The assembly is very straight forward.
You'll want to remove and flip the piston brackets, as we'll be mounting them under the boat, rather than on the transom.
Using blunt object (I used a drill extension) knock out the center pin.
Flip the bracket, and reinstall the pin.
Attach the piston to the tab, and use Loctite on the bolts.
Step 2: Mounting the Tabs
To begin, I held one tab in place, and used a 4' level under the boat to check for clearance.
I decided on a good location for the tab and piston, that didn't interfere with lighting, ratchets, etc.
Mask off the area using painters tape.
Measure from the bottom outer edge over 7".
Using a torpedo level, draw a straight line upwards.
This will be the corner of the trim tab.
These particular tabs have a removable mounting plate.
Mark the center hole, and drill a small pilot hole, and countersink, to ensure the gel coat won't split.
Install the first screw to hold the bracket in place, then drill the remaining pilot holes.
Remove the plate, and countersink all holes.
Install all screws to ensure a good fit.
Once you like it, remove all the screws and painters tape.
Wipe the area down with isopropyl, and prepare for 5200 adhesive.
Shoot 5200 in each screw hole, and apply a decent amount behind the plate.
You'll want it to ooze out completely around the plate, to ensure a water tight seal.
Reattach the mounting plate to the tab, and reinstall the screws.
Afterwards, wipe the excess 5200 away with Simple Green or similar.
Step 3: Mounting the Pistons
Once the tabs are attached, hold a 4' level under the boat and the tab.
The idea is for the tabs to be slightly above the bottom when not deployed.
Apply painters tape to the general area the piston will mount.
(Note: The Piston rotates, for better alignment.)
Holding the piston, tab, and level in place, I decided on a location, 1/8" above the 4' level.
I drew a line around the piston mount, and removed the mounting bracket.
Repeating the same steps as the trim tab bracket, I drilled, countersunk, and attached the piston bracket.
Afterwards, drill the center hole in the bracket for the piston wire.
Finally, remove the bracket and tape.
Run the piston wire up through bracket, and then the hole.
Once the entire length of wire is fed into the hole, prepare for 5200.
Shoot 5200 into each hole, and a generous amount under the bracket.
Hold the piston up near the area, and also apply 5200 around the wire.
Finally reattach the bracket to the hull, and reassemble the piston.
Clean the excess 5200.
Now on to wiring!
Last edited:
.jpg")
.jpg")
.jpg")
.jpg")
.jpg")
.jpg")
.jpg")
.jpg")
.jpg")
.jpg")
.jpg")
.jpg")
.jpg")
.jpg")
.jpg")
.jpg")
.jpg")
.jpg")
.jpg")
.jpg")


