• Welcome to Jetboaters.net!

    We are delighted you have found your way to the best Jet Boaters Forum on the internet! Please consider Signing Up so that you can enjoy all the features and offers on the forum. We have members with boats from all the major manufacturers including Yamaha, Seadoo, Scarab and Chaparral. We don't email you SPAM, and the site is totally non-commercial. So what's to lose? IT IS FREE!

    Membership allows you to ask questions (no matter how mundane), meet up with other jet boaters, see full images (not just thumbnails), browse the member map and qualifies you for members only discounts offered by vendors who run specials for our members only! (It also gets rid of this banner!)

    free hit counter

Garboard drain repair

pcriley

Jet Boat Lover
Messages
21
Reaction score
15
Points
82
Boat Make
Yamaha
Year
2006
Boat Model
SX
Boat Length
23
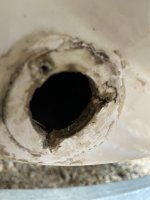
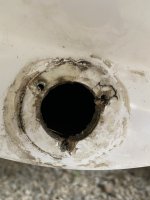
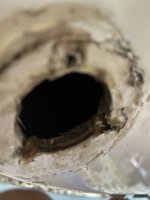
I recently noticed the garboard drain assembly was loose on my 2006 SX230. I found that the screws were stripped and upon removal, the screw holes have broken through to the drain hole. Luckily this is just laminated glass with no wood core so there is no rot to worry about.

Would love to here some opinions on the best way to repair. I was thinking after cleaning up the area I would coat the exposed glass with epoxy to provide insurance against delamination. Then when reinstalling I would rotate the drain assembly and make new screw holes, sealing everything with Lifeseal. Pictures attached.
 

Attachments

  • 43C03A4A-4D75-4407-9F75-FE91D221C596.jpeg
    43C03A4A-4D75-4407-9F75-FE91D221C596.jpeg
    1.2 MB · Views: 13
  • CDAB449D-29DE-439B-8DE1-7E0E85251455.jpeg
    CDAB449D-29DE-439B-8DE1-7E0E85251455.jpeg
    1.5 MB · Views: 14
  • F3DAF132-C709-490B-AABE-FE19AC4AEBB5.jpeg
    F3DAF132-C709-490B-AABE-FE19AC4AEBB5.jpeg
    1.4 MB · Views: 21
I'd epoxy the edges, then get a big washer for the backside. Drill holes in the washer to coincide with the screw holes, then instead of screws use bolts to hold the drain in. Sealant on the backside of the washer and the drain fitting. Should never need to be repaired again if you use the proper hardware.
 
I'd epoxy the edges, then get a big washer for the backside. Drill holes in the washer to coincide with the screw holes, then instead of screws use bolts to hold the drain in. Sealant on the backside of the washer and the drain fitting. Should never need to be repaired again if you use the proper hardware.
How do you access the back side of the garboard drain to install the washer? When i replaced the scupper valve through the jet pump access hatch I don't remember seeing it underneath. I didn't remove the waterbox though so i didn't have a great view.
 
Dixie's approach would work, but you'd have to pull the tray and stand on your head to get those nuts on the back!!!

I think your appraoch @pcriley would be fine. If I were doing it, I'd clean the area, put 5200 into the current screw holes and any cracks, then let harden, then redrill new holes and reapply the drain with caulk. That would last years (probably longer than you'll own the boat)
 
Probably true enough. I’m kind of famous for ”over engineering” my repairs.
 
Now, if you were to hack off the entire transom, you could relay the entire back with fresh glass and embed the washer...

(I see your over-engineering and raise you...)
 
Probably true enough. I’m kind of famous for ”over engineering” my repairs.
Decided to try going this route. Machined a stainless fender washer for the inside piece and JB Welded locknuts on the back side of the washer. I had to grind the bottom of the washer for clearance.

to install the washer on the inside I ran a string from the jet pump access down through the drain hole. All you have to do is put the line inside the washer and drop it. Practically places itself. I’ll update more when I finish up tomorrow.
15F152E6-657F-4C44-B5A9-60AB716225A0.jpeg
06BD1A6C-6805-4E9B-9881-C249974BD53E.jpeg
5A06B51E-6BFF-4D27-A17A-549D05B77F6B.jpeg
 
Wow Nylon washers welded on...Take that!
 
Back
Top