CrankyGypsy
Jetboaters Captain
- Messages
- 352
- Reaction score
- 297
- Points
- 217
- Location
- Tampa, FL 33615
- Boat Make
- SeaDoo
- Year
- 2008
- Boat Model
- Challenger
- Boat Length
- 18
i'm finally posting the pics and my steps for the process i used to repair/replace some FRP winter 2014-2015. i successfully made it through several seasons without any indication of failure of the repaired areas. in the end, the engine bay actually looks better than it did from the factory. it has been through some rough swells and i never once worried about taking it easy due to the repairs.
unfortunately, there were days i just didn't bother to take pictures. i am also missing a few of the photos i took on an old phone. this was my first Yamaha boat (or any boat for that matter) and i had noticed the FRP/gelcoat was different at the very back of the engine bay. at first i thought there was a repair here, but after seeing a few pics of other 2005 boats, this appears to be how the factory installed it. i didn't like the look of it, so i decided to redo this entire section while i was in there. also, i could not find anything underneath that could give a clue to a reason for a repair - the hull looked unscathed here and the materials (specifically the green/grey compound) appear to be the same in other areas of the boat ...re-affirming my belief it came like this from the factory. they must've decided to alter something at the end of the 2005 production year?
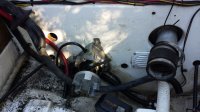
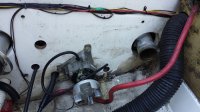
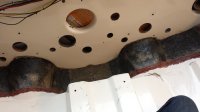
here's two pics of the transom area with the engines pulled. you can see the bearing housings were leaking grease - the vulcanized rubber probably separated years ago. i took the opportunity to replace portions of, and realign, the drivetrain. i also yanked the engine bay carpet and did an extensive noise reduction project:
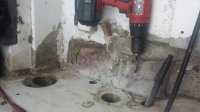
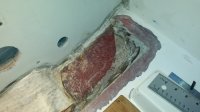
here are pics of the removal of the odd-looking FRP (again, seems to be like this from the factory in 2005):
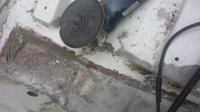
BONDING SLOPE: with the transom area cleaned up, i ground the area surrounding the repair an additional 1.50" from the hole, at a bevel. i used an angle grinder with a coarse sanding disc for this. we want at least a 10:1 ratio (12:1 is optimal) for the new glass to adhere to. the factory glass is generally 1/8" to 3/16" thick, so that is roughly 1.50" out from the hole. use 60-80grit sandpaper to ensure a good bonding surface. clean any dust, oil, and water off with acetone before wetting out your glass:
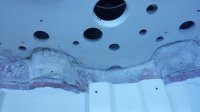
SHAPING: i thought about how i was going to support the new glass for a long time. i finally came up with filling the void with Darice (brand name) Foam Sheet. it's not the optimal solution to getting it to factory standards internally, but it's what i was comfortable with and it did the job really well:
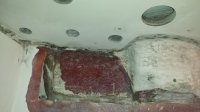
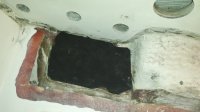
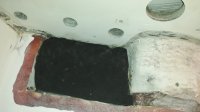
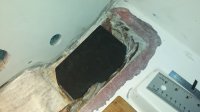
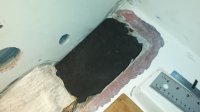
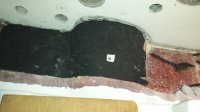
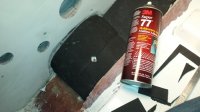
the bilge pump area was bridged with plexiglass. i precut it with a 3.25" holesaw and taped it so i could easily remove the hole after gel. i made sure to always keep the location of the screw visible that helped support the popsicle stick (which kept me from pulling the plug out) so i knew exactly where to place the 3" holesaw when the gelcoat was done. i used epoxy to secure the bridge (the plexi is still there, hidden under glass) and then added more foam to smooth out all the transitions:
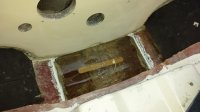
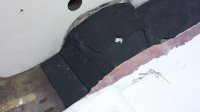
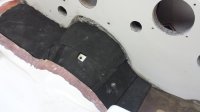
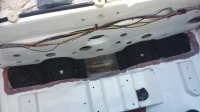
FIBERGLASS LAYERS: i made patterns out of waxed paper and transferred them to the raw fiberglass. always alternate strand mat and woven cloth and make sure the ends overlap if it is like a jigsaw puzzle. start with thinner mat (1.5oz) that is the entire size of the hole & slope area, then a slightly smaller area of cloth (6-8oz). i tried to make the smaller pieces 1/8" smaller around the edges. then a layer of thick mat (i occasionally used the 3oz stuff every few layers to speed up the process). alternate mat (1.5oz) with the cloth (6-8oz) as it builds up level with the underside of the gel. multiple thin layers of fiberglass are stronger compared to thicker layers that move the job along quicker. always try to finish with mat as the top layer, otherwise there's a slight risk that the cloth's weave may show through the gelcoat. cut all the layers out first and check that they fit as planned before starting to wet any of them out. even if a new batch of resin needs to be made before all the layers are done, there will be time to get the next layer on before the last layer cures - this will give it the strongest bond. if it cures, you will need to score the surface with 60-80grit again before adding more layers. there are calculators online (Fibreglast.com has a good one) to ballpark how many layers of raw fiberglass and amount of resin you will need for each patch. this varies on technique and i soon figure out which way to skew the sums for my methods (a little extra resin):
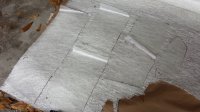
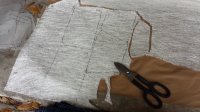
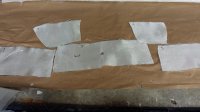
RESIN CHOICES: i considered the three common types of resin. the factory uses polyester because it is cheap. some recommend epoxy because it will make a very strong bond to anything, has a long shelf life, is fumeless, and will cure no matter the ambient temperature. conversely, it's very expensive and has less flex than the others. also, gelcoat doesn't always stick to epoxy resins (i avoid it for this reason - Marine Tex is an epoxy). i chose vinyl ester because it is a good compromise between the two 'esters. simply put, it is a stronger, more water-resistant version of polyester. like poly, it requires MEKP (ketone peroxide - the catalyst) to cure - always. anytime i mention a resin or gelcoat (gelcoats are poly based), there is always MEKP mixed in. the main difference with vinyl is that it has a fairly specific MEKP mix ratio (2%), whereas poly has a bit of range (1-1.5%) for different ambient temperatures and desired cure rates. overall, i was extremely happy with the vinyl. once i did some tests, i knew i did not need the mega-bond of the epoxy. i originally tried to use a finned roller to spread the resin. it only caused grief as it pushed around my perfectly laid glass. i found that pre-wetting the glass on a board wrapped in foil, placing the glass into position, and then stippling the glass with the tip of the bristles worked great to get it into corners, over edges, and remove bubbles quickly. a good idea is to tape off the gelcoat surrounding the repair area to minimize cleanup. any spilled, non-cured resin can be wiped-up easily with acetone. otherwise, use a razor blade to chip it off:
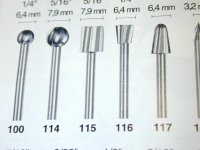
BASIC FILLER OPTIONS: there were gel cracks i ground out with Dremel bur #117, but were not wide enough for glass mat. to fill these, i made what the pros call "peanut butter" due to its consistency. it is also useful for fillets (pronounced "fill it") for making the inside of corners using a tongue depressor. it is resin mixed with fumed silica to reduce sag and sometimes loose fiberglass is added for tensile strength. there is chopped glass (loose strands) and milled fiber (looks like balled-up newspaper for hamsters). i used both, depending on the situation and my mood. the chopped glass produces a much stronger result - a few small pinches to 2 oz of resin is a good start. you'll find that if you add too much chopped glass, it will become "hairy" and not spread well - that's the trade off. to give it a more uniform consistency (prevent it from being runny), add a decent amount of fumed silica. be sure to mix the resin and MEKP thoroughly before ever adding anything to it or you may have a curing issue. if something doesn't cure in the proper amount of time (fillers increase working time), there's a 99.9% chance it never will - it will just have to be removed and refinished.
unfortunately, there were days i just didn't bother to take pictures. i am also missing a few of the photos i took on an old phone. this was my first Yamaha boat (or any boat for that matter) and i had noticed the FRP/gelcoat was different at the very back of the engine bay. at first i thought there was a repair here, but after seeing a few pics of other 2005 boats, this appears to be how the factory installed it. i didn't like the look of it, so i decided to redo this entire section while i was in there. also, i could not find anything underneath that could give a clue to a reason for a repair - the hull looked unscathed here and the materials (specifically the green/grey compound) appear to be the same in other areas of the boat ...re-affirming my belief it came like this from the factory. they must've decided to alter something at the end of the 2005 production year?
here's two pics of the transom area with the engines pulled. you can see the bearing housings were leaking grease - the vulcanized rubber probably separated years ago. i took the opportunity to replace portions of, and realign, the drivetrain. i also yanked the engine bay carpet and did an extensive noise reduction project:


here are pics of the removal of the odd-looking FRP (again, seems to be like this from the factory in 2005):


BONDING SLOPE: with the transom area cleaned up, i ground the area surrounding the repair an additional 1.50" from the hole, at a bevel. i used an angle grinder with a coarse sanding disc for this. we want at least a 10:1 ratio (12:1 is optimal) for the new glass to adhere to. the factory glass is generally 1/8" to 3/16" thick, so that is roughly 1.50" out from the hole. use 60-80grit sandpaper to ensure a good bonding surface. clean any dust, oil, and water off with acetone before wetting out your glass:

SHAPING: i thought about how i was going to support the new glass for a long time. i finally came up with filling the void with Darice (brand name) Foam Sheet. it's not the optimal solution to getting it to factory standards internally, but it's what i was comfortable with and it did the job really well:


the bilge pump area was bridged with plexiglass. i precut it with a 3.25" holesaw and taped it so i could easily remove the hole after gel. i made sure to always keep the location of the screw visible that helped support the popsicle stick (which kept me from pulling the plug out) so i knew exactly where to place the 3" holesaw when the gelcoat was done. i used epoxy to secure the bridge (the plexi is still there, hidden under glass) and then added more foam to smooth out all the transitions:


FIBERGLASS LAYERS: i made patterns out of waxed paper and transferred them to the raw fiberglass. always alternate strand mat and woven cloth and make sure the ends overlap if it is like a jigsaw puzzle. start with thinner mat (1.5oz) that is the entire size of the hole & slope area, then a slightly smaller area of cloth (6-8oz). i tried to make the smaller pieces 1/8" smaller around the edges. then a layer of thick mat (i occasionally used the 3oz stuff every few layers to speed up the process). alternate mat (1.5oz) with the cloth (6-8oz) as it builds up level with the underside of the gel. multiple thin layers of fiberglass are stronger compared to thicker layers that move the job along quicker. always try to finish with mat as the top layer, otherwise there's a slight risk that the cloth's weave may show through the gelcoat. cut all the layers out first and check that they fit as planned before starting to wet any of them out. even if a new batch of resin needs to be made before all the layers are done, there will be time to get the next layer on before the last layer cures - this will give it the strongest bond. if it cures, you will need to score the surface with 60-80grit again before adding more layers. there are calculators online (Fibreglast.com has a good one) to ballpark how many layers of raw fiberglass and amount of resin you will need for each patch. this varies on technique and i soon figure out which way to skew the sums for my methods (a little extra resin):


RESIN CHOICES: i considered the three common types of resin. the factory uses polyester because it is cheap. some recommend epoxy because it will make a very strong bond to anything, has a long shelf life, is fumeless, and will cure no matter the ambient temperature. conversely, it's very expensive and has less flex than the others. also, gelcoat doesn't always stick to epoxy resins (i avoid it for this reason - Marine Tex is an epoxy). i chose vinyl ester because it is a good compromise between the two 'esters. simply put, it is a stronger, more water-resistant version of polyester. like poly, it requires MEKP (ketone peroxide - the catalyst) to cure - always. anytime i mention a resin or gelcoat (gelcoats are poly based), there is always MEKP mixed in. the main difference with vinyl is that it has a fairly specific MEKP mix ratio (2%), whereas poly has a bit of range (1-1.5%) for different ambient temperatures and desired cure rates. overall, i was extremely happy with the vinyl. once i did some tests, i knew i did not need the mega-bond of the epoxy. i originally tried to use a finned roller to spread the resin. it only caused grief as it pushed around my perfectly laid glass. i found that pre-wetting the glass on a board wrapped in foil, placing the glass into position, and then stippling the glass with the tip of the bristles worked great to get it into corners, over edges, and remove bubbles quickly. a good idea is to tape off the gelcoat surrounding the repair area to minimize cleanup. any spilled, non-cured resin can be wiped-up easily with acetone. otherwise, use a razor blade to chip it off:

BASIC FILLER OPTIONS: there were gel cracks i ground out with Dremel bur #117, but were not wide enough for glass mat. to fill these, i made what the pros call "peanut butter" due to its consistency. it is also useful for fillets (pronounced "fill it") for making the inside of corners using a tongue depressor. it is resin mixed with fumed silica to reduce sag and sometimes loose fiberglass is added for tensile strength. there is chopped glass (loose strands) and milled fiber (looks like balled-up newspaper for hamsters). i used both, depending on the situation and my mood. the chopped glass produces a much stronger result - a few small pinches to 2 oz of resin is a good start. you'll find that if you add too much chopped glass, it will become "hairy" and not spread well - that's the trade off. to give it a more uniform consistency (prevent it from being runny), add a decent amount of fumed silica. be sure to mix the resin and MEKP thoroughly before ever adding anything to it or you may have a curing issue. if something doesn't cure in the proper amount of time (fillers increase working time), there's a 99.9% chance it never will - it will just have to be removed and refinished.

Last edited:


