CrankyGypsy
Jetboaters Captain
- Messages
- 352
- Reaction score
- 297
- Points
- 217
- Location
- Tampa, FL 33615
- Boat Make
- SeaDoo
- Year
- 2008
- Boat Model
- Challenger
- Boat Length
- 18
referencing 2005 AR230HO. haven't seen a simplified break-down with pics and the factory service manual doesn't detail the process
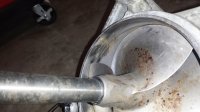
my starboard motor suddenly sounded/looked like it was going to shake itself to pieces at idle, but would smooth out in No Wake mode or higher. a plug change didn't do any good. with it on the trailer, i noticed a squelch at shut-down. i figured it was something with the impeller, so i pulled the pump assembly (it comes out very quickly) and found the wear ring was binding on the impeller:
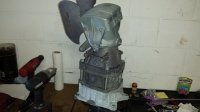
i chose to pull the entire pump as one assembly. i think this gave me a little more leverage in breaking it free from the transom plate. remove the one bolt for the steering cable and the two bolts for the reverse gate (or undo the spring clip). then there are four large bolts and one small bolt (near the coolant intake) that hold the pump assembly to the plate. with everything disconnected, you may need a deadblow hammer to loosen the pump from the plate (there is no silicone). once it breaks free, carefully slide the assembly out:
NOTE: at this point, you could just skip down to the bottom of this post to remove the impellers. i ended up doing a complete break-down to replace one of the housings and clean everything up...
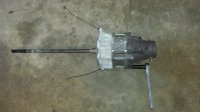
remove the two small bolts that hold the "deflector nozzle" on (the one with the reverse gate attached). i found the best way to remove the four long bolts was to simply lay it on the floor for leverage. just place one foot on the assembly and push down on the wrench:
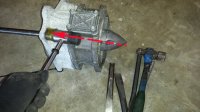
now tap a thick chisel between the tabs to separate the nozzle. be patient and don't get aggressive on the tabs, going from one set to the other as it slowly works itself free. be careful not to hit the mating surfaces with the tip of the chisel. if the chisel is too skinny, you may need to find something else to wedge:
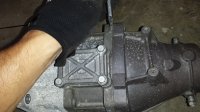
use a deadblow hammer to separate the remaining two pieces (ignore how i am holding the hammer for the sake of the picture). work your way around until it lets go:
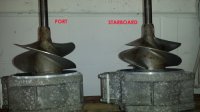
here are my two impellers (note the different pitches). port is marked with grooves from the factory:
the impellers seem pretty beat so i'm going to exchange them for refurbished ones. i was surprised to find my port housing already has a plastic wear ring assembly from a previous owner (probably suffered the same fate). the starboard one will be replaced with the same type (i think it is SBT and they are local). longevity of steel vs price of plastic? this job is quick and easy - i would not have a problem replacing the rings at the beginning of every other season if wear becomes that much of a concern. the rings slide in and out easily - you don't even need to break down the assembly to get to them.
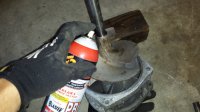
i'm guessing my impellers have been on since day one. so while i waited for my impeller shaft tool (mine was Solas WR007H), i sprayed a little PB Blaster into it and tapped it with a wrench each day. not sure how much this actually penetrated, but it definitely can't hurt. if this doesn't work, you can try lightly heating (not melting) the center of the impeller with a torch and letting it completely cool (repeatedly) to help break up the corrosion:
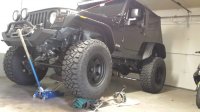
the hardest part is breaking these suckers free. you're probably going to need a solid vice on an even more solid bench. i have a big vice, but it's mounted to a lighter bench. instead of trying to use two wrenches with two people, i came up with a little trick that is more stable than two people working against one another. i unbolted my vice and placed the impeller tool in the vice with the assembly lying flat on the floor. then lowered my tire onto the vice just enough to hold it in place (cover the edges of the vice with a thick layer of towels to prevent any tire damage):
Shade-Tree Mechanics 101
the impeller threads are reversed ...and they were on tight. i think i was nearly flexing the shaft on the port assembly. if you're not using a breaker bar, put on gloves, wrap the wrench with a towel, and give it all you've got. my stock impellers required a 27mm wrench. you can use a large crescent wrench, but i prefer a box end in tough situations like this to prevent slipping/damage. the following picture illustrates removal of the impeller:
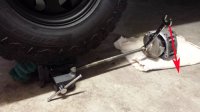
assemblies are separated and the impellers are ready for exchange:

the impeller shaft can only be separated from the duct (the part with bearings) with a press ...disassembling this portion is not necessary for impeller replacement.
my starboard motor suddenly sounded/looked like it was going to shake itself to pieces at idle, but would smooth out in No Wake mode or higher. a plug change didn't do any good. with it on the trailer, i noticed a squelch at shut-down. i figured it was something with the impeller, so i pulled the pump assembly (it comes out very quickly) and found the wear ring was binding on the impeller:

i chose to pull the entire pump as one assembly. i think this gave me a little more leverage in breaking it free from the transom plate. remove the one bolt for the steering cable and the two bolts for the reverse gate (or undo the spring clip). then there are four large bolts and one small bolt (near the coolant intake) that hold the pump assembly to the plate. with everything disconnected, you may need a deadblow hammer to loosen the pump from the plate (there is no silicone). once it breaks free, carefully slide the assembly out:

NOTE: at this point, you could just skip down to the bottom of this post to remove the impellers. i ended up doing a complete break-down to replace one of the housings and clean everything up...
remove the two small bolts that hold the "deflector nozzle" on (the one with the reverse gate attached). i found the best way to remove the four long bolts was to simply lay it on the floor for leverage. just place one foot on the assembly and push down on the wrench:

now tap a thick chisel between the tabs to separate the nozzle. be patient and don't get aggressive on the tabs, going from one set to the other as it slowly works itself free. be careful not to hit the mating surfaces with the tip of the chisel. if the chisel is too skinny, you may need to find something else to wedge:

use a deadblow hammer to separate the remaining two pieces (ignore how i am holding the hammer for the sake of the picture). work your way around until it lets go:

here are my two impellers (note the different pitches). port is marked with grooves from the factory:

the impellers seem pretty beat so i'm going to exchange them for refurbished ones. i was surprised to find my port housing already has a plastic wear ring assembly from a previous owner (probably suffered the same fate). the starboard one will be replaced with the same type (i think it is SBT and they are local). longevity of steel vs price of plastic? this job is quick and easy - i would not have a problem replacing the rings at the beginning of every other season if wear becomes that much of a concern. the rings slide in and out easily - you don't even need to break down the assembly to get to them.
i'm guessing my impellers have been on since day one. so while i waited for my impeller shaft tool (mine was Solas WR007H), i sprayed a little PB Blaster into it and tapped it with a wrench each day. not sure how much this actually penetrated, but it definitely can't hurt. if this doesn't work, you can try lightly heating (not melting) the center of the impeller with a torch and letting it completely cool (repeatedly) to help break up the corrosion:

the hardest part is breaking these suckers free. you're probably going to need a solid vice on an even more solid bench. i have a big vice, but it's mounted to a lighter bench. instead of trying to use two wrenches with two people, i came up with a little trick that is more stable than two people working against one another. i unbolted my vice and placed the impeller tool in the vice with the assembly lying flat on the floor. then lowered my tire onto the vice just enough to hold it in place (cover the edges of the vice with a thick layer of towels to prevent any tire damage):

Shade-Tree Mechanics 101
the impeller threads are reversed ...and they were on tight. i think i was nearly flexing the shaft on the port assembly. if you're not using a breaker bar, put on gloves, wrap the wrench with a towel, and give it all you've got. my stock impellers required a 27mm wrench. you can use a large crescent wrench, but i prefer a box end in tough situations like this to prevent slipping/damage. the following picture illustrates removal of the impeller:

assemblies are separated and the impellers are ready for exchange:

the impeller shaft can only be separated from the duct (the part with bearings) with a press ...disassembling this portion is not necessary for impeller replacement.
Last edited:

